Introduction
Exporting data involves installing export integration and then creating batch export.
Prerequisites
Create folders in the following cloud storage integrations:
- Amazon AWS S3 bucket storage
- Microsoft Azure Blob
Installing export integrations
Based on your preferences, you can integrate AWS S3 or Azure Blob with OpsRamp. After successful integration, you can create batch export to move data to the respective locations configured in AWS S3 buckets or Azure Blob containers.
AWS S3 integration
To integrate with AWS S3:
- Select Setup > Integrations > Integrations.
- From INTEGRATIONS screen, go to Available Integrations.
- From Available Exports, click Exports > AWS S3.
- From AWS S3 INTEGRATION, click Install.
- From Install AWS S3 Integration, provide the following information and click Install:
- Name: Refers to the name of the Integration.
- Logo: Refers to the logo you upload depending on the integration type.
Authentication section appears.
- From Authentication section, provide details for the following parameters and click Save:
- Access Key ID: Refers to the Unique Identifier to access the Amazon S3 bucket.
- Secret access key: Refers to the key and secret generated from the AWS portal.
- Bucket Name: Refers to the name of the S3 bucket where you want to export data.
- Base URI: Refers to the location to store the data in the Amazon S3 bucket. For example,
https://s3.regionName.amazonaws.com.
Installed Integrations displays the integration in the Exports tab.
Azure Blob storage integration
To integrate with Azure Blob:
- Select Setup > Integrations > Integrations.
- From INTEGRATIONS screen, go to Available Integrations.
- From Available Exports, click Exports > Blob Storage.
- From BLOB STORAGE INTEGRATION screen, click Install. Install Blob Storage Integration window appears.
- From Install Blob Storage Integration window, provide the following information and click Install.
- Name: Refers to the name of the Integration.
- Logo: Refers to the logo you upload depending on the integration type.
Authentication section appears.
- From Authentication section, provide details for the following parameters and click Save.
- Storage account name: Azure Blob account name.
- Secret access key: Refers to the access key generated from the Azure portal.
- Container Name: Refers to the name of the Azure container to which you want to export data.
- Base URI: Refers to the location to store the export data. For example,
https://portal.azure.com.
Integration now appears in Installed Integrations.
Creating batch export
Exporting data from OpsRamp to the configured locations in Amazon S3 or Azure Blob is an easy process. You can simply select the desired type of data, schedule the export process as a recurring or on-demand, and select the desired export integration.
Prerequisite
Set up batch export integration under Setup > Integrations > Exports for AWS S3 or Azure Blob.
To create the batch export:
- Select Setup > Exports > Batch Export.
- From BATCH EXPORT screen, click +.
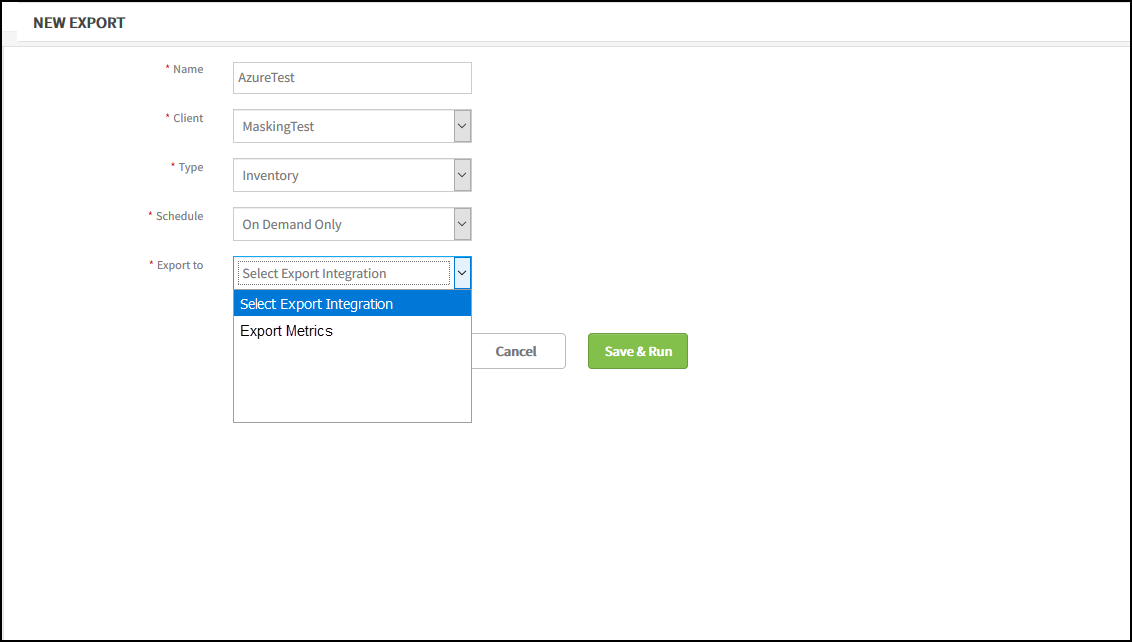
- From BATCH EXPORT screen, provide the following information, and click Save & Run.
- Name: Refers to the unique name of the export.
- Client: Refers to the client that requires batch export.
- Type: Refers to the type of data that you want to export.
- Schedule: Refers to one of the schedule options to perform batch export:
- On Demand Only - Generates exports when a request is created or re-run.
- On-Demand and on Recurring Schedule - Generates export when you raise a re-run request and generates incremental export at scheduled intervals.
- Export to: Refers to the Installed Integration to AWS S3 or Azure Blob.
BATCH EXPORT LIST displays the new export.

Batch Export
After creating the batch export, you can:
- Edit: To modify your batch export details.
- Delete: To remove a configured batch export from the OpsRamp platform. Click the Delete icon to remove the batch export.
Note
- Data is exported in JSON format.
- The content of the batch export depends on the type and frequency of the batch export schedule. For example, ticket export scheduled at a frequency of one day will have the previous day activity log. A ticket export scheduled weekly or monthly will have the activity log of the previous seven days.
Viewing batch export
After exporting the data from OpsRamp to the installed integrations you can view the exported data in the OpsRamp platform, AWS S3, and Azure Blob.
| Attribute | Description |
|---|---|
| Batch Export Name | Name of the Batch Export |
| Client Name | Name of the selected client |
| Last Run | The time and date of the recently run export |
| Last Export | Displays one of the following status:
|
| Created By | Name of the author |
| Action | To export data from OpsRamp. The Run Now action is available only for data export with On Demand Only option. |
Viewing batch exports in OpsRamp
You can always view the configured Batch Export details in Exports > Batch Export. The BATCH EXPORT LIST page displays the details of the Batch Export.
Viewing batch exports in AWS S3
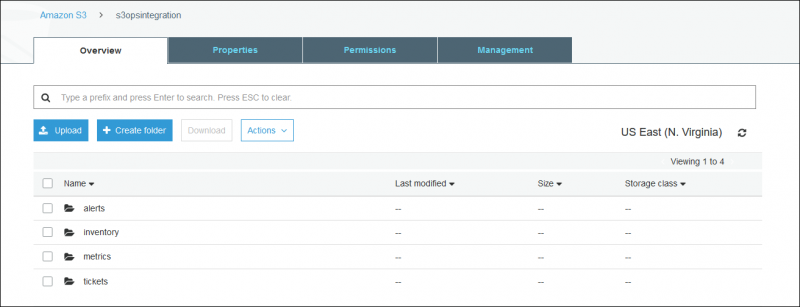
You can view the generated batch exports in AWS S3 bucket in the corresponding folders. For example, Alerts export is stored in the Alerts folder.
View Batch Export in AWS S3
Export name details
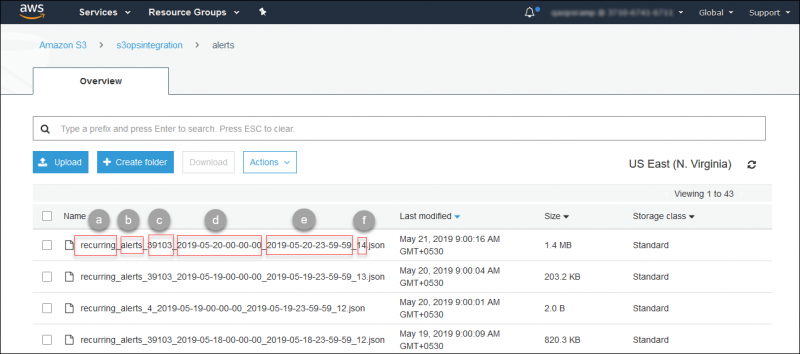
AWS stores the export files in S3 folders as JSON format.
The following list describes the export name in the following screenshot:
- a refers to the schedule of batch export(recurring/on-demand).
- b refers to the Type of batch export.
- c refers to Unique Client ID.
- d refers to the starting timestamp of the schedule.
- e refers to the ending timestamp of the schedule.
- f refers to the serial number of the recurring export.

Export Name Details in AWS S3
Viewing batch export in Azure Blob
You can view the generated data exports in the Azure Blob container in the corresponding folders. For example, Alerts export is stored in the Alerts folder.
View Batch Export in Azure Blob
Export name details
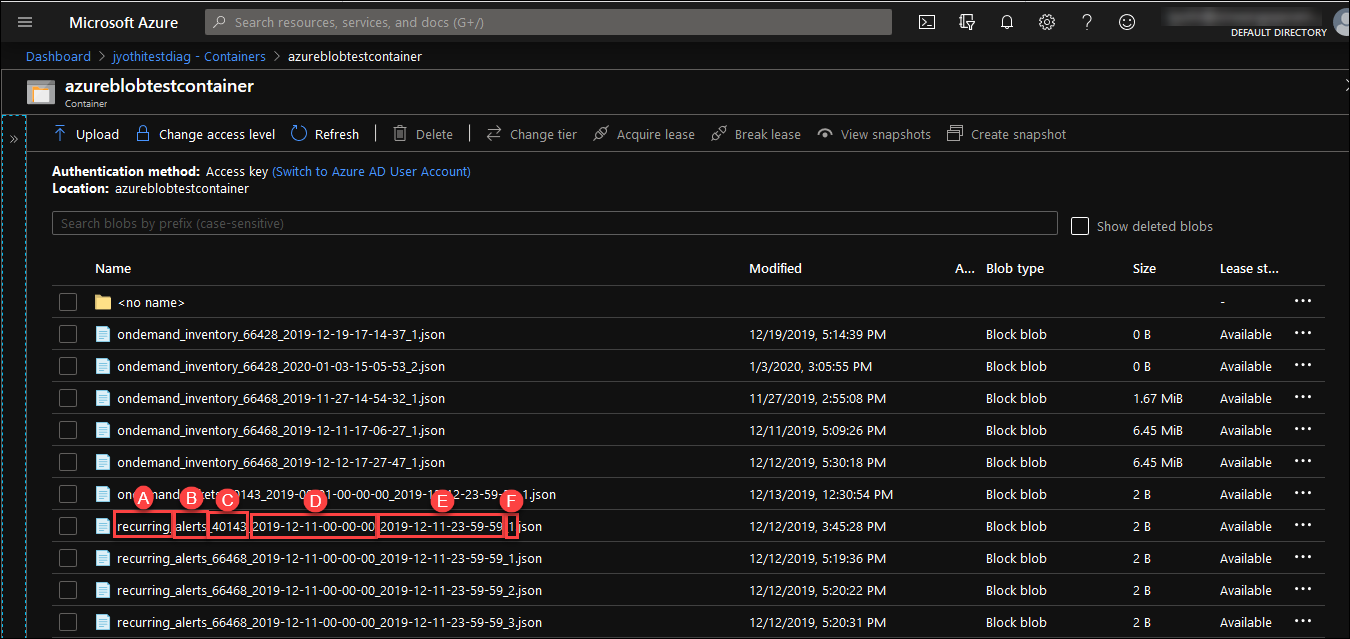
Azure Blob stores the export files in Azure Blob containers as JSON format.
The following list describes the export name in the following screenshot:
- A refers to the schedule of batch export(recurring/on-demand).
- B refers to the type of batch export.
- C refers to Unique Client ID.
- D refers to the starting timestamp of the schedule.
- E refers to the ending timestamp of the schedule.
- F refers to the serial number of the recurring export.
