Introduction
Pingdom is a global performance monitoring solution for websites and web applications. The OpsRamp integration supports webhooks to enable OpsRamp to accept alerts from Pingdom.
OpsRamp configuration
Configuration involves:
- Installing the integration.
- Configuring the integration.
Step 1: Install the integration
To install:
- Select a client from the All Clients list.
- Go to Setup > Integrations > Integrations.
- From Available Integrations, select Monitoring > Pingdom.
- Click Install.
Step 2: Configure the integration
To configure the integration:
- From the API tab, provide the following:
- Authentication: Copy Tenant Id, Token and Webhook URL for configuration. These settings are used for creating a HTTP Request template.
- Map Attributes: Provide the mapping information for the third-party.
- From the Monitoring of Integration tab, click Assign Templates.
- From the Audit Logs, set up audit log criteria and time frame.
Configuring the map attributes
To configure the mapping attributes:
- Select the required OpsRamp property from the drop-down.
- Click Add Mapping Attributes to map attributes for the specific OpsRamp alert property.
- Click + to define the mappings.
- From Create Alert Mappings on Status, define the mappings, parsing conditions, and default values, and Save.
The following tables shows the attribute mappings.
| OpsRamp Entity | OpsRamp Property | Third-party Entity (Pingdom Entity) | Third-party Property (Pingdom Property) | ||||||
|---|---|---|---|---|---|---|---|---|---|
| ALERT | Alert subject | Alert | check_name - $description | ||||||
| ALERT | Alert description | Alert | long_description version : $version check_id : $check_id check_name : $check_name check_type : $check_type check_params : $check_params tags : $tags importance_level : $importance_level previous_state : $previous_state state_changed_timestamp : $state_changed_timestamp state_changed_utc_time : $state_changed_utc_time first_probe : $first_probe second_probe : $second_probe | ||||||
| ALERT | Alert resource name | Alert | check_params.hostname | ||||||
| ALERT | Alert Metric | Alert | check_type | ||||||
| ALERT | Alert Time | Alert | state_changed_utc_time | ||||||
| ALERT | Alert State | Alert | current_state
|
Pingdom configuration
Configuration involves:
- Adding an integration.
- Connect the integration to uptime checks.
Step 1: Add an integration
To add an integration:
- Log into Pingdom.
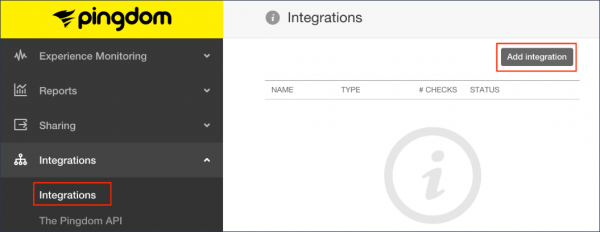
- Go to Integrations > Integrations.

Add Integration
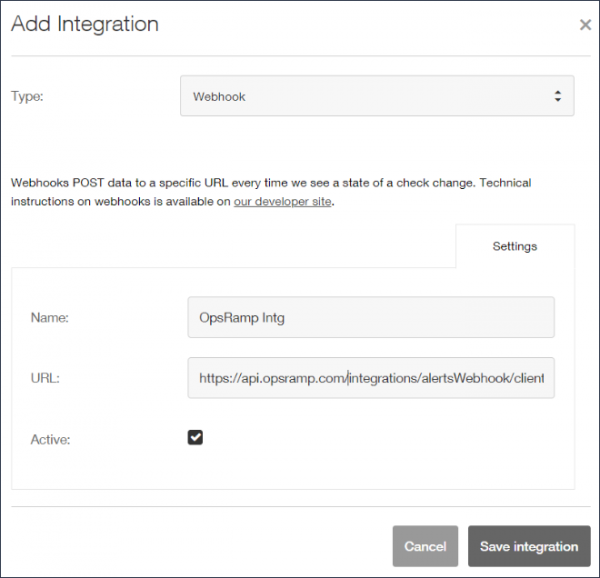
- Select Add Integrations and configure the following:
- Select integration Type as Webhook.
- Provide name for the integration. For example: OpsRamp Integration
- Paste the OpsRamp webhook URL -
https://{api-url}/integrations/alertsWebhook/{tenantid}/alerts?vtoken={token}
>Note: Provide the Tenant ID and Token from the OpsRamp configuration.
For example:https://api.vistanet.jp/integrations/alertsWebhook/client_1/alerts?vtoken=Oz6JGgJy0C2f7aqSRrnq4ne6Qp5g5Pgp - Select Active and click Save Integration.

Add Integration Details
Step 2: Connect integration to uptime checks
To connect the integration to uptime checks:
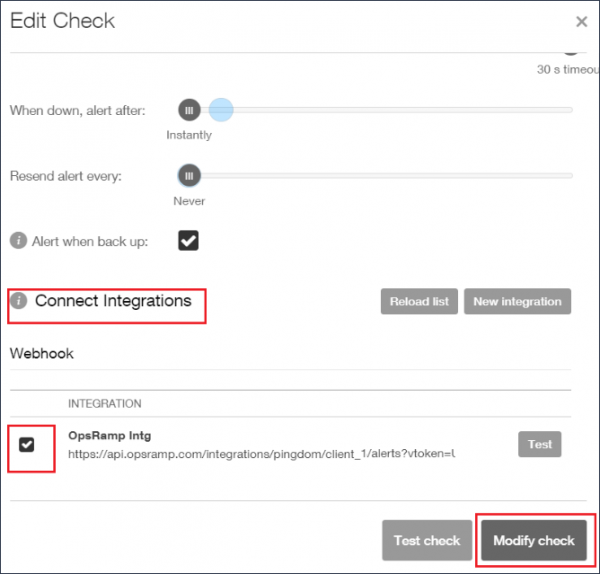
- Go to the Experience Monitoring menu and click Uptime.
- Click the Uptime check you want to add to the integration.
- Scroll to the bottom of Edit Check page where you find Connect Integrations section and select the previously configured integration and click Modify Check to save.
