When an AWS account is created, you are signed-in as a root user (a single sign-in entity) with unrestricted access to the subscribed AWS services, using an email and password unique to your organization. As a best practice, avoid using the root user account for basic tasks. Use Identity and Access Management (IAM) credentials to authorize OpsRamp to manage your resources.
Install the AWS integration on the OpsRamp console using Identity and Access Management (IAM) access key ID and secret access key. IAM is a web service that helps in securely controlling access to AWS services. For more information, see What is IAM?
Workflow
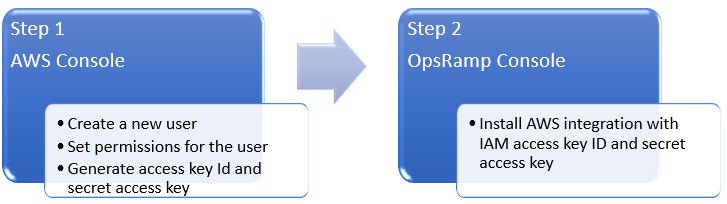
Process Flow - Install AWS integration with IAM credentials
AWS configuration
To configure AWS integration:
- Sign in to your root account in the AWS management console.
- On the navigation bar, click your account name, and then choose My Security Credentials.
- From the Identity and Access Management navigation pane, click Users > Add user and give a suitable name to the new user.
Familiarize yourself with Creating users on AWS console. - Select programmatic access as a type of access and click Next: Permissions.
Note: Programmatic access is for the users who require access to the API, AWS CLI, or Tools for Windows PowerShell. The programmatic access option creates an access key and security access key for each new user. - On the Set permissions page, specify how you want to assign permissions to the user and click Next: Tags.
Refer to Creating IAM Policies (console). - (Optional) Add metadata to the user by attaching tags as key-value pairs and click Next: Review to see the details.
- Click Create user.
The page displays the user’s access key ID and secret access keys. - Save the access keys by clicking Download.csv at a safe location.
Important
This is your only opportunity to view or download the secret access keys. Save the access key ID and secret access key generated in a secure place. You will not have access to the secret keys again after this step.
OpsRamp configuration
To configure AWS integration:
- Go to Setup > Integrations > Integrations.
- Click All Clients and from the drop-down list, select a client.
The Available Integrations page opens. - From the Available Integrations page, click Public Cloud and then click AWS.
- Click Install.
- On the Install AWS Integration page:
- Name: Give a suitable name for the integration.
- Region(s): Select the AWS region from the drop-down list.
The services that belong to the selected region are onboarded.
Note: You can select multiple regions to onboard the services.
If you select two regions A and B, and if you are not authorized to access region B, then onboarding fails for both regions A and B. - AWSType: Select IAM.
- Account Number: Provide the root account number.
- Access Key: Provide Access Key generated in the AWS console.
- Security Key: Provide Security Key generated in the AWS console.
- Click Install.
The AWS icon appears in the list of installed integrations with the details such as installed time, installed by, and enable status.
- Click the AWS icon. The AWS integration page displays the credentials of the AWS account integration and discovery profiles.