Introduction
Cherwell Service Management is a cloud-based IT service management solution that helps IT teams in organizations to implement, automate and upgrade service and support processes.
Note
Cherwell with OpsRamp is a two-way integration.OpsRamp configuration
Configuration involves:
- Installing the integration.
- Configuring the integration.
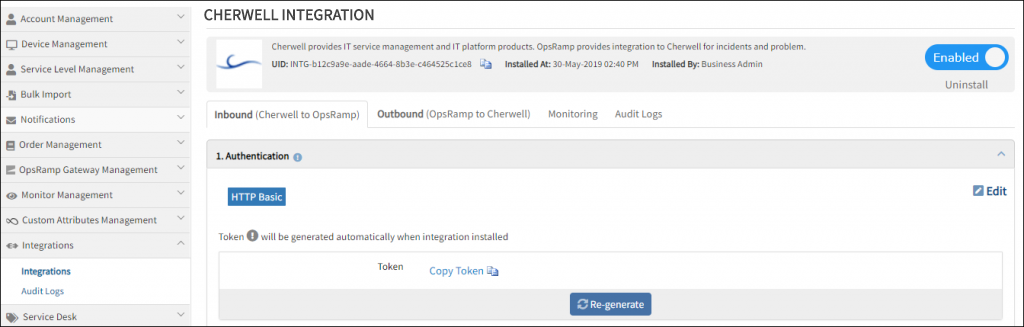
Step 1: Install the integration
To install:
- From All Clients, select a client.
- Go to Setup > Integrations > Integrations.
- From Available Integrations, select Collaboration > Cherwell.
- Click Install.
Step 2: Configure the integration
Configure the following: - Inbound - Outbound - Monitoring of Integration - Audit Logs
Inbound
To send entities from Cherwell to OpsRamp:
- Authentication: Configure the authentication to call Cherwell APIs.
- Select Authentication Type Basic from the drop-down and click Save.
- Take note of the Tenant Id and Token. This would be used while creating and updating ticket in Cherwell.
Cherwell Inbound Configuration
- Map Attributes: Map Cherwell attributes with OpsRamp entity attributes.
- Select OpsRamp entity from the drop-down menu.
- Click Map against respective attribute, provide the mapping details and click Save.

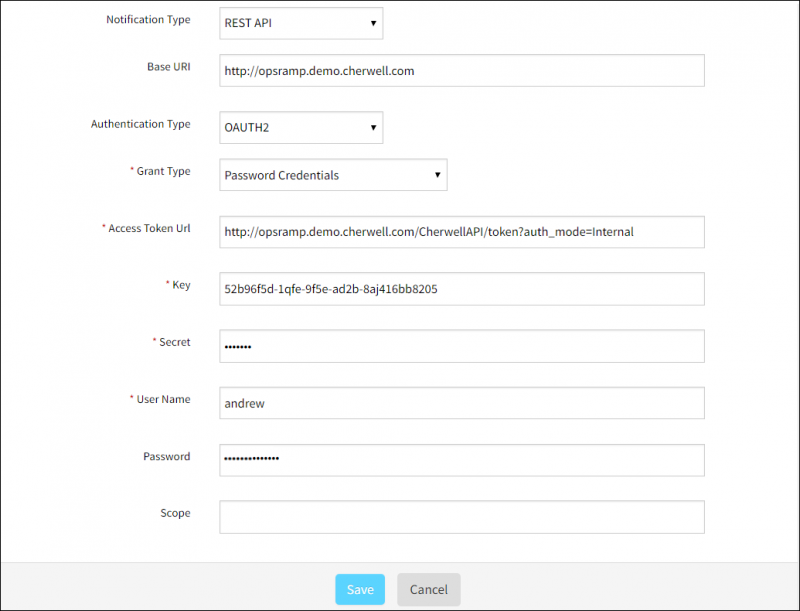
Outbound
To send entities to Cherwell from OpsRamp:
- Integration Basic Configuration: Configure notification details to trigger integration events.
- Notification type: REST API
- Base URL:
http://opsramp.demo.cherwell.com/CherwellAPI/token?auth_mode=Internal - Authentication type: OAUTH2
- Click Save.
- Take note of Tenant Id, Key, and Secret. These would be used to configure REST API clients in Cherwell.
Cherwell Outbound Configuration
- Map Attributes: Map OpsRamp entity attributes with Cherwell attributes.
- Select OpsRamp entity as Incident and OpsRamp property as Priority from the drop-down.
- Click Map against the respective attribute. Create Integration Mapping window appears.
- Provide the values and click Save.
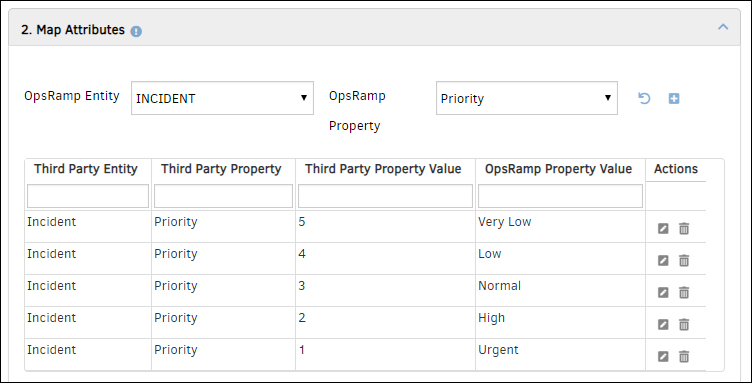
Mapping Attributes
- Integration Events: Events are for sending notifications whenever an action is performed on OpsRamp entities.
- Click Add to add an integration event. Add Integration Event page appears.
- Provide a name for the integration event.
- Select Service Desk from the drop-down and then select entity type and action.
- Select Parent Configuration to assign the basic integration details configured in step 1.
- Provide endpoint URL.
- Select the web method, provide the header name and value.
- Provide the payload and click Save.
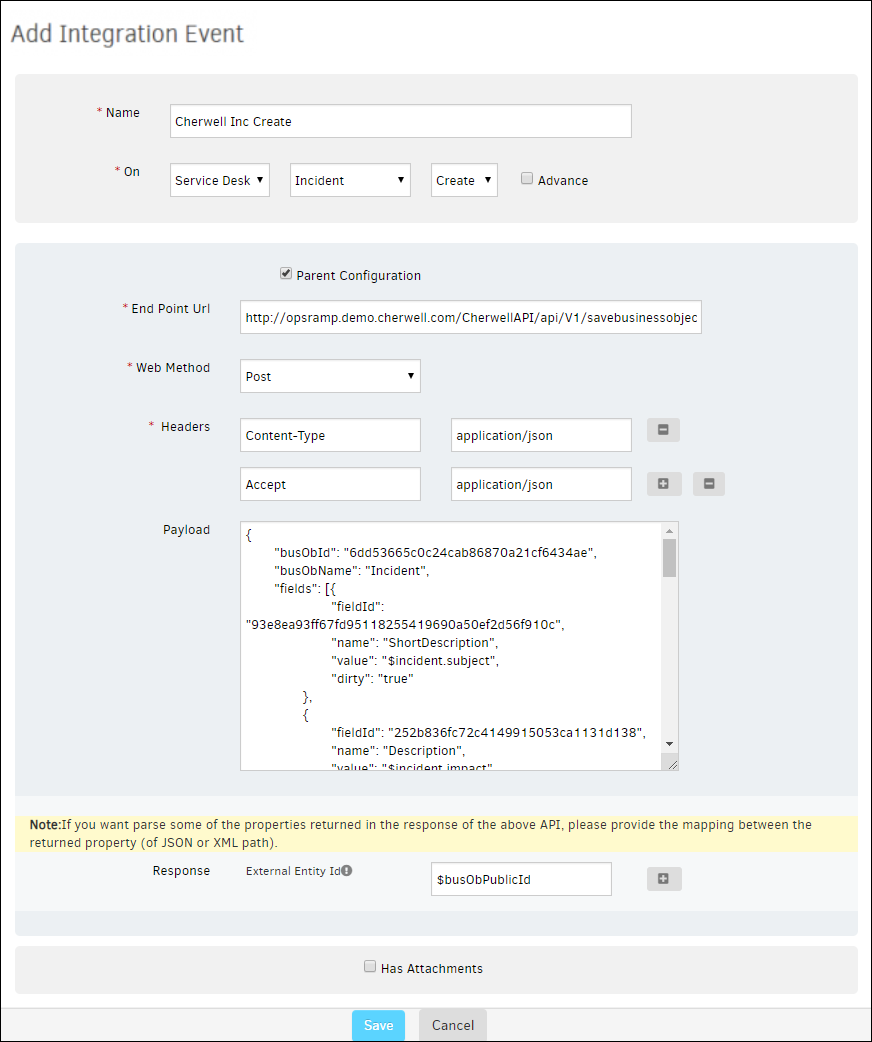
Add Integration Event
- To parse the properties returned in response for the payload, select the OpsRamp property from the drop-down and provide the value.
- A custom field that is already configured as response payload attribute for a given integration is not available for configuration in any other integrations. You need to remove the existing mapping from the integration to make the custom field available to map on response payload of any other integration.
- Verify Integration: Validate if the integration is successful.
- Select the event from the drop-down and provide the JSON payload.
- Click Verify to verify the integration.
- Integration Failures: In the case of failure in integration, a message is sent to the user about the failure.
- Select notification type Email, provide the email address and then click Save.


Integration Event Payloads
The following are field and example payloads to create incidents.
Create incident
| Field | Value |
|---|---|
| Endpoint URL | https://{subdomain}.com/CherwellAPI/api/V1/savebusinessobject |
| Headers |
|
| Method | POST |
| Authentication | OAUTH2 |
Request
The following is a sample request:
{
	"busObId": "6dd53665c0c24cab86870a21cf6434ae",
	"busObName": "Incident",
	"fields": [{
			"fieldId": "93e8ea93ff67fd95118255419690a50ef2d56f910c",
			"name": "ShortDescription",
			"value": "$incident.subject",
			"dirty": "true"
		},
		{
			"fieldId": "252b836fc72c4149915053ca1131d138",
			"name": "Description",
			"value": "$incident.impact",
			"dirty": "true"
		},
		{
			"fieldId": "83c36313e97b4e6b9028aff3b401b71c",
			"name": "Priority",
			"value": "[@$incident.priority.name@]",
			"dirty": "true"
		},
		{
			"fieldId": "5eb3234ae1344c64a19819eda437f18d",
			"name": "Status",
			"value": "[@$incident.status.name@]",
			"dirty": "true"
		},
		{
			"fieldId": "933bd530833c64efbf66f84114acabb3e90c6d7b8f",
			"name": "CustomerRecID",
			"value": "9337c2322a087296f7322a481d8858300e3f6e1dbb",
			"dirty": "true"
		},
		{
			"fieldId": "936725cd10c735d1dd8c5b4cd4969cb0bd833655f4",
			"name": "Service",
			"value": "Account Management",
			"dirty": true
		},
		{
			"fieldId": "ae05c132527e48bd95d063c445622df7",
			"name": "Impact",
			"value": "Department",
			"dirty": true
		},
		{
			"fieldId": "29d741aae8bf461f8aafa3c9eb4dc822",
			"name": "Urgency",
			"value": "Medium",
			"dirty": true
		},
		{
			"fieldId": "943f9d35d7ec5d7dc0921a41609d8e93b03a62d190",
			"name": "OpsRamp Inc ID",
			"value": "$incident.uniqueId",
			"dirty": true
		},
		{
			"fieldId": "9339fc404e4c93350bf5be446fb13d693b0bb7f219",
			"name": "Owned By",
			"value": "Andrew Simms",
			"dirty": true
		}
	]
}
Response
The following is a sample response:
{
	"busObPublicId": "102375",
	"busObRecId": "943f5ba5a1cb1fe68918764510ba96442c3a85e5d0",
	"cacheKey": null,
	"fieldValidationErrors": [],
	"notificationTriggers": [],
	"errorCode": null,
	"errorMessage": null,
	"hasError": false
}$busObPublicId to
read the Autotask ticket ID and save it to the external entity ID of the OpsRamp incident.Cherwell configuration
Configuring Cherwell incidents with OpsRamp involve the following:
- Configuring REST API Client.
- Configuring Web Services Manager.
- Configuring One-Step.
Step 1: Configure the REST API client
Cherwell Service Management(CSM) Administrator supports OAuth2 protocol to authenticate and authorize calls to the REST API. The OAuth2 protocol enables third-party clients to get access to HTTP services.
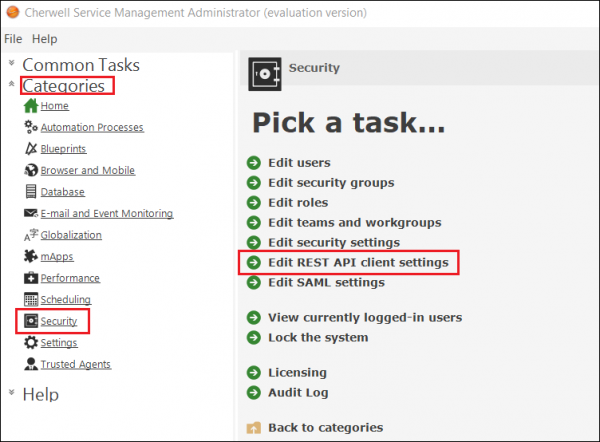
To configure the REST API client:
- Login to Cherwell Service Management Administrator.
- Click Categories and then click Security.
- Select Edit REST API client settings from the Pick a task menu.
Create Client ID
- Click the Plus icon to create new REST API client.
- Provide the following:
- Name: Provide a name (Example: OpsRamp REST API)
- Culture: Default value
- Description: Provide details (Example: To configure CSM OAuth details in OpsRamp to call Cherwell APIs)
- Client Key: Auto-generated value (Use the Client Key from the OpsRamp outbound configuration.)
- Token Lifespan: Default value
- Refresh Token Lifespan: Default value
- API access is enabled: Active
- Allow anonymous access: Active
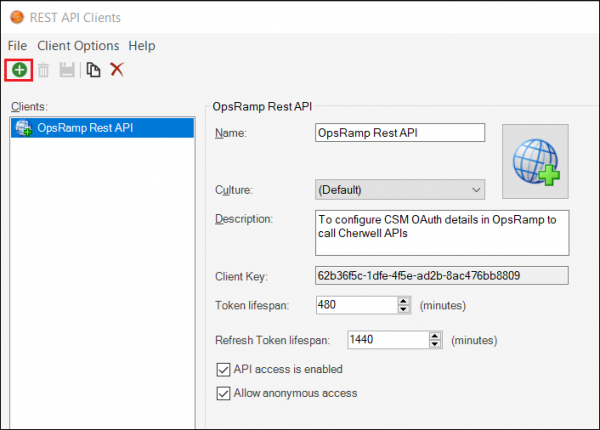
REST API Client
- Click OK to save the details.


Step 2: Configure the Web Services Manager
Configure OpsRamp REST API details in Web Services Manager. Cherwell uses these details to call OpsRamp APIs to integrate respective entities.
To configure Web Services Manager:
- Click Categories and then click Browser and Mobile.
- Select Web Services Manager.

Web Service Manager
- Click the Plus button to create a new Web Service.
- Go to General to configure a web service, provide the following and click OK.:
- Name: Provide a name to web service (Example: OpsRamp Incident API)
- Description: Provide details about web service (Example: API to create/update incident in OpsRamp)
- URL: Provide OpsRamp API URL. (Example:
https://api.vistanet.jp) - Service Type: REST
- Security Type: Basic
- Always call web service from Cherwell Server: Default value
- Log calls to this web service: Select Active
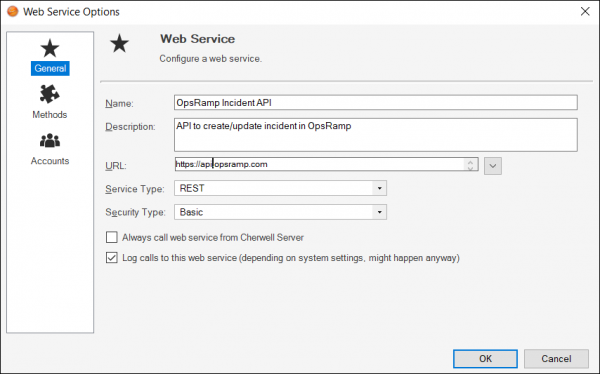
Web Service Options - General
- Go to Method > Create Incident, click Add to configure a create incident API:
- Go to Method > Update Incident, click Add to configure an update incident API:


Create incident method
To configure OpsRamp create incident APIs:
- From Methods > Create Incident, click Add.

Web Service Methods
- Provide the following:
- Name: Provide a name to the method (For example: Create Incident)
- Description: Give details about method (For example: OpsRamp create incident API details)
- End point:
api/basic/tenants/{OpsRamp client Id}/incidents
For example:api/basic/tenants/client_392/incidents - Result Type: JSON
- Request Type: POST
Create Incident Method
- Parameters:
- Payload:
- Name: payload
- Data Type: text
- Param Type: Standard
- Is content: Active
- Content-Type
- Name: Content-Type
- Data Type: text
- Param Type: Header
- Authorization
- Name: Authorization
- Data Type: text
- Param Type: Header
- Payload:
- Click OK to save the method.

Create update method
To configure OpsRamp update incident APIs:
- From Methods > Update Incident, click Add.
- Provide the following:
- Name: Provide a name to the method (For example: Update Incident)
- Description: Provide details about method
For example: OpsRamp update incident API details - End point:
api/basic/tenants/{OpsRamp client Id}/incidents/{opsRampIncidentId}
For example:api/basic/tenants/client_392/incidents/{opsRampIncidentId} - Result Type: JSON
- Request Type: POST
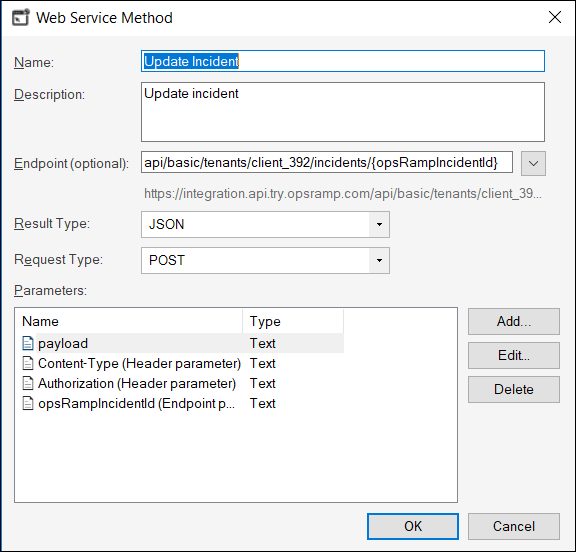
Update Incident Method
- Parameters:
- Payload:
- Name: payload
- Data Type: text
- Param Type: Standard
- Is content: Active
- Content-Type
- Name: Content-Type
- Data Type: text
- Param Type: Header
- Authorization
- Name: Authorization
- Data Type: text
- Param Type: Header
- OpsRamp Incident Id
- Name: opsRampIncidentId
- Data Type: text
- Param Type: Endpoint
- Payload:
- Click OK to save the method.

Step 3: Configure One-Step
One-Step consists of a series of actions and can be simple (a few actions) or complex (multiple actions that run under conditional circumstances).
To configure One-Step:
- Ensuring that the prerequisites are completed.
- Creating an incident.
- Updating an incident.
Sub-step 1: Perform prerequisites
The following steps are required before configuring One-Step:
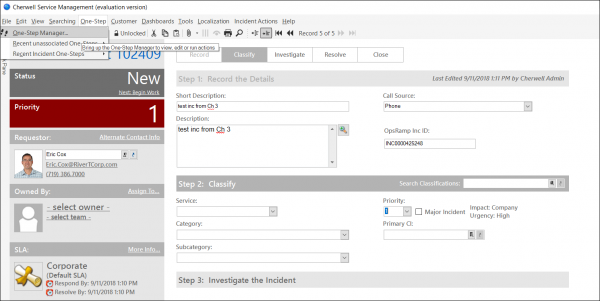
- Create a custom field (OpsRamp Inc ID) to save the OpsRamp incident Id in Cherwell incident table.
- Configure lookup tables for priority and status to map OpsRamp attributes with Cherwell attributes.
Sub-step 2: Create incidents
To create an incident:
- Click One-Step and then click One-Step Manager.
One-Step Manager
- From the Association drop-down, select Incident.
- Click the Plus button to create new One-Step.
- Provide the following:
- Name: Provide name (Example: OpsRamp Create Incident)
- Description: Provide details of One-Step (Example: One-Step to call OpsRamp Incident REST API)
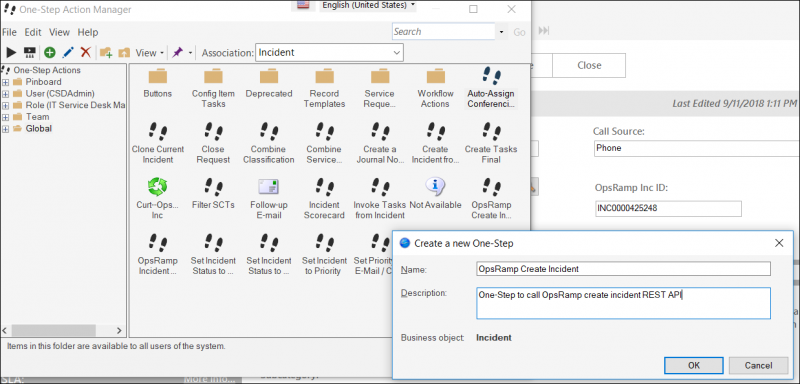
Create Incident
- Click OK. One-Step editor window appears.
- Configure the following actions and click Ok:


Action-1: Configure Step details
- General: Details provided while creating new One-Step will be auto-populated. Edit if required.
- Conditions: Optional
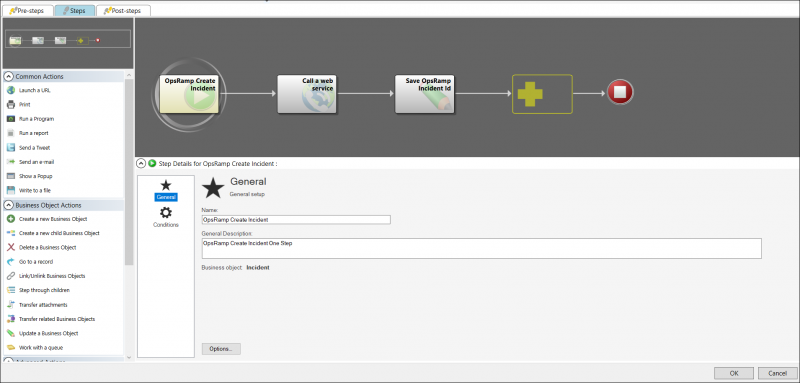
Action 1

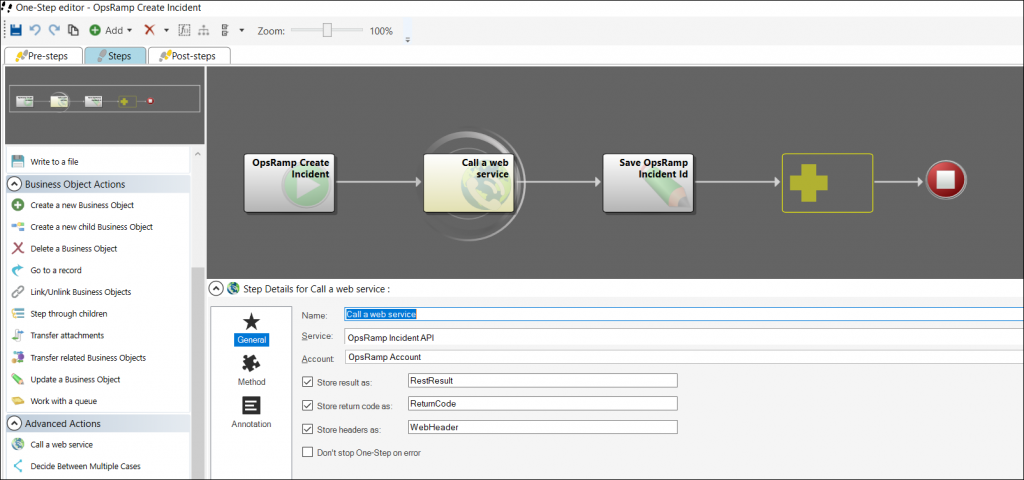
Action-2: Configure web service details
- Click Advanced Actions and then click call a web service to configure web service details.
- Add the General information:
- Name: Provide a name to the web service (Example: Call a web service)
- Service: Select the web service created in CSM administrator. (OpsRamp Incident API)
- Account: Select the authentication account created in CSM administrator. (OpsRamp Account)
- Store result as: RestResult
- Store return code as: ReturnCode
- Store header as: WebHeader
- Don’t stop One-Step on error: Not applicable
Action 2
- Add the Method information and click OK.
- Method: Select the web service method created in CSM administration portal. (Create Incident). Select Set Value.
- Parameters: Provide the field values and payload information.
- Annotation: Default value.

Field values:
| Field | Value |
|---|---|
| Content-Type | application/json |
| Authorization | vtoken (For example: vtoken HpWLEUf89bpEAKwT3MdBQFGEIwAKCWRPx02) Note: Replace {token} with OpsRamp API authentication token. |
| EndPoint (opsRampIncidentId) | incident.OpsRamp Inc ID |
Payload:
{
    "subject": "Incident.Short Description",
    "description": "Incident.Description",
    "priority": "Incident.OpsRamp Priority",
    "extTicketId": "Incident.Incident ID"
}
Call a Web Service
Action-3: Update a Business Object
Updating a Business Object parses OpsRamp incident Id from a response and saves OpsRamp incident as Cherwell incident. Before configuring this action, create a custom field for the incident (OpsRamp Inc ID).
- Go to Advanced Actions > Update a Business Object to configure details.
- Add the General information:
- Name: Provide a name (Example: Save OpsRamp Incident Id)
- Business Object: Incident
- Reload business object before update: Default value
- Save business object after action: Default value
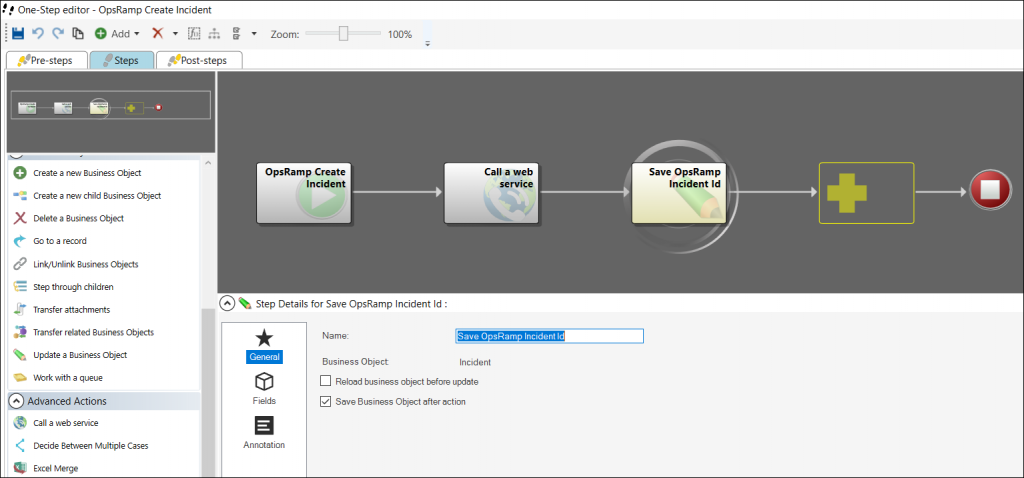
Send OpsRamp Icident Id
- In the Fields section, click OpsRamp Inc ID and select Template.
- Provide the value as
RestResult, select RestResult, right click and select Modifiers, and provide the following:- Modifier: Select Find Object
- Text: Provide value (Id)
- Annotation: Default values
- Click OK to save the details.


Update Business Object
Sub-step 3: Update incidents
To update an incident using One-Step:
- Click One-Step and then click One-Step Manager.
- From the Association drop-down, select Incident.
- Click the Plus button to create new One-Step.
- Provide the following:
- Name: Provide name (Example: OpsRamp Update Incident)
- Description: Provide details of One-Step (Example: OpsRamp Update Incident One Step)
- Click OK. One-Step editor window appears.
- Configure the following actions and click OK.
Action-1: Configure Step details**
- General: Details provided while creating new One-Step will be auto-populated. Edit if required.
- Conditions: Optional
Actions-2: Configure Web Service details**
- Go to Advanced Actions > call a web service to configure web service details.
- Add the General information:
- Name: Provide a name to the web service (Example: Call a web service)
- Service: Select the web service created in CSM administrator. (OpsRamp Incident API)
- Account: Select the authentication account created in CSM administrator. (OpsRamp Account)
- Store result as: Not applicable
- Store return code as: Not applicable
- Store header as: Not applicable
- Don’t stop One-Step on error: Not applicable
- Add the Method information:
- Method: Select the web service method created in CSM administration portal. (Create Incident). Select Set Value.
- Parameters: Provide the field values and payload.
- Click Ok.
Field values
| Field | Value |
|---|---|
| Content-Type | application/json |
| Authorization | vtoken (For example: vtoken HpWLEUf89bpEAKwT3MdBQFGEIwAKCWRPx02) Note: Replace {token} with OpsRamp API authentication token. |
| EndPoint (opsRampIncidentId) | incident.OpsRamp Inc ID |
Payload:
{
    "subject": "Incident.Short Description",
    "description": "Incident.Description",
    "priority": "Incident.OpsRamp Priority",
    "extTicketId": "Incident.Incident ID"
}