Introduction
SignalFx is an advanced monitoring and alerting solution. By integrating SignalFx with OpsRamp, alerts generated from SignalFx can be accepted into the system. SignalFX is integrated using the Webhook mechanism.
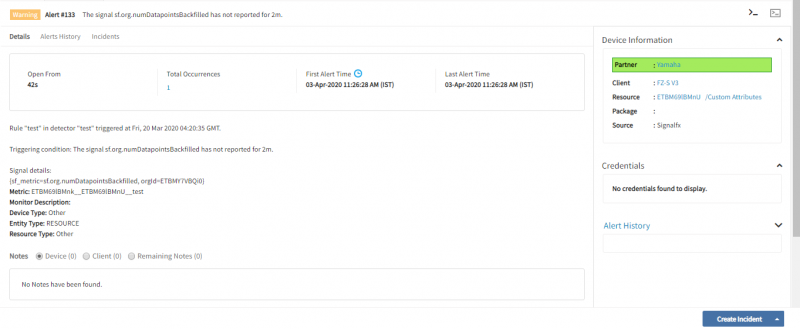
After successful integration, SignalFx alerts can be viewed by the system.
OpsRamp configuration
Configuration is required to generate critical information (such as the Webhook URL and Token) and to map attributes that are required for alert generation from SignalFx.
Configuration involves:
- Installing the integration
- Configuring the integration
Step 1: Install the integration
To install SignalFx into the system:
- Go to Setup > Integrations > Integrations.
- From Available Integrations, select Monitoring > SignalFx.
- Click Install.
After the installation, SignalFx appears under My Integrations.
Step 2: Configure the integration
Inbound configurations capture all the required details to call OpsRamp APIs in SignalFx.
Authentication
- Configure the Authentication type to call OpsRamp APIs.
- Select Webhooks as the authentication mechanism to generate the Token and WebHook URL. Both are required to define alert endpoints.
Configuring the map attributes
After installation, SignalFx attributes are mapped to OpsRamp attributes. Attributes can be modified depending on the payload request.
Default attribute mappings are:
| Third-Party Entity | OpsRamp Entity | Third-Party Property | OpsRamp Property |
|---|---|---|---|
| status | Alert Current state | anomalous | Warning |
| status | Alert Current state | ok | Ok |
| description | Alert Subject | messageBody | Alert Description |
| eventType | Alert Metric | detectorId | Alert resource name |
Notes
- Attributes can be modified.
- Mappings are user-selectable and depend on the environment.
Sample payload
This is a sample payload that has been validated with OpsRamp integration:
{
"severity": "Critical",
"detectOnCondition": "when(binary < lower_threshold_signal, lasting(duration, 1.0))",
"messageBody": "Rule "test" in detector "test" triggered at Fri, 20 Mar 2020 04:20:35 GMT. Triggering condition: The signal [sf.org](http://sf.org/).numDatapointsBackfilled has not reported for 2m. Signal details: {sf_metric=http://sf.org/.numDatapointsBackfilled, orgId=ETBMY7VBQi0}",
"inputs": {
"lower_threshold_signal": {
"value": "1",
"fragment": "const(1)"
},
"binary": {
"value": "0",
"fragment": "1 if x is not None else 0",
"key": {
"orgId": "ETBMY7VBQi0",
"sf_metric": "[sf.org](http://sf.org/).numDatapointsBackfilled"
}
}
},
"rule": "test",
"description": "The signal [sf.org](http://sf.org/).numDatapointsBackfilled has not reported for 2m.",
"messageTitle": null,
"sf_schema": 2,
"eventType": "ETBM69lBMnk__ETBM69lBMnU__test",
"runbookUrl": null,
"triggeredWhileMuted": false,
"detectorId": "ETBM69lBMnU",
"imageUrl": "https://static.ap0.signalfx.com/signed/eyJhbGciOiJIUzI1NiJ9.eyJiVCI6InN0YXJ0IiwiaUlkIjoiRVNfUzJCckJOQ1EiLCJpc3MiOiJjb20uc2lnbmFsZnguYXBwIiwib0lkIjoiRVRCTVk3VkJRaTAiLCJleHAiOjE1ODUyODI4NDZ9.PL5NJV1y9GyVAIZ0Xo82BhDpPl9e1KNl4UrXGLuPi04",
"tip": "",
"statusExtended": "anomalous",
"incidentId": "ES_S2BrBNCQ",
"detector": "test",
"detectorUrl": "https://app.ap0.signalfx.com/#/detector/ETBM69lBMnU/edit?incidentId=ES_S2BrBNCQ&is=anomalous",
"status": "anomalous",
"timestamp": "2020-03-20T04:20:35Z"
}
ElasticLog configuration
Configuring SignalFx involves:
- Set up detector to trigger alerts
- Creating an alert rule
Step 1: Set up detectors to trigger alerts
A detector monitors a signal for conditions or issues. Those conditions (or issues) are expressed as one or more rules that triggers an alert when the conditions in the rules are met. Individual rules in a detector are identified according to the state: Info, Warning, Minor, Major, Critical.
For example, a detector that monitors the latency of an API call may turn into a critical state when the latency is significantly higher than normal, as defined in the detector rules.
To create a new detector:
- Log into the SignalFx Admin UI.
- Go to Alerts > Detector and click New Detector.
- Enter the name of the detector as CPU Performance.
- Click Create Alert Rule.
Step 2: Create an alert rule
To create and activate an alert rule for the detector:
- Add a CPU system metric for Alert Signal and click Proceed to Alert Condition.
- Select Custom Threshold as an alert condition and click Proceed to Alert Settings.
- Enter the details for alert settings and click Proceed to Alert Message.
- Customize the Alert Message by selecting the severity status and click Proceed to Alert Recipients.
- Perform the following steps for the alert recipient and click Proceed to Activate Alert Rule.
Click Custom, fill the Webhook details and add the URL detail in the Webhook Notification dialog box. Click Update: Target endpoint.
Example Webhook detail:[https://{api-url}/integrations/alertsWebhook/{client_id}/alerts/?vtoken={vtoken](https://api.vistara.io/integrations/alertsWebhook/%7Bclient_id%7D/alerts/?vtoken={vtoken)}- {tenantId} – Replace with OpsRamp client unique id.
- {token} – Replace with OpsRamp token.
- Click Activate Alert Rule for the Rule Name CPU Performance.
Viewing alerts
To view the alerts:
- Select the Workspace drop-down option and go to Alerts.
- Search for SignalFx as the source name to view alerts.
- Click an alert ID.