Introduction
Zabbix is an open source monitoring solution for network servers, devices, services and other IT resources. The OpsRamp integration allows OpsRamp to accept alerts from Zabbix.
Zabbix Version verified integration: Zabbix 4.4.3
Important
Older Zabbix versions having Agent dependency do not work when upgraded to Zabbix 4.4.3. Reconfigure the upgraded Zabbix 4.4.3 according to the steps mentioned in this document.OpsRamp configuration
Configuration involves the following:
- Installing the integration.
- Configuring the integration.
Step 1: Install the integration
To install:
- From All Clients, select a client.
- Go to Setup > Integrations > Integrations.
- From Available Integrations, select Monitoring > Zabbix.
- Click Install.
Step 2: Configure the integration
To configure the integration:
- From the API tab, provide the following:
- Authentication: Copy Tenant Id, Token and Webhook URL for configuration. These settings are used for creating a HTTP Request template.
- Map Attributes: Provide the mapping information for the third-party.
- From the Monitoring of Integration tab, click Assign Templates.
- From the Audit Logs, set up audit log criteria and time frame.
Configuring the map attributes
To configure the mapping attributes:
- Select the required OpsRamp property from the drop-down.
- Click Add Mapping Attributes to map attributes for the specific OpsRamp alert property.
- Click + to define the mappings.
- From Create Alert Mappings on Status, define the mappings, parsing conditions, and default values, and Save.
Note
Attributes can be modified at any time.The following tables shows attribute mappings.
| Third-Party Entity | OpsRamp Entity | Third-Party Property | OpsRamp Property | Third-Party Property Value | OpsRamp Property Value |
|---|---|---|---|---|---|
| Problem | Alert | State | alert.currentState | Information | Info |
| Warning | Warning | ||||
| High | Critical | ||||
| OK | OK | ||||
| Problem | Alert | Metric | alert.serviceName | ||
| Problem | Alert | Description | alert.description | ||
| Problem | Alert | IP | alert.deviceName | ||
| Problem | Alert | EventID | alert.extAlertId | ||
| Problem | Alert | Subject | alert.subject |
Zabbix configuration
Configuration involves:
- Configuring media types.
- Configuring actions.
Step 1: Configure media types
To configure Media Types in Zabbix:
- Log into Zabbix Admin UI.
- Go to Administration, Media Type and click Create Media Type. Media Type screen appears.
- Enter the following required details and click Add.
- Name: Any name for media type (For example, OpsRamp Alert Webhook)
- Type: Webhook
- Parameters: Provide the parameters:
- Click Add. The Media Type is added.
Parameter descriptions
The following table provides parameter descriptions for configuring media types.
| Name | Value |
|---|---|
| Subject | {ALERT:SUBJECT} |
| Message | {ALERT:MESSAGE} |
| OpsRampURL | webhook URL copied from OpsRamp (For example: `https://{yourdomain}:/integrations/alertsWebhook/client_1/alerts?vtoken={token}` |
Script
The following is a script for posting alert data to OpsRamp:
try {
Zabbix.Log(4, 'opsramp webhook script value=' + value);var result = {
'tags': {
'endpoint': 'opsramp'
}
},
params = JSON.parse(value),
req = new CurlHttpRequest(),
alertPayload = {},
resp;postAlertToOpsRamp();/**
* Function to post alert data to OpsRamp
*/
function postAlertToOpsRamp() {
req.AddHeader('Content-Type: application/json');
req.AddHeader('Accept: application/json');
var res = req.Post(params.OpsRampURL,prepareOpsRampAlertPayload());
res = JSON.parse(res);
}/**
* Function to prepare required OpsRamp alert payload to send
*/
function prepareOpsRampAlertPayload() {
alertPayload.Subject = params.Subject;
var msg = params.Message;
var msgLines = msg.split('\r\n');
for (var i = 0; i < msgLines.length; i++) {
var field = msgLines[i].split(':');
alertPayload[field[0]] = field[1];
}alertPayload.State = alertPayload['Status'];
if(alertPayload['Status'] == 'PROBLEM') {
if(alertPayload['Trigger_Severity'] == 'Information' || alertPayload['Trigger_Severity'] == 'Not classified') {
alertPayload.State='Information';
} else if(alertPayload['Trigger_Severity'] == 'Average' || alertPayload['Trigger_Severity'] == 'Warning') {
alertPayload.State='Warning';
} else if(alertPayload['Trigger_Severity'] == 'High' || alertPayload['Trigger_Severity'] == 'Disaster') {
alertPayload.State='High';
}
} else if (alertPayload['Status'] == 'OK') {
alertPayload.State = 'OK';
}return JSON.stringify(alertPayload);
}return "OK";
} catch (error) {
Zabbix.Log(4, 'OPSRAMP issue creation failed json : ' + JSON.stringify({"fields": fields}));
Zabbix.Log(4, 'OPSRAMP issue creation failed : ' + error);
result = {};
}

return JSON.stringify(result);
Step 3: Configure actions
To configure actions:
- Go to Configuration > Actions and click Create action.
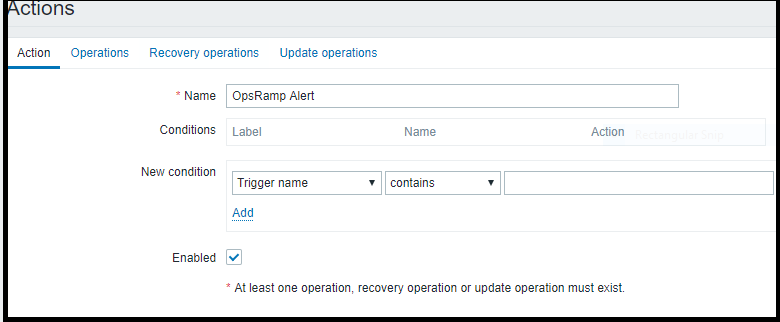
Zabbix Integration
- For the Action tab, provide the following:
- Name: Enter any name (For example, OpsRamp Alert Webhook Action)
- Conditions: Leave default
- New Condition: Leave default
- Enabled: Select the check box
- For the Operations tab, provide the following:
- Default operation setup duration: Leave default value (For example, 1h)
- Default subject: Problem: {EVENT.NAME}
- Default message:
Description:{TRIGGER.NAME} Status:{TRIGGER.STATUS} Host_Name:{HOSTNAME} IP:{IPADDRESS} EventID:{EVENT.ID} Trigger_Severity:{TRIGGER.SEVERITY} Event_Severity:{EVENT.SEVERITY} Metric:{ITEM.KEY} Date:{EVENT.DATE} Time:{EVENT.TIME} Item_Name:{ITEM.NAME} - Pause operations for suppressed problems:** Leave default value
- Operations: Click New and enter the following:
- Steps: Leave default value
- Step duration: Leave default value
- Operation Type: Select Send message
- Send to User groups: Select user group to notify.
- Send to Users: Select user to notify.
- Send only to: Select the media type created (For this example, OpsRamp Alert WebhooK)
- Default message: Leave default
- Conditions: Leave default
- Click Add to save.
- For the Recovery operations tab, provide the following:
- Default subject: Resolved: {EVENT.NAME}
- Default message:
ResolvedTime: {EVENT.RECOVERY.TIME} Description:{EVENT.NAME} Status:{TRIGGER.STATUS} Host_Name:{HOSTNAME} IP:{IPADDRESS} EventID:{EVENT.ID} Trigger_Severity:{TRIGGER.SEVERITY} Event_Severity:{EVENT.SEVERITY} Acknowledged: {EVENT.ACK.STATUS} Metric:{ITEM.KEY} Date:{EVENT.DATE} Time:{EVENT.TIME} Item_Name:{ITEM.NAME} - Operations: Click New and enter the following:
- Operation type: Select Notify all involved
- Default message:Select the check box
- Click Add to save.
- For the Update operations tab, provide the following:
- Default subject: Updated problem:: {EVENT.NAME}
- Default message:
Problem updated at:{EVENT.UPDATE.ACTION} Problem name:{EVENT.UPDATE.DATE} {EVENT.UPDATE.TIME}.{EVENT.UPDATE.MESSAGE} Host_Name:{HOSTNAME} IP:{IPADDRESS} Description:{EVENT.NAME} Trigger_Severity:{TRIGGER.SEVERITY} Event_Severity:{EVENT.SEVERITY} Metric:{ITEM.KEY} EventID:{EVENT.ID} Current_Status{EVENT.STATUS} Acknowledged: {EVENT.ACK.STATUS} Item_Name:{ITEM.NAME} - Operations: Click New and enter the following details:
- Operation Type: Select Send message
- Default media type: Select the media type created (For this example, OpsRamp Alert WebhooK)
- Default message: Select check box.
- Click Add. Actions details are added.
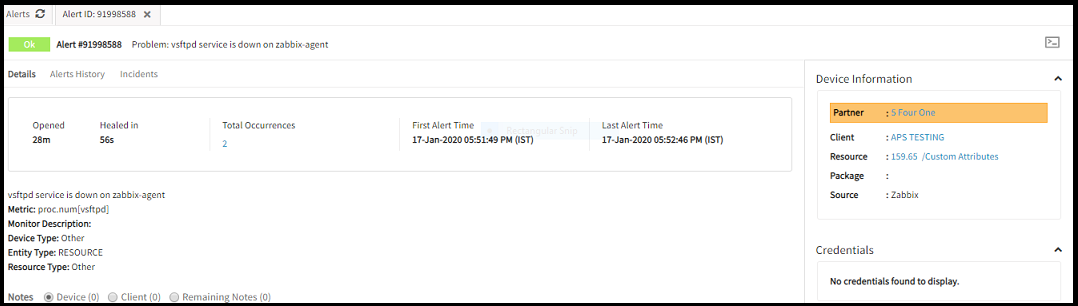
Sample Payload
{
"Subject": "Problem: vsftpd service is down on zabbix-agent",
"Description": "vsftpd service is down on zabbix-agent ",
"Status": "PROBLEM",
"Host_Name": "zabbix",
"IP": "159.65.159.89",
"EventID": "3387",
"Trigger_Severity": "Disaster",
"Event_Severity": "Disaster",
"Metric": "proc.num\[vsftpd\]",
"Date": "2020.01.17",
"Time": "10",
"Name": "vsftpd",
"State": "High"
}
What to do next
- View alerts in OpsRamp
- From Workspace drop-down options at OpsRamp Console, navigate to Alerts and on the Alerts page, search with the Source name as Zabbix. Related alerts are displayed.
- Click on Alert ID to view.