Introduction
This topic explains the procedure to integrate AWS with OpsRamp. After successful integration, you can manage and monitor AWS instance in OpsRamp.
Prerequisites
The following is required for integration: Depending on the AWS type, provide:
- IAM: access key and security key
- IAM (with AssumeRole): access key, security key, AssumeRole ARN, External Id
- External Id: AssumeRole ARN
OpsRamp configuration
Configuration involves:
- Configuring the integration.
- Adding a discovery profile.
Step 1: Configure the integration
To integrate:
- From All Clients, select a client.
- Go to Setup > Integrations > Integrations.
- From Available Integrations, select Public Cloud > AWS and click Install.
- Provide the following:
- Name
- Service Account Email: Provide AWS master/payer account number.
- Project Id
- Service Account Management Certificate
- Management Certificate PassPhrase
- Click Install.
Step 1: Configure the integration
To integrate:
- From All Clients, select a client.
- Go to Setup > Integrations > Integrations.
- From Available Integrations, select Public Cloud > AWS and click Install.
- Provide the following:
- Name
- Region(s): Select the AWS region. The resources that belong to the selected region are on-boarded via the integration. You can select multiple regions to onboard resources. If you select two regions A and B and if you are not authorized to access region A, then onboarding fails for both regions A and B.
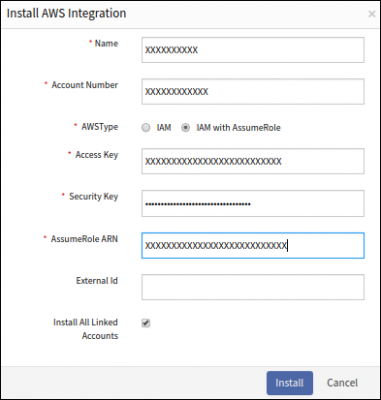
- AWS Type:
- IAM: An IAM role is an IAM entity that defines a set of permissions for making AWS service requests.
IAM roles are not associated with a specific user or group. Instead, trusted entities assume roles, such as IAM users, applications, or AWS services such as EC2.- Account Number
- Access Key
- Security Key
- IAM (with AssumeRole): Returns a set of temporary security credentials are used to access AWS resources
you might normally do not have access to.
These temporary credentials consist of an access key ID, a secret access key, and a security token. Typically, you use AssumeRole for cross-account access or federation.- Account Number
- Access Key
- Security Key
- AssumeRole ARN
- External Id
- Install All Linked Accounts
- External ID: An External ID is generted when you provide your account number.
External ID is a set of temporary security credentials that you can use to access AWS resources via your OpsRamp Cloud account.
You need access to onboard AWS accounts using External ID. To gain access, contact OpsRamp Support.- Account Number
- External Id: An External ID is generted when you provide your account number.
- AssumeRole ARN
- Install All Linked Accounts
- IAM: An IAM role is an IAM entity that defines a set of permissions for making AWS service requests.
- Click Save.
Install all linked accounts option
The Install All Linked Accounts option is available with the AWS types: IAM (with AssumeRole) and External ID AWS. This option allows newly provisioned accounts to be onboarded through the AWS Landing Zone without user intervention.
Prerequisites:
- The option must be selected only from master/payer accounts.
- The same credentials on the onboarded master/payer account must be authorized to list all linked accounts.
- Roles in the linked account must have the same name as the roles in the master account.
- Roles on each linked account must be authorized to discover all the resources.
OpsRamp automatically discovers any new accounts added under a master/payer account.
All such newly discovered accounts are auto-onboarded as separate AWS integrations
into the same tenant with exernal ID and AssumeRole ARN.
The account number in AssumeRole ARN of the linked account is replaced with the
account number of the respective linked account.
Install AWS Integration
Note
The following actions are not inherited to linked accounts.
- Stream AWS Alarms
- Collect Cloud Trail Events
- Process AWS Events
- The master account needs to be re-scanned every time a new linked account is added.
Step 2: Add a discovery profile
To create a discovery profile:
To add a discovery profile:
- From the integration, click Add.
- Provide the following:
- Profile Details.
- Profile name
- Filter Criteria
- Smart filters: Use to filter resources based on the resource type.
- Resource filters: Use to filter resources based on certain resource attributes.
- Perform Actions: Select actions to perform on the selected devices.
- Manage Device
- Stream CloudWatch Alarms: Provide SQS URL to consume alarms.
CloudWatch is monitored by cloud and alarms generated are collected by OpsRamp through the Stream Alarm in SQS URL. - Process unmanaged resource alarms: Processes all un-managed resource alarms.
- Stream CloudTrail Messages: Provide SQS URL to consume events.
CloudTrail generates events when there is a change (example: instance launch, terminate) and OpsRamp captures events through the CloudTrail SQS URL. This is beneficial with periodic discovery since cloud changes are immediately streamed to OpsRamp. - Stream AWS Events: Provide SQS URL to consume events.
- Collect Cost Analytics: Provide the S3 bucket in AWS. This setting is used to collect project cost details for services and resources that are used.
In the following screenshot,bill-by-resourceis the S3 bucket name.
- Assign Credentials Matching with Fingerprint: Verifies that the credentials set of the EC2 instance matches with the credential set of the keypair.
- Assign Gateway Management Profile: Select the Gateway management profile from the drop-down list.
- Perform Agent Action
- Agent Type: Direct or Proxy
- Install Agent (Linux only)
- Install Agent through Gateway: Select the Gateway through which instances can be accessed to install Agent. Linux Agent only.
- Discovery schedule. Based on the settings, discovery is triggered based on the scheduled time. New resources added to the environment are automatically discovered.
- Profile Details.
- Click Save.