Introduction
SSO integration configuration is done with both Azure AD and OpsRamp. The configuration sets up redirects to the custom branded URL.
Azure AD uses cross-domain Identity Management (SCIM) and Security Assertion Markup Language (SAML2.0). SCIM uses REST APIs to communicate between Azure AD and OpsRamp. The SCIM schema is used to handle end-to-end user management such as creating, updating and deleting user accounts.
Prerequisite
- Partners must register with OpsRamp to receive OpsRamp login credentials.
- Provide your custom branding URL (such as
<yourwebsitename>.app.vistanet.jp).
Azure AD configuration
To configure SSO integration:
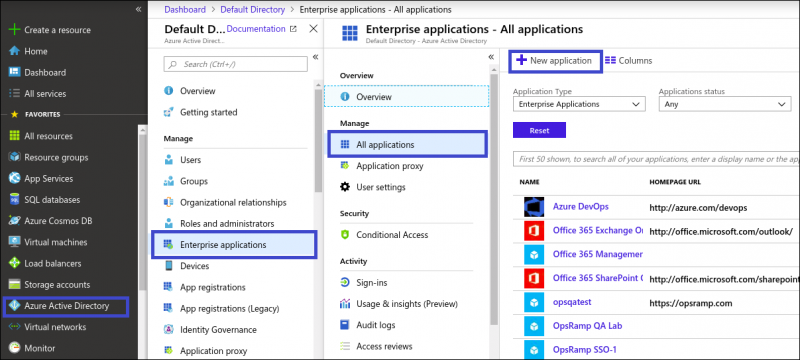
- From the Azure AD console, select Azure Active Directory.
- From Default Directory, select Enterprise applications > All applications > +New application.
Create New Application
- From Add an application > Non-Gallery Application > Add your own application, provide a name and click Add. For example, OpsRampSSO.
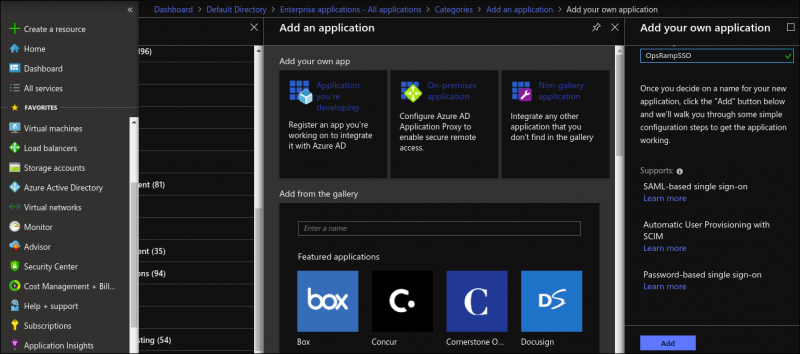
Non-Gallery Application
- From Single sign-on > SAML, provide the following settings in the Set up
section: - Identifier: Custom branding URL in OpsRamp. (For example,
https://<custom brand name>.opsramp.net/saml.do) - Reply URL:
https://<OpsRamp Custom Brand URL>/samlResponse.do(For example:https://azuread.app.vistanet.jp/samlResponse.do) - User Identifier:
user.userprincipalname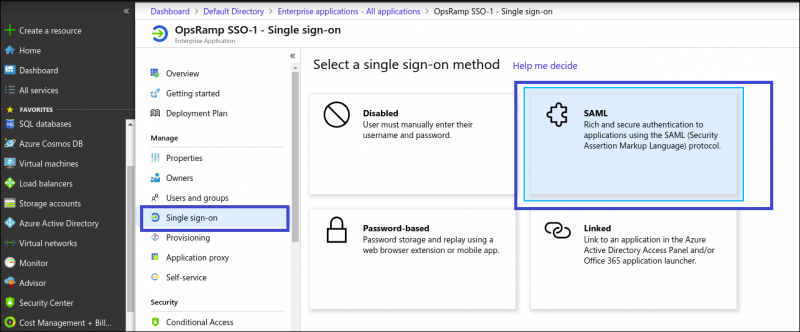
OpsRamp Single sign-on SAML
- Identifier: Custom branding URL in OpsRamp. (For example,
- Copy the following information: (Required for OpsRamp configuration)
- Login URL
- Azure AD Identifier
- Logout URL
- Click Download on Certificate (Base64) field. (Required for OpsRamp configuration)
- From the SAML Signing Certificate screen, right-click on the certificate name and select Make Certificate active from the certificate drop-down options.
- Provide the following settings and Save:
- Signing Option: Sign SAML Response and assertion
- Signing Algorithm: SHA-256
- (Optional) Enable JIT user provisioning one the User Attributes & Claims tab.
- From Provisioning, specify the following:
- Provisioning: Automatic
- Admin Credentials: Token URL and Secret Token (These settings are copied from the OpsRamp configuration steps.)
- Notification Email: Valid email address for receiving email notifications.
- Click Test Connection to validate the Token settings. After successful validation of Token settings, the Mappings section is automatically populated.
- From Provisioning > Settings, specify the following:
- Provisioning Status: On. This is used to synchronize user data.
- Scope: for synchronizing the user data. Sync only assigned users and groups is recommended.
- Clear current data and restart synchronization: Check this box. This is in case of any data mismatch or data corruption
OpsRamp configuration
To configure SSO integration:
- From All Clients, select a client.
- Go to Setup > Integrations > Integrations.
- From Available Integrations, select SSO > Azure AD and click Install.
- Provide the following settings:
- Issuer URL: Identity provider Issuer URL
- Redirection URL: SAML EndPoints for HTTP
- Logout URL: Sign-out URL as required
- Certificate: x.509 Certificate
- Click Install.
1 In the User Provision step, provide the following settings and click Save:
- Provision Type: SCIM.
- Default Role: the required user role.
- Copy the URL and Token information. These settings are used wehn configuring Azure AD Provisioning settings.
- In the Map Attributes step:
- Define the OpsRamp Entity. Depending on the type of OpsRamp Entity, select USER or USERGROUP.
- Define OpsRamp Property. Depending on the selected type of OpsRamp Entity, select the corresponding OpsRamp Property.
User synchronization
To start the user synchronization between Azure AD and OpsRamp:
- From the Azure AD Provisioning screen, select Current Status > Refresh. Refresh executes a REST API call from Azure AD.
- If the REST-defined user attributes match with the OpsRamp user attributes, the user information is updated in OpsRamp.
- If the REST-defined user attributes do not match with the OpsRamp user attributes, they are matched when the attributes are defined in the OpsRamp Map Attributes step and then updated.
- If the REST-defined user attributes do not match with the defined Map Attributes, the API response fails, user synchronization fails, and the user is not created in OpsRamp.
- Azure AD displays the progress of synchronization and the result is displayed.