Introduction
Freshservice with OpsRamp is a bi-directional integration. After successful integration, you can view Freshservice Incidents in OpsRamp and vice versa. User needs to complete configurations in OpsRamp and Freshservice, separately.
Freshservice is a cloud-based IT Help Desk and service management solution that enables organizations to simplify their IT operations. The solution offers features that include a ticketing system, self-service portal, and knowledge base.
Note
This collaboration integration supports the webhook-based inbound calls with different types of service management requests. For example, you can select one or multiple Entity Types from Incident, Service Request, Problem, and Change.Key scenarios
Users of Freshservice can create an OpsRamp incident and update using the inbound integration and can receive updates from OpsRamp using the outbound integration.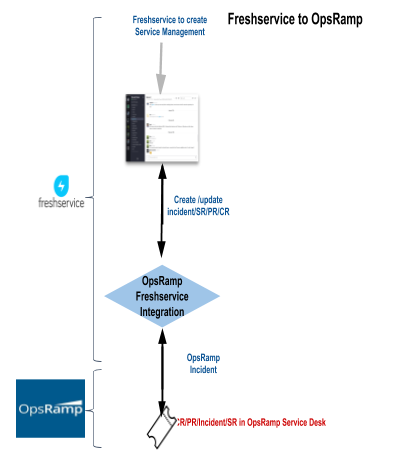
Create or update incident request, change, problem, service request
Prequisites and considerations
- Prerequisite: Enable webhook channel of communication.
- Consideration: Outbound updates are limited to only incidents, service request, change request, and problem request of the ServiceManagment tool.
Use APIs to configure
To use APIs for configuring, refer to the collaboration integration APIs.
Using user interface of OpsRamp and Freshservice also you can complete Freshservice integration.
OpsRamp configuration
Configuration involves:
- Installing the integration
- Configuring the integration
Step 1: Install the integration
To install:
- From All Clients, select a client.
- Go to Setup > Integrations > Integrations.
- From Available Integrations, select Collaboration > Freshservice.
- Click Install.
Step 2: Configure the integration
Configure the following:
- Inbound
- Outbound
- Monitoring of integration
- Audit logs
Inbound
To send entities from Freshservice to OpsRamp:
- In Authentication, configure the authentication to call Freshservice APIs.
- Select Webhook as Authentication Type.
- Select the required service management entities from Entity Type.
- Click Save.
Note: Copy URL details. These values are used for creating and updating selected entities in Freshservice.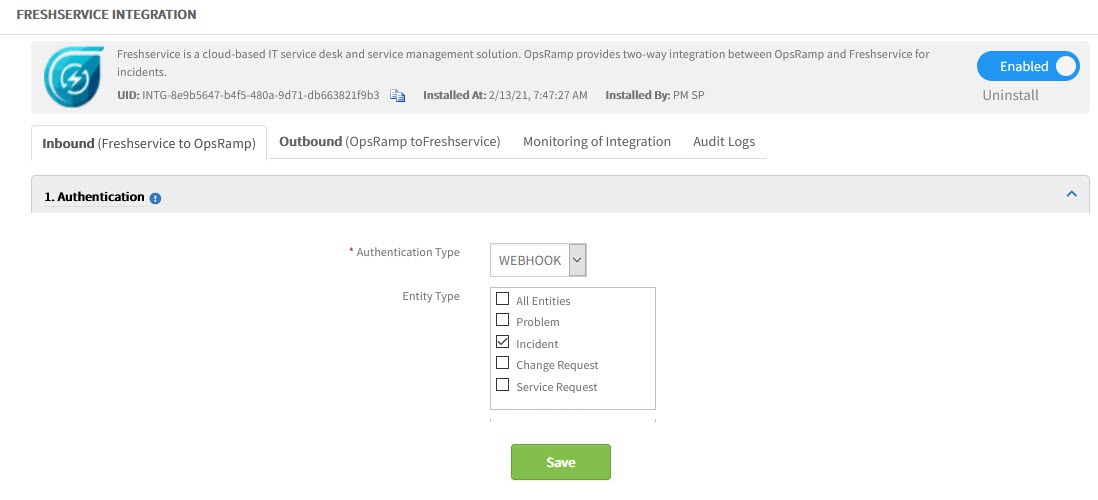
Freshservice Integration
- In Map Attributes, map Freshservice attributes with OpsRamp entity attributes.
- Select the OpsRamp entity from the drop-down menu.
- Click Map against the respective attribute, provide the mapping details, and click Save.
The following table shows the property mappings:
| Third-Party Entity | OpsRamp Entity | Third-Party Property | OpsRamp Property (non-editable) | ||||||||||||
|---|---|---|---|---|---|---|---|---|---|---|---|---|---|---|---|
| Tickets | Incident | status
| incident.status.name | ||||||||||||
| Tickets | Incident | priority
| incident.priority.name | ||||||||||||
| Tickets | Incident | response.description | incident.latestResponse.description | ||||||||||||
| Tickets | Incident | subject | incident.subject | ||||||||||||
| Ticket | Incident | description | incident.impact | ||||||||||||
| Tickets | Incident | extTicketId | incident.extTicketId |
Note
Mapping can be modified at a later time.Outbound
To send entities from OpsRamp to Freshservice:
- In Integration Basic Configuration, configure notification details to trigger the defined events.
- Notification Type: REST API
- Base URI:
https://{subdomain}.com/helpdesk/tickets - Authentication Type: Basic
- Click Save.
- In Map Attributes, map OpsRamp attributes with Freshservice attributes.
- Select the OpsRamp entity and then click Map against the required attribute.
- Provide mapping values for the entity and click Save.
- In Integration Events, specify details about the event.
An action performed on an entity is defined as an event. When an event is triggered, notifications are sent to the respective users.
a. Provide name for the integration event.
b. Select Service Desk, select Incident, and then select the action type.
c. Select Parent Configuration to assign the configured basic integration details to the event.
d. Provide the endpoint URL.
e. Select the web method and provide headers and payload.
Notes:
- To add more tokens to the payload, click the token in the Place Holders list.
- A custom field that is already configured as response payload attribute for a given integration is not available for configuration in any other integrations.
Remove the existing mapping from the integration to make the custom field available to map the response payload of any other integration.
f. To parse a property returned in the response, select the property from the drop-down, provide the parsing value, and click Save. - In Verify Integration, validate whether the integration is successful.
- Select event from the drop-down and then select the payload type.
- JSON: Provide the JSON payloads with the values.
- Form: Provide only the values.
- Provide the payload/values and click Verify.
- Select event from the drop-down and then select the payload type.
- For Integration Failures, select Email as the notification type, provide the email address, and click Save. In the case of failure in integration, a message is sent to the configured email address.
Integration event payloads
The following are the integration field values and event payloads for creating events.
Create ticket
| Fields | Values |
|---|---|
| Endpoint URL | https://{subdomain}.com/helpdesk/tickets |
| Headers |
|
| Method | POST |
| Authentication Type | BASIC |
| Username | Freshservice username |
| Password | Freshservice password |
Request with hard-coded values
The following is a sample request with hard-coded values:
{
	"helpdesk_ticket" : {
		"description" : "Test ticket to verify integration",
		"subject" : "Test ticket to verify integration",
		"email" : "xxx@domain.com",
		"priority" : 1,
		"status" : 2,
		"source" : 1,
		"category_92437" : "NE NOC",
		"subcategory1_92437" : "Monitoring",
		"group_id" : "25000001317"
	}
}
Request with tokens
The following is a sample request with tokens:
{
	"helpdesk_ticket" : {
		"description" : "$incident.impact",
		"subject" : "$incident.subject",
		"email" : "xxx@domain.com",
		"priority" : "[@$incident.priority.name@]",
		"status" : "[@$incident.status.name@]"
	}
}
Response
The following is a sample response:
{
	"helpdesk_ticket": {
		"cc_email": {
			"cc_emails": [],
			"fwd_emails": [],
			"reply_cc": [],
			"tkt_cc": []
		},
		"created_at": "2014-03-05T17:23:43+05:30",
		"deleted": false,
		"delta": true,
		"description": "Some details on the issue",
		"description_html": "Details on the issue",
		"display_id": 24,
		"due_by": "2014-03-05T18:23:43+05:30",
		"email_config_id": null,
		"frDueBy": "2014-03-05T17:53:43+05:30",
		"fr_escalated": false,
		"group_id": null,
		"id": 55,
		"isescalated": false,
		"notes": [],
		"owner_id": null,
		"priority": 1,
		"requester_id": 216,
		"responder_id": null,
		"source": 2,
		"spam": false,
		"status": 2,
		"subject": "Support needed..",
		"ticket_type": "Incident",
		"to_email": null,
		"trained": false,
		"updated_at": "2014-03-05T17:23:43+05:30",
		"urgent": false,
		"status_name": "Open",
		"requester_status_name": "Being Processed",
		"priority_name": "Low",
		"source_name": "Portal",
		"requester_name": "hulk",
		"responder_name": "No Agent",
		"to_emails": null,
		"department_name": null,
		"assoc_change_id": "Getting ES3 back up to speed1",
		"assoc_problem_id": null,
		"assoc_change_cause_id": null,
		"custom_field": {},
		"attachments": []
	}
}
Freshservice configuration
Workflow Automator is used to configure Freshservice.
Workflow Automator allows automation all the repetitive tasks and manual processes. These processes include assigning tickets to the right agent or team, triggering webhooks to integrate with third-party tools, and more. With the Workflow Automator, workflows are created using simple drag and drop actions.
A workflow includes the following components:
- Event: The component defines when a workflow has to be triggered.
- Condition: The component defines the parameter(s) that needs to be validated during the execution of a workflow.
- Action: The component displays the outcome of the workflow.
Configuration involves creating the following workflow automators:
- Creating an incident.
- Updating an incident.
Step 1: Create incident
To configure a create incident workflow automator:
- Log into Freshservice and go to Setting > Workflow Automator.
- On the New Automator drop-down, click Ticket to create a workflow.
- Provide the following required details and click Create:
- Title: Provide a title. For example: OpsRamp Create Incident Automator
- Description: Description of the workflow.
Example: This automator triggers the OpsRamp API to create an incident in OpsRamp.
- On the Workflow Automator page, set up an event providing the following details and click Done:
- When any of these events occur: Select
Incident is Raised. - These events can be performed by: Select
Anyone.
- When any of these events occur: Select
- Set up a condition to provide a set of parameters to the workflow.
The workflow, after being triggered, checks for the parameters. Upon the validation of the parameters, the workflow performs the defined action. This example does not have a condition so that all new incidents are integrated. - Set up action by clicking on the Action icon, dragging and placing next to the event, and do the following:
- Perform these actions on Select
Ticket. - Select
Trigger Webhook. - Request Type: Select
POST. - Callback URL: Enter an OpsRamp incident to create an API URL:
https://{api-url}/integrations/incidentWebhook/{tenantId}/incidents?vtoken={token}
For example:https://api.vistanet.jp/integrations/incidentWebhook/client_1/incidents?vtoken=d75rcZ6NKdRTMlwHDRCpDqTWhqMIBpUk
Note: Copy the webhook URL that provides the complete URL with Tenant ID and token.- To copy, navigate to Setup > Integrations > Integrations > Select client > My Integrations > Webhook tab > Copy Webhook URL.
- Requires Authentication:
No - Encoding:
JSON - Content as Advanced and give the following payload (Modify payload as required based on use case):
Example Payload
{ "subject" : "{{ticket.subject}}", "description" : "{{ticket.description}}", "priority" : "{{ticket.priority}}", "extTicketId":"{{ticket.id}}" }- Click Done to save the action.
- Perform these actions on Select
- Click Activate to save the Automator.
Step 2: Configure an update incident
To configure an update incident workflow automator:
- Go to Settings > Workflow Automator.
- From the New Automator dropdown, click Ticket.
- Provide the required details.
- Title: Provide a title. For example, OpsRamp Update Incident Automator
- Description: Description of the workflow. For example, this Automator triggers the OpsRamp API to update an incident in OpsRamp.
- On the Workflow Automator page, set up an event providing the following details and click Done.
- When any of these events occur: Select
Incident is Updated, Reply is sent. - These events can be performed by: Select
Anyone.
- When any of these events occur: Select
- Set up a Condition.
This is where you provide a set of parameters to the workflow. The workflow, after being triggered, checks for the parameters. Upon the validation of the parameters, the workflow performs the defined action. As this example does not have any condition, all new incidents are integrated. - Set up action by clicking on the Action icon, dragging and placing next to the event, and providing the following details:
- Perform these actions on Select
Ticket. - Select
Trigger Webhook. - Request Type: Select
POST. - Callback URL: Enter an OpsRamp incident to create an API URL:
https://{api-url}/integrations/incidentWebhook/{tenantId}/incidents?vtoken={token}.- For example:
https://api.vistanet.jp/integrations/incidentWebhook/client_1/incidents?vtoken=d75rcZ6NKdRTMlwHDRCpDqTWhqMIBpUk
Note: Webhook URL – Copy the webhook URL that provides the complete url with tenantId and token. - To copy, navigate to Setup > Integrations > Integrations > Select client > My Integrations > Webhook tab > Copy Webhook URL.
- For example:
- Requires Authentication:
No - Encoding:
JSON - Content as Advanced and provide the following payload (Modify payload as required based on use case):
{ "priority": "{{ticket.priority}}", "status": "{{ticket.status}}", "extTicketId":"{{ticket.id}}", "response": { "description": "{{ticket.latest_public_comment}}" } }- Click Done to save the action.
- Perform these actions on Select
- Click Activate to save the Automator.
Result
Incident, Service Request, Problem Request, and Change Request when created at OpsRamp are created at Freshservice also. Any Update from Freshservice on all four requests is updated at OpsRamp and vice-versa also.