Introduction
ManageEngine ServiceDesk Plus is a web-based, IT help desk software with integrated asset and project management built on an ITIL framework.
OpsRamp supports a one-way (outbound) integration.
OpsRamp configuration
Configuration involves:
- Installing the integration.
- Configuring the integration.
Step 1: Install the integration
To install:
- From All Clients, select a client.
- Go to Setup > Integrations > Integrations.
- From Available Integrations, select Collaboration > ManageEngine ServiceDesk Plus.
- Click Install.
Step 2: Configure the integration
Configure the following: - Inbound - As this is a one-way integration, only outbound is required. - Outbound - Monitoring of Integration - Audit Logs
Outbound
To send entities from OpsRamp to ManageEngine ServiceDesk Plus:
- In Integration Basic Configuration, (optional) configure notification details to trigger notification events and click Save.
- In Map Attributes, the mapping of attributes is not required as this is a one-way integration.
- In Integration Events, specify the event. An action performed on an entity is defined as an event.
When an event is triggered, notifications are sent to the respective users.
- Click Add. Add Integration Event page appears.
- Provide name for the integration event.
- Default entities are Service Desk and Incident. Select the action type from the drop-down. The action type for create Incident is Create and for update or add response to Incident is Update.
- Provide endpoint URL, select the web method, and provide headers, payload.
- To add more tokens to the payload, click the token in Place Holders list and provide the value.
- A custom field that is already configured as response payload attribute for a given integration is not available for configuration in any other integrations. You need to remove the existing mapping from the integration to make the custom field available to map on response payload of any other integration.
- To parse a property returned in response, select the property from the drop-down and provide the parsing value and click Save.
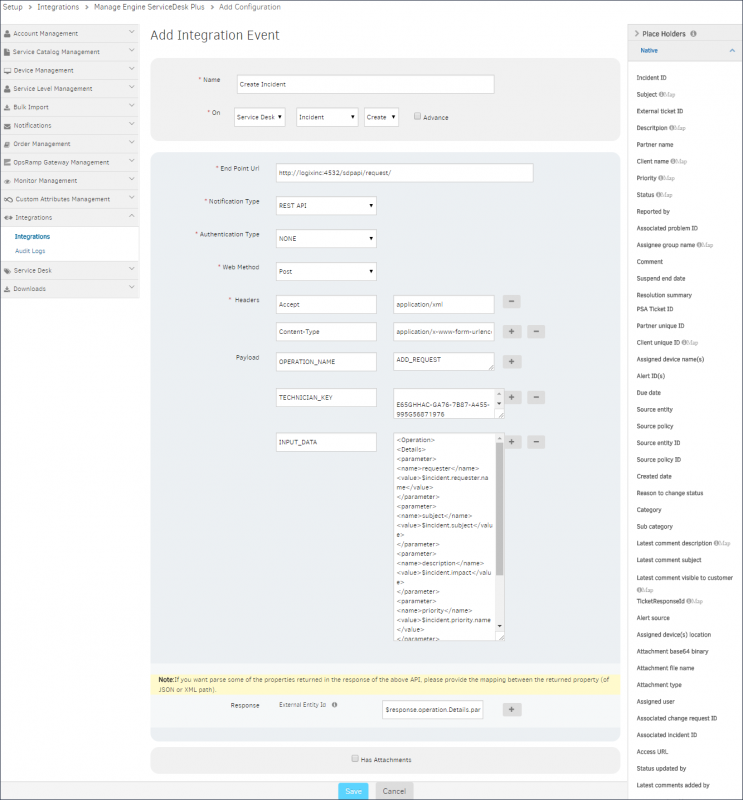
Add Integration Event
- Verify Integration, validate if the integration is successful.
- Select the event from the drop-down and then select payload type.
- Provide the payload values and then click Verify.
- For Integration Failures: In the case of failure in integration, a message is sent to the configured email address.
- Select the notification type Email, provide the email address, and click Save.

Integration event payloads
| Field | Value | ||||||||
|---|---|---|---|---|---|---|---|---|---|
| Endpoint URL | http://{servername}:{port number}/sdpapi/request/ | ||||||||
| Notification Type | REST API | ||||||||
| Authentication | NONE | ||||||||
| Web Method | POST | ||||||||
| Headers |
Note: Click the Add icon to add multiple values. | ||||||||
| Payload |
|
Request payload
    <Operation>
    <Details>
    <parameter>
    <name>requester</name>
    <value>$incident.requester.name</value>
    </parameter>
    <parameter>
    <name>subject</name>
    <value>$incident.subject</value>
    </parameter>
    <parameter>
    <name>description</name>
    <value>$incident.impact</value>
    </parameter>
    <parameter>
    <name>priority</name>
    <value>$incident.priority.name</value>
    </parameter>
    <parameter>
    <name>status</name>
    <value>$incident.status.name</value>
    </parameter>
    </Details>
    </Operation>
Note
To map ManageEngine ServiceDesk Plus ticket ID with OpsRamp, select EXT_ENTITY_ID from Response drop-down and provide the$response.operation.Details.parameter.value value.Response
<?xml version="1.0" encoding="UTF-8" standalone="no"?>
    <API version="1.0">
    <response>
    <operation name="ADD_REQUEST">
    <result>
    <statuscode>200</statuscode>
    <status>Success</status>
    <message>Request added successfully</message>
    </result>
    <Details>
    <workorderid>28</workorderid>
    </Details>
    <Details>
    <parameter>
    <name>workorderid</name>
    <value>28</value>
    </parameter>
    </Details>
    </operation>
    </response>
    </API>
Update incident
| Field | Value | ||||||||
|---|---|---|---|---|---|---|---|---|---|
| Endpoint URL | http://{servername}:{port number}/sdpapi/request/$utils.extEntityId($incident.id,$installedAppId,$entity) | ||||||||
| Notification Type | REST API | ||||||||
| Authentication | NONE | ||||||||
| Web Method | POST | ||||||||
| Headers |
| ||||||||
| Payload |
|
Note
To map ManageEngine ServiceDesk Plus status property with OpsRamp, select STATUS_MSG from Response drop-down and provide the$response.operation.result.message value.Request payload
    <Operation>
    <Details>
    <parameter>
    <name>priority</name>
    <value>$incident.priority.name</value>
    </parameter>
    <parameter>
    <name>status</name>
    <value>$incident.status.name</value>
    </parameter>
    </Details>
    </Operation>
Note
To map the ManageEngine ServiceDesk Plus status property with OpsRamp, select STATUS_MSG from the Response drop-down and provide the$response.operation.result.message value.Response
    <?xml version="1.0" encoding="UTF-8" standalone="no"?>
    <API version="1.0">
    <response>
    <operation name="EDIT_REQUEST">
    <result>
    <statuscode>200</statuscode>
    <status>Success</status>
    <message>Request 26 successfully edited</message>
    </result>
    </operation>
    </response>
    </API>
Add response to incident
| Field | Value | ||||||||
|---|---|---|---|---|---|---|---|---|---|
| Endpoint URL | http://{servername}:{port number}/sdpapi/request/$utils.extEntityId($incident.id,$installedAppId,$entity)/notes | ||||||||
| Notification Type | REST API | ||||||||
| Authentication | NONE | ||||||||
| Web Method | POST | ||||||||
| Headers |
| ||||||||
| Payload |
|
Request payload
    <Operation>
    <Details>
    <Notes>
    <Note>
    <parameter>
    <name>isPublic</name>
    <value>false</value>
    </parameter>
    <parameter>
    <name>notesText</name>
    <value>$incident.latestResponse.description</value>
    </parameter>
    </Note>
    </Notes>
    </Details>
    </Operation>
Note
To manage ManageEngine ServiceDesk Plus status property with OpsRamp, select STATUS_MSG from Response drop-down and provide the$response.operation.result.message value.Response
    <?xml version="1.0" encoding="UTF-8" standalone="no"?>
    <API version="1.0">
    <response>
    <operation name="ADD_NOTE">
    <result>
    <statuscode>200</statuscode>
    <status>Success</status>
    <message>Note added successfully for request 26</message>
    </result>
    </operation>
    </response>
    </API>
ManageEngine ServiceDesk Plus configuration
Configuration involves generating an authentication key. The authentication key (technician key) is required to post OpsRamp events as ServiceDesk Plus Incidents using ServiceDesk Plus APIs.
To generate an authentication key in ServiceDesk Plus:
- Log into ServiceDesk Plus with administrator privileges.
- Click Admin, go to Users > Technician.
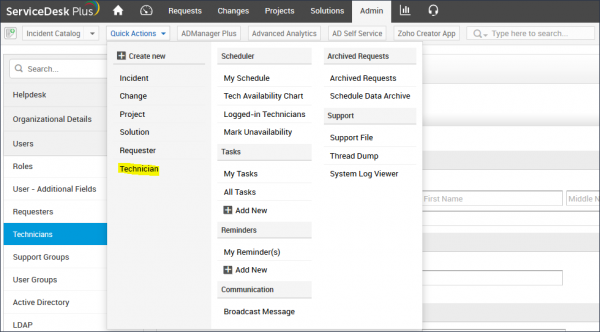
Create New Technician
- Click Add New to add a new technician and configure the following:
- Provide name.
- Provide description and specify the privileges for the technician.
- Select Enable login for this technician and provide information for the technician.
- Select Enable Administrator Privileges (SDAdmin).
- In API key details, click Generate/Regenerate and then select Never Expires to generate the authentication key.
- Copy the authentication key. The key is used while configuring an integration event in OpsRamp.

Alternatively, you can generate an authentication token for an existing user by editing the technician details using API key details > Generate.
