Introduction
ServiceNow integration with OpsRamp is a bi-directional integration supporting the following types of integration:
- Incident integration: An OpsRamp incident can be viewed in ServiceNow. Alternatively, a ServiceNow incident can be viewed in OpsRamp.
- CMDB integration: OpsRamp resources can be integrated with third-party configuration item (CI) entities.
Note
For ServiceNow New York (or later) version, the recommendation is to use the ServiceNow Store method. For earlier versions, use the standard integration method.Supported version of ServiceNow (latest): Quebec
Prerequisites
The following is required to integrate using the ServiceNow Store:
- Valid ServiceNow Store user credentials
- Valid OpsRamp user credentials
- Download the OpsRamp integration from the ServiceNow Store
Download the OpsRamp integration from the ServiceNow Store
OpsRamp is available under the certified apps category on the ServiceNow Store.
- The OpsRamp-ServiceNow integration is certified to support the latest ServiceNow version, Quebec.
- The prior versions (Paris, Orlando, and New York)) are also supported.
Download and install OpsRamp integration from the ServiceNow Store. To view the OpsRamp integration, go to System Applications > My Company Applications on the ServiceNow Service Management page.
ServiceNow incident management integration
Using incident integration, you can view an OpsRamp incident in ServiceNow and vice versa. An OpsRamp incident can be viewed in ServiceNow or a ServiceNow incident can be viewed in OpsRamp. Either scenario requires that the Service Desk Priority matrix is configured.
OpsRamp
This section describes the configuration steps for ServiceNow Incident management integration.
To integrate ServiceNow in OpsRamp:
From All Clients, select a client.
Go to Setup > Integrations > Integrations.
From Available Integrations, select Collaboration > ServiceNow.
Click Install.
In the Inbound Configuration tab, select authentication type as OAUTH2 and click Save.
Retain the Tenant ID, Key, and Secret information. This information is used in ServiceNow to create the OAuth provider.
In the Outbound Configuration tab, ensure that the Key, Secret, Username, and Password information are available.
 - Search for OAuth Client in ServiceNow to get the details.
 - To get the Client ID (key in OpsRamp) and Client secret (secret in OpsRamp, go to **System OAuth > Application Registries** and search for the name **OpsRamp OAuth Client**.
 - To get the Username, refer to Create User Account under **Modify OAuth Details** in **Configuring the OpsRamp API** of the ServiceNow section.
In the Integration Basic Configuration section, provide the following and click Save. Configure the basic notification details to trigger events:
 - Notification type: REST API
 - Base URI: `https://{servicenow-subdomain}.com`. For example, `https://demo.servicenow.com`.

 - Authentication type: OAUTH2
 - Grant Type: Password Credentials
 - Access Token URL: `https://{servicenow-subdomain}.com/oauth_token.do`. For example, `https://demo.servicenow.com/oauth_token.do`
 - Key, Secret, Username, and Password
In the Integration Event section, click Add. Add Integration Event page appears.
Provide a name for the integration event.
Select the Entity from the first drop-down list.
Select the Entity Type from the second drop-down list.
Select the Entity type event from the third drop-down list.
Depending on the combination of selected Entity and Entity Type, placeholders are updated in the right pane. Placeholders are the attributes that are used in the integration event API payload and are categorized into Native, Additional and Custom Attributes.
Provide the End Point URL.
Select the Notification Type from the available options: REST API and SOAP API.
Select the Authentication Type from the available options: BASIC and OAUTH.
Select the Web Method and provide the Headers and Payloads.
Go to Verify Integration > Integration Event Payloads to view the URL, headers, and payloads. Import sets should be modified when configuring the OpsRamp API in ServiceNow.
Provide the payload for the respective action and click Save.
Notes
- To find a caller_id, go to Organization > User. Select the user to use as the caller for the incident and copy sys_id.
- A preconfigured custom field as a response payload attribute for a specific integration is not be available for other integrations. It can be made available for other integrations by removing the existing mapping.
- To add more tokens to the payload, click the token in the placeholder list.
- To parse the properties returned in the response for the configured API payload, select the property from the drop-down and enter a value.
Verify integration
To validate if the integration is successful:
- Select the event from the drop-down and select payload type.
- Provide the payload and click Verify.
A 200-OK success response indicates that the integration is successful.
Integration failures
In case of a failure in integration, a message is sent to the designated user. To set up email notification:
- Select notification type Email.
- Enter the email address.
- Click Save.
Integration event payloads
Refer to the integration event payload below to create an incident in ServiceNow.
Create an incident in ServiceNow:
| Fields | Values |
|---|---|
| Endpoint URL | https://{subdomain}.com/api/now/import/x_opra_opsramp_int_opsramp_incident |
| Headers |
|
| Method | POST |
Sample request
{
	"caller_id": "6816f79cc0a8016401c5a33be04be441",
	"status": "$incident.status.name",
	"impact": "$incident.businessImpact.name",
	"urgency": "$incident.urgency.name",
	"subject": "$incident.subject",
	"description": "$incident.impact",
        "opsramp_incident_id": "$incident.uniqueId"
}
Sample response
{
	"import_set": "ISET0013148",
	"staging_table": "x_opra_opsramp_int_opsramp_incident",
	"result": [{
		"transform_map": "OpsRamp Incident Trans Map",
		"table": "incident",
		"display_name": "number",
		"display_value": "INC0979030",
		"record_link": "https://{subdomain}.com/api/now/table/incident/c4372d5e0f971200500c00dce1050e56",
		"status": "inserted",
		"sys_id": "c4372d5e0f971200500c00dce1050e56"
	}]
}
Customize configuration in ServiceNow
ServiceNow Kingston version supports OAuth2.0 authentication.
Prerequisite
If integration is at the partner level, then a custom field to save the OpsRamp client id should already be created in the Company form with the name OpsRamp Client ID. To make the details visible, edit the company form layout and update it with the OpsRamp Client ID. For example, client_1.
This information is used in the business rule script to route incidents to the OpsRamp client.
Considerations
A custom field to save the OpsRamp Incident ID is already created in the Incident form with the name ‘OpsRamp Incident ID’. To make the d3etails visible, edit the incident form layout.
Configuring the OpsRamp API in ServiceNow involves the following steps:
- Modify custom fields.
- Modify OAUTH detail.
- Modify the REST message.
- Modify the business rule script with OpsRamp Client ID.
- Optionally, add a more field.
Modify custom fields
To modify a custom field, do the following:
- View OpsRamp Incident ID custom field
- Modify OpsRamp Client ID custom field
To view an Incident ID custom field
You can view custom fields in the ServiceNow incident table to save the OpsRamp Incident ID in a ServiceNow incident. Configure the Form Layout to ensure the OpsRamp Incident ID column is visible in the Incident form.
To modify an OpsRamp Client ID custom field
Configure the Form Layout so that the OpsRamp Client ID is visible in the Company form. From the OpsRamp Client ID custom field, update the OpsRamp Client ID column for each company in ServiceNow.
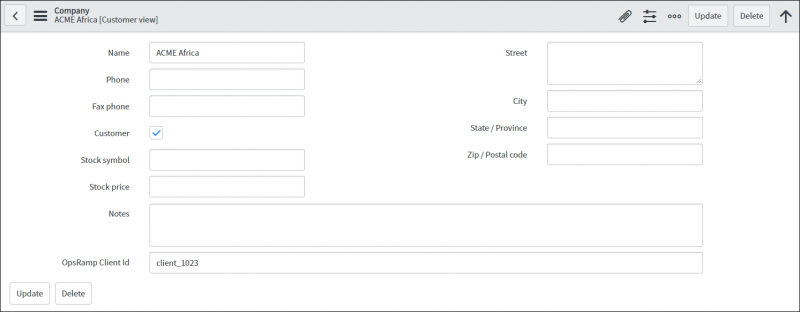
Company Custom Field
Note
- If integration is performed at the client level, the OpsRamp Client ID does not have to be modified.
- If integration is performed at the partner level, a custom field to save the OpsRamp Client ID is already created in the ‘Company’ form with the name ‘OpsRamp Client ID’. Edit the Company form layout to make it visible in the Company form and update with the OpsRamp equivalent Client ID. This ID is used in a business rule script to route incidents to the client in OpsRamp. For example,
Client_1023.
Modify OAUTH
The process of configuring OAuth in ServiceNow involves the following steps:
- Creating a user account
- Modifying an OAuth provider
Create a user account
To create a user account:
- Click Organization in the left pane and click Users.
- Select New to create a new user.
- Provide the user details and click Submit.
- In the User profile and on the Roles tab, click Edit.
- On the Edit Members page under Collection, search for
x_opra_opsramp_int.admin. - Select
x_opra_opsramp_int.adminand click Save.
Modify the OAuth provider
An OAuth provider should be configured before configuring the OpsRamp OAuth details to call APIs from ServiceNow.
Prerequisite: Perform the inbound configuration in OpsRamp before modifying an OAuth provider.
To modify the OAuth provider:
- Click System OAuth in the left pane followed by Application Registry.
- In the center pane, search for OpsRamp OAuth Provider and click to edit.
- View and modify the details in the Application Registries page as mentioned:
- Client ID: Provide the OpsRamp OAuth2.0 key copied from OpsRamp.
- Client Secret: Provide OpsRamp OAuth2.0 secret copied from OpsRamp.
- Token URL: Update OpsRamp OAuth token URL with
https://{Your OpsRamp domain}/auth/oauth/token. For example,https://api.vistanet.jp/auth/oauth/token.
- Click Update to save the details.
Modify the REST message
These REST messages are called in a business rule script when certain conditions are met based on configuration settings. To modify the REST message before configuring OpsRamp API details, do the following:
- Modify the endpoint in the REST message.
- Modify the endpoint in the REST message HTTP methods.
Modify the endpoint in the REST message
- Log into ServiceNow.
- Click System Web Services in the left pane.
- Search OpsRamp Incident REST and click Edit.
- Modify the details for the REST message: Endpoint:
https://{your OpsRamp domain}. For example,https://api.vistanet.jp - Click Submit to save the details.
Modify the REST message HTTP methods
After modifying the REST message, modify the HTTP methods.
To modify the HTTP methods:
From the Rest Message OpsRamp Incident REST page, go to the HTTP Methods tab.
Change the Endpoint in the REST message HTTP methods for Create Incident and Update Incident.
Syntax:
https://{your OpsRamp domain}/api/v2/tenants/${tenantId}/incidentsExample:https://api.vistanet.jp/api/v2/tenants/${tenantId}/incidentsClick Update.
Note
The placeholder for the endpoint is replaced in the business rule script.Modify the business rule script with the OpsRamp Client ID
A business rule is a server-side script that is run to display, insert, update, or delete a record or to query a table.
To call OpsRamp APIs when an incident is created or updated, with details configured in REST messages section:
- Define the conditions to trigger the rule.
- Provide the script to invoke the API.
To configure a business rule:
Click System Definition in the left pane and select Business Rule.
Search for the business rule OpsRamp Incident BR and click to edit. From the Business Rule page, provide the following information.
When to run: Specify when to run the business rule.
Filter Conditions: Change the user name for the following conditions replacing it with the user created while modifying OAUth:
Created by is not a system administrator and/or
Updated by is not a system administrator
Note that this filter condition is provided to avoid looping so with the OpsRamp API created or updated incident in ServiceNow, the script does not invoke the integration back to OpsRamp. The system administrator is the user-created during authentication.
Advanced: Modify the Script with the following considerations:
If integration is at the OpsRamp client level, navigate to the line with the text
var opsRampClientId = 'client_392'and replace it with the OpsRamp Client ID.If integration is at the OpsRamp partner level,
- Go to the line with the text
var opsRampClientId = current.company.x_opra_opsramp_int_opsramp_client_idand uncomment that line. - Navigate to line with string
var opsRampClientId = 'client_392'and comment this line.
- Go to the line with the text
Click Update.
Note
If the activity has multiple rules running at the same time, then rules are executed from low order to high order.(Optional) Add more fields
In the default configuration, only mandatory fields are added in a payload. Additional fields can be added to support specific requirements.
To update an import set and transform an existing map, do the following steps:
- Modify import sets
- Modify the transform map
Modify import sets
Import sets allow importing of data from various data sources and the mapping of data into ServiceNow tables. The staging table needs to be modified to add OpsRamp incident fields.
To add OpsRamp incident fields:
- Click System Definition in the left pane and click Tables.
- Search for table name
x_opra_opsramp_int_opsramp_incidentand click the label to edit. - From the Columns section, click New to create new fields.
- Provide details about the new record and click Submit.
Note
These fields are to be used in a payload configured for OpsRamp integration events to send data from OpsRamp.Modify the transform map
After adding new fields, add mapping for these fields in the transform maps section.
To modify the transform map:
Click System Import Sets in the left pane and click Transform Maps.
Search for source table column with the name
x_opra_opsramp_int_opsramp_incident.Click the name
x_opra_opsramp_int_opsramp_incidentto edit.Select the transform map created in the OpsRamp Incident Trans Map from the Map drop-down.
Click New on the Field Maps page.
Create a map for the following fields:
- Map:
OpsRamp Incident Trans - Map Source Table:
OpsRamp Incident[x_opra_opsramp_int_opsramp_incident] - Target Table:
Incident - Source Field: Select the field created under Modify Import Sets
- Target Field: Refers to the ServiceNow Incident field to map
- Coalesce: Inactive
- Use Source Script: Inactive
- Map:
Incidents from ServiceNow are now available for viewing in OpsRamp (and in ServiceNow).
CMDB integration
For ServiceNow CMDB integration, this topic describes how to do ServiceNow Integration with OpsRamp.
OpsRamp configuration
This section describes the configuration steps for ServiceNow CMDB integration.
From All Clients, select a client.
Go to Setup > Integrations > Integrations.
From Available Integrations, go to Collaboration > ServiceNow.
Click Install. ServiceNow is installed and the Inbound configuration page is displayed.
In the Inbound Configuration tab, select authentication type as OAUTH2 and click Save. Note the Tenant ID, Key, and Secret, which are used in ServiceNow to Modify OAuth Provider.
In the Outbound Configuration tab, provide the Prerequisite: If using the ServiceNow Store, provide the following details: Key, Secret, Username, and Password. Search for OAuth Client in ServiceNow for more information.
In the Integration Basic Configuration section, configure basic notification details to trigger events defined:
 - Notification type: REST API
 - Base URI: Base URL of ServiceNow Instance (Example: `https://demo2577.service-now.com`)
 - Authentication type: OAUTH2
 - Grant Type: Password Credentials
 - Access Token URL: Access Token URL of ServiceNow Instance. For example, `https://{subdomain}.com/oauth_token.do`.
 - Key, Secret, Username, and Password.
Click Save.
In the Integration Event section, Click Add, which displays the Add Integration Event page.
Provide a name for the integration event.
Select (resource/ Any Resource /Create) for the field On.
Select the Entity from the first drop-down list.
Select the Entity Type from the second drop-down list.
Select the Entity type event from the third drop-down list.
Depending on the combination of selected entity and entity type, the placeholders are updated in the right pane. Placeholders are the attributes that are used in the integration event API payload. Placeholders are categorized into Native, Additional and Custom Attributes.
Select Parent Configuration to assign the configured basic integration details.
Select the web method as POST to provide: header name and value.
View the integration event payloads under Verify Integration to view the URL, headers, and payloads. Prerequisite: Setting Configure Import Sets
Provide the payload for the action and click Save.
- A custom field already configured as the response payload attribute for a given integration is not available for configuration in other integrations. Remove an existing mapping from the integration to make the custom field available for mapping in the response payload for another integration.
- To add more tokens to the payload, click the token in the placeholder list.
- To parse the properties returned in a response for the configured API payload, select the property from the drop-down and provide a value.
Verify CMDB integration
Validate if the integration is successful.
To do a validation:
- Select the event from the drop-down and select the payload type.
- Provide the payload and then click Verify.
A 200-OK success response is generated if the integration is successful.
CMDB integration failures
In case of a failure in integration, a message is sent to the user.
To set up an email notification:
- Select notification type Email.
- Provide the email address.
- Click Save.
CMDB integration event payloads
In event configuration, you can define web methods, payload data, and endpoint URL to post the data to ServiceNow.
| Fields | Values |
|---|---|
| Endpoint URL | {ServiceNow Base URI}/api/now/import/x_opra_opsramp_int_opsramp_ci (Example: https://demo2577.service-now.com/api/now/import/x_opra_opsramp_int_opsramp_ci) |
| Headers |
|
| Method | POST |
Refer to the integration event payload below to create CMDB in ServiceNow.
Sample CMDB request
{
	"caller_id": "6816f79cc0a8016401c5a33fdfdbe07441",
	"opsramp_resource_id": "$defaultresource.uniqueId",
	"ipaddress": "$defaultresource.ipAddress",
	"macaddress": "$defaultresource.macAddress",
	"dnsname": "$defaultresource.dnsName",
	"hostname": "$defaultresource.name",
	"make": "$defaultresource.make",
	"model": "$defaultresource.model",
	"resourcetype": "$defaultresource.resourceTag.name",
	"systemuid": "$defaultresource.systemUID"
}
Sample CMDB response
External Entity ID : $result[0].sys_idSample CMDB response from ServiceNow
{
	"import_set": "ISET0010019",
	"staging_table": "x_opra_opsramp_int_opsramp_ci",
	"result": [{
		"transform_map": "OpsRamp CI Trans Map",
		"table": "cmdb_ci",
		"display_name": "name",
		"display_value": "Test_CI",
		"record_link": "https://demo.service-now.com/api/now/table/cmdb_ci/7a528149db8e27808fad9b3c8a961978",
		"status": "inserted",
		"sys_id": "7a528149db8e27808fad9b3c8a961978"
	}]
}
ServiceNow custom configuration
ServiceNow Kingston version supports OAuth2.0 authentication.
CMDB prerequisite
If integration is at the partner level, then a custom field to save OpsRamp Client ID
is already created in Company form with the name OpsRamp Client ID. Edit the company form layout to make its details visible and update with the OpsRamp Client ID. For example, client_1.
The details are used in the business rule script to route incidents to the right client in OpsRamp.
CMDB considerations
A custom field to save the already-created OpsRamp Resource ID in the cmdb_ci form with the name OpsRamp Resource ID.
Configuring the OpsRamp API in ServiceNow involves the following steps:
- Modifying Custom Fields
- Modifying OAUTH Detail
- Modifying REST Message
- Modifying Business Rule Script with OpsRamp Client ID
- (Optional) Adding Additional Fields
Modify custom CMDB fields
Modifying custom fields involves the following:
- Viewing OpsRamp Resource ID custom field
- Modifying OpsRamp Client ID custom field
View OpsRamp Resource ID custom CMDB field
Examine the custom fields in the ServiceNow cmdb_ci table to save the OpsRamp resource ID in ServiceNow CI. Configure the Form Layout to ensure the OpsRamp Resource ID column is visible in the CI form.
Modify OpsRamp client ID custom CMDB field
If integration is at the partner-level, then a custom field would have been created to save OpsRamp Client ID with the name OpsRamp Client ID.
Edit the Company form layout to make the Company form visible and update with the OpsRamp equivalent Client ID. For example, Client_1023.
This ID is used in the business rule script to route incidents to the designated client in OpsRamp.
Note
If integration is performed at the client-level, the OpsRamp Client ID does not have to be modified.Configure Form Layout to ensure the OpsRamp Client ID column is visible in the Company form. After creating the OpsRamp Client ID custom field, update the OpsRamp Client ID column for each company in ServiceNow.
Modify CMDB OAUTH
To configure OAUTH2.0 in ServiceNow:
- Create a user account
- Modify the OAuth provider
Create a CMDB user account
To create a user account:
- Click Organization in the left pane and click Users.
- Select New to create a new user.
- Provide the user details and click Submit.
- In the User profile, click the Roles tab and click Edit.
- From the Edit Members page, search for
x_opra_opsramp_int.adminunder Collection. - Assign
x_opra_opsramp_int.adminand click Save.
Modify the CMDB OAuth provider
OAuth provider is required to configure OpsRamp OAuth details to call APIs from ServiceNow. Perform the Inbound Configuration in OpsRamp before creating the OAuth provider.
To configure an OAuth provider:
Click System OAuth in the left pane and then click Application Registry.
Search for OpsRamp OAuth Provider and click to edit.
Modify the following details:
- Client ID: Provide OpsRamp OAuth2.0 key copied from OpsRamp.
- Client Secret: Provide OpsRamp OAuth2.0 secret copied from OpsRamp.
- Token URL: Provide OpsRamp OAuth token URL –
https://{Your OpsRamp domain}/auth/oauth/token. For example,https://api.vistanet.jp/auth/oauth/token.
Click Update to save the details.
Modify the CMDB REST message
REST messages are required to configure the OpsRamp API details. These REST messages are invoked in the business rule script depending on specific criteria.
Modifying REST message involves the following steps:
- Modify an endpoint in the REST message
- Modify an endpoint in the REST message HTTP methods
Modify the endpoint in the REST message for CMDB
Log into ServiceNow.
Click System Web Services in the left pane and click REST Message.
Search for OpsRamp CI REST and click Edit.
Modify the following details for the REST message:
- Change Endpoint in the REST message definition.
- Change Endpoint in the REST message HTTP methods (Create CI & Update CI)
Click Submit to save the details.
Modify the CMDB HTTP methods
After modifying the REST message, modify the HTTP methods as follows:
From the Rest Message OpsRamp CI REST page, navigate to the HTTP Methods tab.
Change the endpoint in the REST message HTTP methods for Create Incident and Update incident.
- Syntax:
https://{your OpsRamp domain}/api/v2/tenants/${tenantId}/incidents - Example:
https://api.vistanet.jp/api/v2/tenants/${tenantId}/incidents)
- Syntax:
Click Update.
Note
The placeholder in Endpoint is replaced in the business rule script.Modify the business rule script with the OpsRamp Client ID
A business rule is a server-side script that is run to display, insert, update, or delete a record (or to query a table).
To call OpsRamp APIs (details configured in the EST messages section) when a configuration item is created or updated, do the following:
- Define the conditions to trigger the rule
- Provide the script to invoke the API
To configure a business rule:
Click System Definition in the left pane and click Business Rule.
Search for the name OpsRamp CI BR and click the name to edit.
From the Business Rule page, provide when to run: Change the user name in Filter Conditions.
Replace the user name with the user created while modifying OAUth:
Created by is not the system administrator and/or
Updated by is not the system administrator.
Note that this filter condition is given to avoid looping so when OpsRamp API created or updated the incident in ServiceNow, the script did not invoke the integration back to OpsRamp, and the system administrator is the user created during authentication.
Advanced: Modify the script with the following considerations:
If integration is at the OpsRamp client level, navigate to the line with text
var opsRampClientId = 'client_1341'and replace it with the OpsRamp Client ID.If integration is at OpsRamp partner level,
- Go to the
var opsRampClientId = current.company.x_opra_opsramp_int_opsramp_client_idline and uncomment the line. - Navigate to the
var opsRampClientId = 'client_1341'line and comment out the line.
- Go to the
(Optional) Add more CMDB fields
As part of default configurations, only mandatory fields are added in a payload. You can add more fields according to specific requirements. Update the Import set and transform maps that are already created with these steps:
- Modify the import sets.
- Modify the transform map.
Modify CMDB import sets
Import sets allow data to be imported from various data sources and then mapped into ServiceNow tables. A staging table needs to be modified to add OpsRamp incident fields.
To add new fields:
- Click System Definition in the left pane and click Tables.
- Search for the table name
x_opra_opsramp_int_opsramp_ciand click the name to edit. - From the Columns section, click New to create new fields.
- Provide details about the new record and click Submit.
These fields are to be used for payloads configured for OpsRamp integration events.
Modify transform map
After adding new fields, make sure to add mapping for these fields in the Transform maps section.
To modify a transform map:
Click System Import Sets on the left pane and then click Transform Maps.
Search for the source table column
x_opra_opsramp_int_opsramp_ciand click the name to edit.Go to Field Maps and click New to create mappings for newly created fields.
Create the map with the following considerations:
- Map:
OpsRamp CI Trans - Map Source Table:
OpsRamp CI[x_opra_opsramp_int_opsramp_ci] - Target Table:
Configuration Item[cmdb_ci] - Source Field: Select the field that was created when the import sets were modified
- Target Field: Refers to the ServiceNow Incident field to map
- Coalesce: Inactive Use Source Script: Default
- Map: