Introduction
ServiceNow integration with OpsRamp is a bi-directional integration. OpsRamp provides the following two types of integration with ServiceNow:
- Incident Integration:
View an OpsRamp incident in ServiceNow (and vice versa). - CMDB Integration: Integrate OpsRamp Resources with third-party Configuration Item (CI) entities.
Important
The document describes how to complete ServiceNow Integration for inbound and outbound configurations. Inbound or outbound configurations can be created separately.ServiceNow incident management integration
Using incident integration, an OpsRamp incident can be viewed in ServiceNow (or vice versa).
Prerequisite
Configure the Service Desk priority matrix. For details, view how to manage Service Desk.
OpsRamp configuration
This section describes the configuration steps for ServiceNow Incident management integration.
To integrate ServiceNow:
- Select a client from the All Clients list.
- Go to Setup > Integrations > Integrations.
- From Available Integrations, select Collaboration > ServiceNow and click Install.
- From the Inbound Configuration tab, do the following:
- In the Authentication section:
- Select authentication type as OAuth2 and click Save.
- Take note of the Tenant ID, Key and Secret.
Note: These details are used in ServiceNow to create the OAuth provider.
- Click Save.
- In the Authentication section:
- From the Outbound Configuration tab, do the following:
- In the Integration Basic Configuration section, provide the following and Save.
configure basic notification details to trigger events defined:
- Notification type: REST API
- Base URI:
https://{servicenow-subdomain}.com.
For example:https://demo.servicenow.com - Authentication type: OAuth2
- Grant Type: Password Credentials
- Access Token:
URL:https://{servicenow-subdomain}.com/oauth_token.do
For example:https://demo.servicenow.com/oauth_token.do - Add Key, Secret, Username and Password.
- In the Integration Event section do the following steps to create an integration event:
- Click Add. Add Integration Event page appears.
- Provide a name for the integration event.
- Select the Entity from the first drop-down list.
- Select the Entity Type from the second drop-down menu.
- Select the Entity type event from the third drop-down list.
- Depending on the combination of selected Entity and Entity Type, the placeholders are updated in the right pane. Place Holders are the attributes that are used in the integration event API payload. Placeholders are categorized into Native, Additional and Custom Attributes.
- Provide the End Point URL.
- Select the Notification Type. Available options are REST API and SOAP API.
- Select the Authentication Type. Available options are BASIC and OAuth.
- Select the Web Method and provide the Headers and Payloads.
- View Integration Event Payloads under Verify Integration to view the URL, headers and payloads. Prerequisite: Modify Import Sets
- Provide the payload for the respective action and then click Save.
- In the Integration Basic Configuration section, provide the following and Save.
configure basic notification details to trigger events defined:
Notes
- To find caller_id, go to Organization > User. Select the user to use as the caller to incident and copy
sys_id. - A custom field already configured as response payload attribute for a given integration is not available for configuration in any other integrations. Remove the existing mapping from the integration to make the custom field available for mapping in the response payload from any other integration.
- To add more tokens to the payload, click the token in the placeholder list.
- To parse the properties returned in response for the configured API payload, select the property from the drop-down menu and provide the value. )
Verify integration
To validate if the integration is successful, do the following:
- Select the event from the drop-down menu and then select payload type.
- Provide the payload and then click Verify. A 200-OK success response is generated if the integration is successful.
Integration failures
In case of a failure in integration, a message is sent to the respective user. Select notification type Email, provide the email address, and click Save.
Integration event payloads
Refer to the integration event payload below to create an incident in ServiceNow.
Create incident in ServiceNow
| Fields | Values |
|---|---|
| Endpoint URL | https://{subdomain}.com/api/now/import/u_opsramp_incident |
| Headers |
|
| Method | POST |
Sample request
{
	"u_caller_id": "6816f79cc0a8016401c5a33be04be441",
	"u_status": "$incident.status.name",
	"u_impact": "$incident.businessImpact.name",
	"u_urgency": "$incident.urgency.name",
	"u_subject": "$incident.subject",
	"u_description": "$incident.impact",
	"u_opsramp_incident_id": "$incident.uniqueId"
}
Sample response
{
	"import_set": "ISET0013148",
	"staging_table": "u_opsramp_incident",
	"result": [{
		"transform_map": "OpsRamp Incident Trans Map",
		"table": "incident",
		"display_name": "number",
		"display_value": "INC0979030",
		"record_link": "https://{subdomain}.com/api/now/table/incident/c4372d5e0f971200500c00dce1050e56",
		"status": "inserted",
		"sys_id": "c4372d5e0f971200500c00dce1050e56"
	}]
}
ServiceNow configuration
ServiceNow Kingston version supports OAuth2 authentication with Basic authentication.
Configuring the OpsRamp API in ServiceNow involves the following:
- Configuring Custom Fields
- Configuring OAuth
- Configuring REST Message
- Configuring Import Set
- Configuring Transform Map
- Configuring Business Rule
Configure custom fields
Create the custom fields as below:
- OpsRamp Incident ID custom field
- OpsRamp Client ID custom field
OpsRamp Incident ID custom field
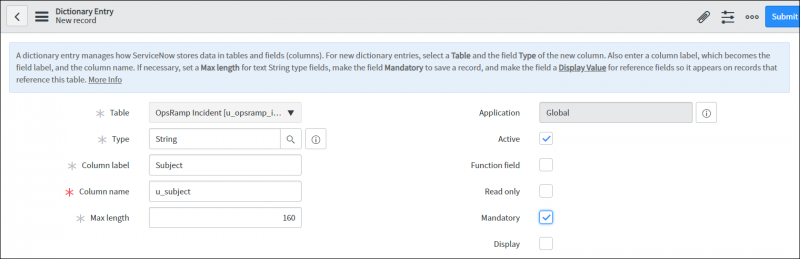
A custom field needs to be created in the ServiceNow incident table to save the OpsRamp Incident ID as a ServiceNow incident.
To create an OpsRamp Incident ID custom field:
- Log into ServiceNow.
- Click System Definition on the left pane and click Dictionary.
- Select New to create a new field.
- Provide the following details:
- Table: Select Incident[incident] table
- Application: Default value
- Type: Select String
- Active: Active
- Column label: Provide a name to the custom field (Example: OpsRamp Incident ID)
- Function Field: Default value
- Column name: Auto-generated if Column label is provided
- Read only: Default value
- Max length: 64
- Mandatory: Default value
- Display: Default value
- Click Submit to save details.
- Configure Form Layout to ensure that OpsRamp Incident ID column is visible in the Incident form.
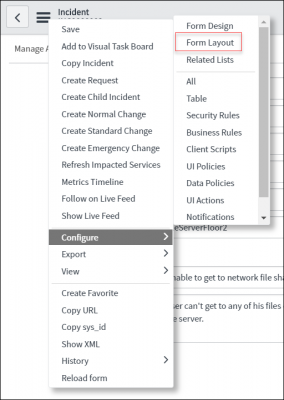
Configuring the Form Layout
OpsRamp Client ID custom field
Create a custom field (OpsRamp Client ID) in the ServiceNow Company table to save the OpsRamp Client ID.
Note
- Create custom field (OpsRamp Client ID) if integration is performed at OpsRamp Partner level.
- If integration is performed at the client level, the OpsRamp Client ID does not need to be configured.
To create an OpsRamp Client ID custom field:
- Click System Definition on the left pane and then click Dictionary.
- Select New to add a field.
- Provide the required details:
- Table: Select
Company[core_company]table - Application: Default value
- Type: Select
String - Active: Active
- Column label: Provide a name to custom field (Example: OpsRamp Client ID)
- Function Field: Default value
- Column name: Auto-generated if the Column label is provided
- Read only: Default value
- Max length: 64
- Mandatory: Default value
- Display: Default value
- Table: Select
- Click Submit to save details.
- Configure Form Layout to ensure that OpsRamp Client ID is visible in the Company form.
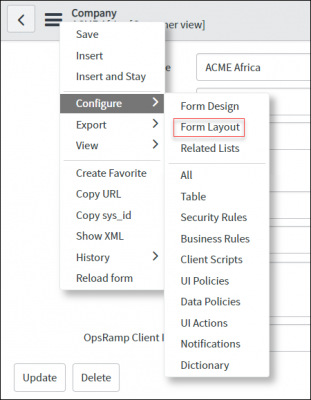
Configuring the Company Form Layout
After creating the OpsRamp Client ID custom field, update the OpsRamp client ID column for each company in ServiceNow.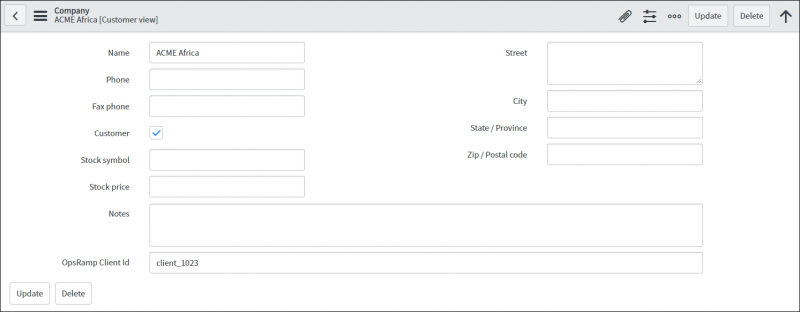
Updating the Client ID
Configure OAuth
The process of configuring OAuth in ServiceNow involves the following steps:
- Create a user account
- Configure the OAuth profile:
- Create an OAuth client
- Create an OAuth provider
Create a user account
To create a user account:
- Click Organization on the left pane and click Users.
- Select New to add a user.
- Provide the user details and click Submit.
- In the User profile, click the Roles tab, and click Edit.
- Select the roles required (rest_service and web_service_admin).
- Click Done.
Configure OAuth profile
Validate if OAuth2 plugin is Active.
- Click System Definition on the left pane and click Plugins.
- Verify the status of the OAuth2 plugin.
Creating the OAuth client is a prerequisite to generate the Client ID and the Client Secret.
Both fields are required to configure the ServiceNow authentication details.
To create an OAuth client:
- Click System OAuth on the left pane and click Application Registry.
- Click New to add an Application Registry.
- Click Create an OAuth API endpoint for external client.
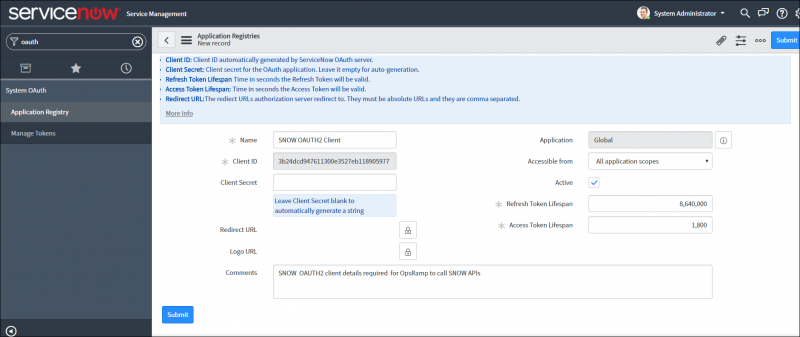
- Provide the following details in the Application Registries page:
- Name: Provide a name (Example: SNOW OAuth2Client)
- Application: Default value -Global
- Client ID: Auto-generated
- Accessible from: Default value - All application scopes
- Client Secret: Auto-generated
- Active: Select Active
- Refresh Token Lifespan: Default value - 8,640,000
- Access Token Lifespan: Default value - 1800
- Redirect URL: Optional
- Logo URL: Optional
- Comments: Provide comments about the client.
Example: SNOW OAuth2client details required for OpsRamp to call SNOW APIs
- Click Submit.
Before configuring OpsRamp OAuth details to call APIs from ServiceNow, configure the OAuth provider.
Perform the Inbound Configuration in OpsRamp before creating the OAuth provider.
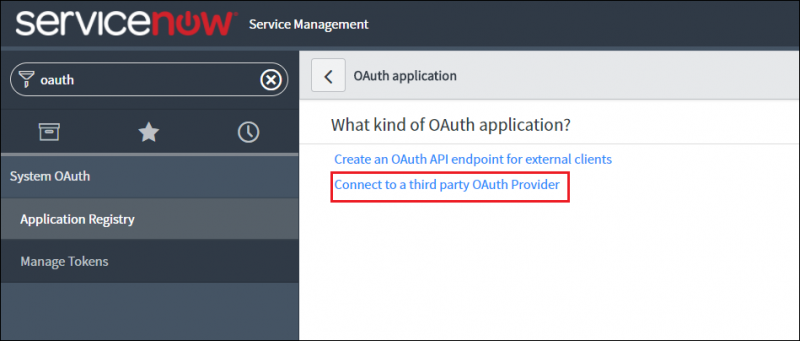
To configure the OAuth provider:
- Click System OAuth on the left pane and then click Application Registry.
- Click New from the Application Registry drop-down menu.
- Click Connect to a third party OAuth provider.
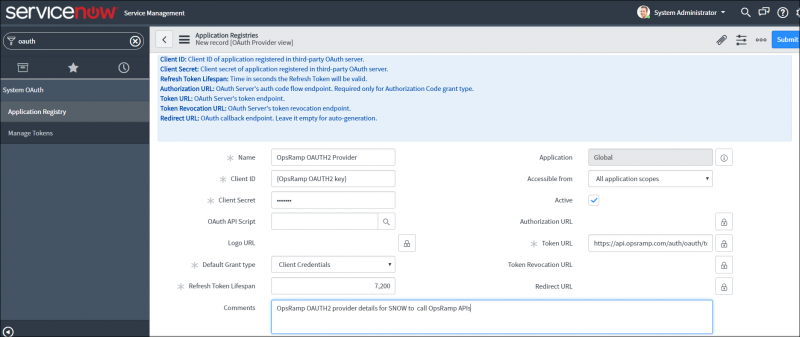
- Provide the details in Application Registries page:
- Name: Give a name
Example:OpsRamp OAuth2 Provider - Application: Default value - Global
- Client ID: Provide OpsRamp OAuth2 key
- Accessible from: Default value - All application scopes
- Client Secret: Provide OpsRamp OAuth2 secret
- Active: Select Active
- OAuth API Script: Optional
- Authorization URL: Optional
- Logo URL: Optional
- Token URL: Provide OpsRamp OAuth token URL as
https://{Your OpsRamp domain}/auth/oauth/token
Example:https://api.vistanet.jp/auth/oauth/token - Default Grant Type: Select Client Credentials
- Token Revocation URL: Optional
- Refresh Token Lifespan: Optional - 7200
- Redirect URL: Optional
- Comments: Provide SNOW OAuth2 client details required for OpsRamp to call SNOW APIs.
- Name: Give a name
- Click Submit to save the details.
Provide SNOW OAuth2 Client Details
Configure a REST message
Configure REST messages before configuring the OpsRamp API details. REST messages can be invoked with a business rule script when certain configuration conditions are met.
Configuring a REST message involves the following steps:
- Configure a REST message
- Configure a REST message using the HTTP method:
- Create Incident HTTP method
- Update Incident HTTP method
To configure a REST message
- Log into ServiceNow.
- Click System Web Services on the left pane and click REST Message.
- Select New to create a REST message.
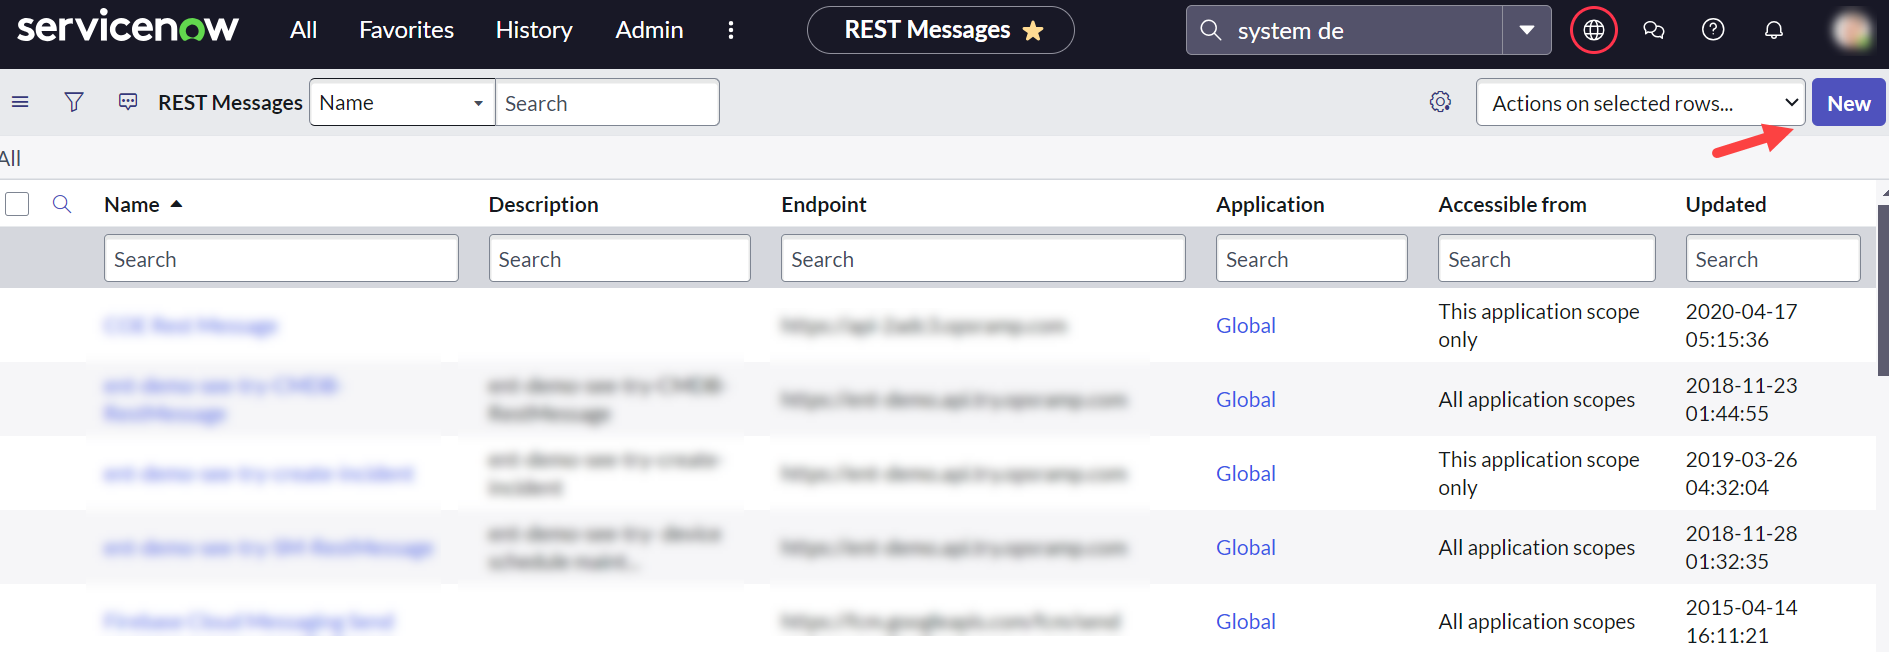
Configure a REST Message
- Provide details for the REST message:
- Name: Provide a name for the REST message. This name is required in business rule script
Example: OpsRamp Create Incident - Application: Default value - Global
- Accessible from: Default value - This application scope only
- Description: Provide description about REST message
Example: Rest message to call OpsRamp create incident API - Endpoint: https://{your OpsRamp domain}
Example:https://api.vistanet.jp - Authentication:
- Authentication type: Select OAuth 2.0
- OAuth profile: Search profiles and select OAuth provider profile created in the OAuth section
Example: OpsRamp OAuth2Provider default profile
- HTTP Request: No configurations required
- Name: Provide a name for the REST message. This name is required in business rule script
- Click Submit to save the details.
Save a REST Message Configuration
Note
To learn more about APIs, view Getting started with APIs.Configure REST message HTTP method
After creating a REST message, the following HTTP methods can be created to configure OpsRamp create/update incident API details.
- Create an incident HTTP method
- Update an Incident HTTP method
Step 1: Create an incident HTTP method
- Click New on the HTTP method page.
- Provide details in HTTP Method page.
- REST Message: Auto populates OpsRamp Create Incident REST
- Application: Default value - Global
- Name: Provide a name (Example: Create Incident)
- HTTP Method: Select POST
- Endpoint:
https://{your OpsRamp domain}/api/v2/tenants/${tenantId}/incidents
Example:https://api.vistanet.jp/api/v2/tenants/${tenantId}/incidents - Authentication: Authentication type: Select
Inherit from Parent. As authentication details are already configured in the REST message, its details are inherited.
- Click Submit.
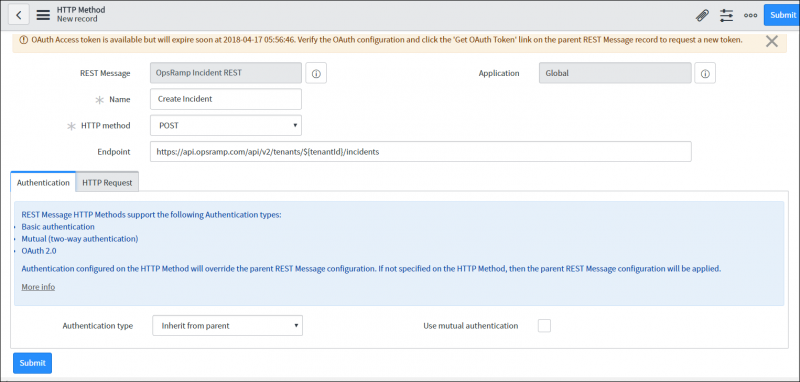
Create an Incident HTTP Method
Note
The placeholder inEndpoint is replaced in the business rule script.HTTP request
| Fields | Values |
|---|---|
| HTTPS Headers | Create Content-Type header
|
| HTTP Query Parameters | Provide OpsRamp create incident payload |
Sample payload
{
	"subject": "${subjectToken}",
	"description": "${descriptionToken}",
	"priority": "${priorityToken}",
	"extTicketId": "${extTicketIdToken}"
}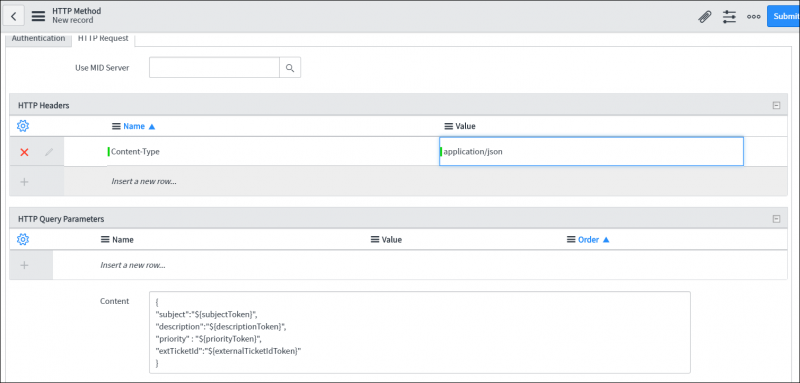
Payload for an Incident HTTP Method
Step 2: Update an incident HTTP method
To configure OpsRamp update incident API:
- Click New on the HTTP method page.
- Provide following details:
- REST Message: Automatically populates OpsRamp Update Incident REST
- Application: Default value - Global
- Name: Provide a name (Example: Update Incident)
- HTTP Method: Select
POST - Endpoint:
https://{your OpsRamp domain}/api/v2/tenants/${tenantId}/incidents/${incidentId}
For example:https://api.vistanet.jp/api/v2/tenants/${tenantId}/incidents/${incidentId}) - Authentication: Authentication type: Select
Inherit from Parent. As authentication details are already configured in the REST message, its details are inherited.
- Click Submit.
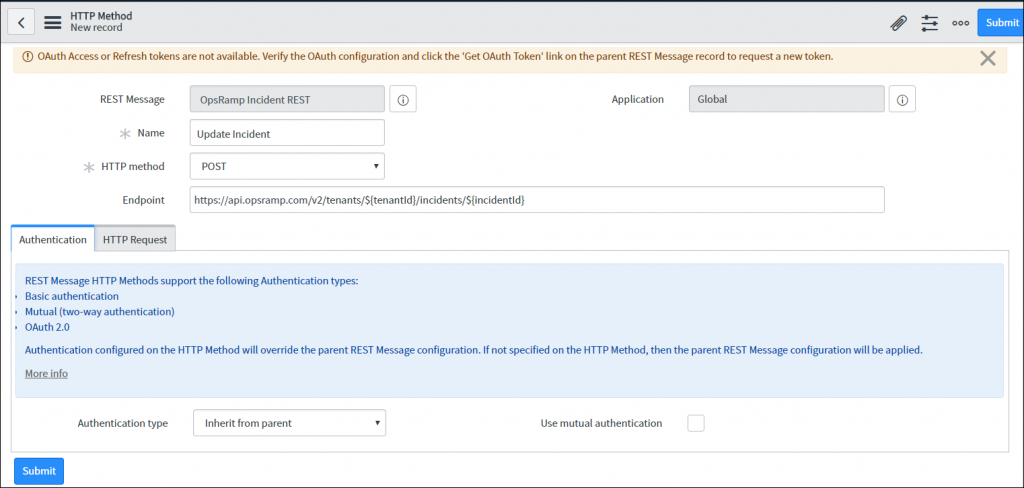
Update an Incident HTTP Method
Note
The placeholder inEndpoint is replaced in the business rule script.HTTP Request
| Fields | Values |
|---|---|
| HTTPS Headers | Create Content-Type header
|
| HTTP Query Parameters | Provide OpsRamp update incident payload |
Sample payload
{
	"priority": "${priorityToken}",
	"status": "${statusToken}",
	"response": {
		"description": "${responseToken}"
	}
}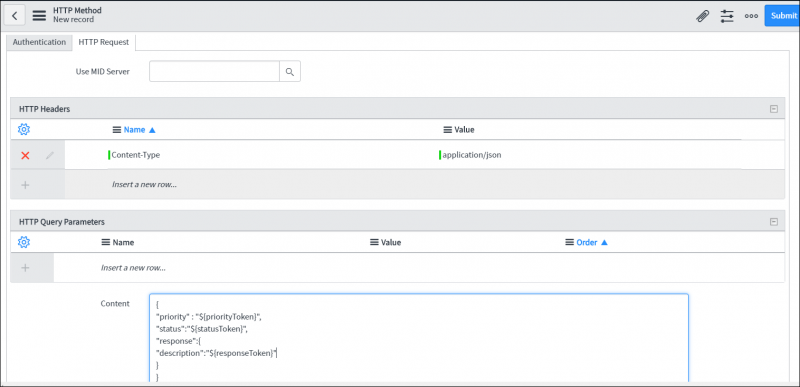
Payload for an Incident HTTP Method
Configure import set
Import sets allow user to import data from various data sources and map the data into ServiceNow tables. To create a staging table to save OpsRamp incident columns, do the following:
- Create a table
- Create table columns
Create a table
To create a table:
- Click System Definition on the left pane and click Tables.
- Select New to create a table.
- Fill required details:
- Label: Provide a label to the table
Example: OpsRamp Incident - Application: Default value
- Name: Auto-generated when if a label is provided
- Create module: Default value
- Create mobile module: Default value
- Add module to menu: Default value
- Extends table: Select
Import Set Row
- Label: Provide a label to the table
- Click Submit to save table.

Create a Staging Table
Create table columns
To create table columns:
- Select the created table name (OpsRamp Incident[u_opsramp_incident]) from the Table drop-down menu.
Create a Table Columns
- On the Columns tab, click New to create a table column. The following fields are mandatory (more columns can be added as needed):
| Column Label | Table | Application | Type | Active | Function Field | Column name | Read only | Max Length | Mandatory | Display |
|---|---|---|---|---|---|---|---|---|---|---|
| Caller ID | OpsRamp Incident[u_opsramp_incident] | Default Value | String | Active | Default Value | Auto-generated value | Inactive | 32 | Active | Inactive |
| Description | OpsRamp Incident[u_opsramp_incident] | Default Value | String | Active | Default Value | Auto-generated value | Inactive | 4000 | Active | Inactive |
| Impact | OpsRamp Incident[u_opsramp_incident] | Default Value | String | Active | Default Value | Auto-generated value | Inactive | 32 | Active | Inactive |
| OpsRamp Client ID | OpsRamp Incident[u_opsramp_incident] | Default Value | String | Active | Default Value | Auto-generated value | Inactive | 64 | Active | Inactive |
| OpsRamp Incident ID | OpsRamp Incident[u_opsramp_incident] | Default Value | String | Active | Default Value | Auto-generated value | Inactive | 64 | Active | Inactive |
| Status | OpsRamp Incident[u_opsramp_incident] | Default Value | String | Active | Default Value | Auto-generated value | Inactive | 32 | Active | Inactive |
| Subject | OpsRamp Incident[u_opsramp_incident] | Default Value | String | Active | Default Value | Auto-generated value | Inactive | 160 | Active | Inactive |
| Urgency | OpsRamp Incident[u_opsramp_incident] | Default Value | String | Active | Default Value | Auto-generated value | Inactive | 32 | Active | Inactive |
| Work Notes | OpsRamp Incident[u_opsramp_incident] | Default Value | String | Active | Default Value | Auto-generated value | Inactive | 4000 | Inactive | Inactive |
An example set of table columns:
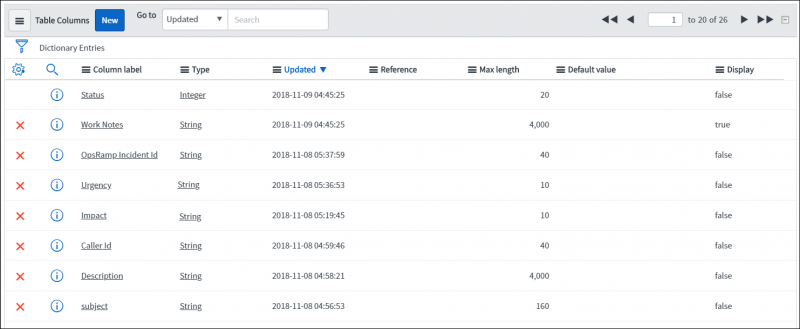
Creating ServiceNow Table Columns
Configure transform map
Configuring the transform map involves the following steps:
- Creating a transform map.
- Configuring field maps.
Create transform map
A transform map is a set of field maps that determines the relationships between fields in an import set and fields in an existing ServiceNow table. The relationship between the staging table created using import sets needs to be defined with the incident table.
To create a transform map:
- Click System Import Sets on the left pane and then click Transform Maps.
- Select New to create a Transform Map.
- Provide the required details:
- Name: Provide a name to transform map
Example: OpsRamp Incident Trans Map - Created: Default value
- Source table: Select staging table created (
OpsRamp Incident[u_opsramp_incident]) - Target table: Select
incident[Incident] - Active: Active
- Order: Default value
- Run business rules: Active
- Run script: Active. Place
INC_Trans_map_script.jsin the script field - Enforce mandatory fields: Select
No - Copy empty fields: Default value
- Name: Provide a name to transform map
- Click Submit to save the details.
Configure field maps
After creating Transform Map, configure field maps for each column in the staging table
u_opsramp_incident with the incident table.
To configure field maps:
- Select the transform map created (OpsRamp Incident Trans Map) from the Map drop-down menu.
- Click New on the Field Maps page.
- Create map for the following columns:
| Map | Source Table | Target Table | Source Field | Target Field | Coalesce | Use Source Script |
|---|---|---|---|---|---|---|
| OpsRamp Incident Trans Map | OpsRamp Incident[u_opsramp_incident] | incident | Subject (u_subject) | Short Description (short_description ) | Inactive | Inactive |
| OpsRamp Incident Trans Map | OpsRamp Incident[u_opsramp_incident] | incident | Description (u_description) | Description (description) | Inactive | Inactive |
| OpsRamp Incident Trans Map | OpsRamp Incident[u_opsramp_incident] | incident | Status (u_status) | State (state) | Inactive | Inactive |
| OpsRamp Incident Trans Map | OpsRamp Incident[u_opsramp_incident] | incident | Impact (u_impact) | Impact (impact) | Inactive | Inactive |
| OpsRamp Incident Trans Map | OpsRamp Incident[u_opsramp_incident] | incident | Urgency (u_urgency) | Urgency (urgency) | Inactive | Inactive |
| OpsRamp Incident Trans Map | OpsRamp Incident[u_opsramp_incident] | incident | Caller ID (u_caller_id) | Caller ID (u_caller_id) | Inactive | Inactive |
| OpsRamp Incident Trans Map | OpsRamp Incident[u_opsramp_incident] | incident | OpsRamp Incident ID (u_opsramp_incident_id) | OpsRamp Incident ID (u_opsramp_incident_id) | Active | Inactive |
| OpsRamp Incident Trans Map | OpsRamp Incident[u_opsramp_incident] | incident | OpsRamp Client ID (u_opsramp_client_id) | OpsRamp Client ID (u_opsramp_client_id) | Inactive | Inactive |
| OpsRamp Incident Trans Map | OpsRamp Incident[u_opsramp_incident] | incident | Work Notes (u_work_notes) | Work Notes (u_work_notes) | Inactive | Inactive |
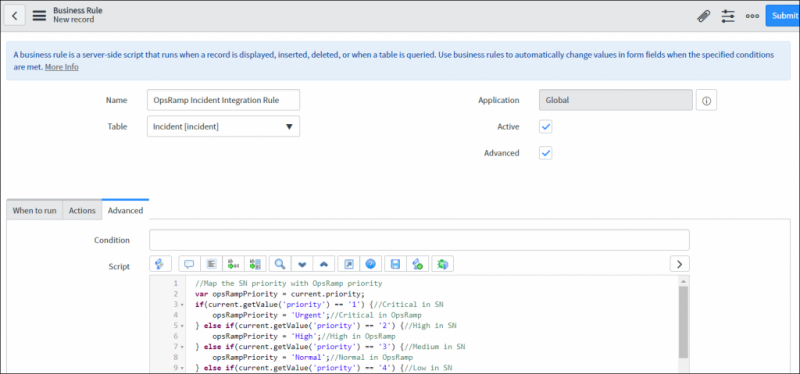
Configure a business rule
A business rule is a server-side script that is run to query a table or to display, insert, update, or delete a record.
To call OpsRamp APIs (details configured in the REST messages section) when an incident is created or updated:
- Define the conditions to trigger the rule
- Provide the script to invoke the API
To configure the business rule:
- Click System Definition on the left pane and click Business Rule.
- Select **New **to configure the business rule.
- Provide details in the Business Rule page and click Submit..
Name: Provide a name for the business rule
Example: OpsRamp Incident Integration RuleApplication: Default value - Global
Table: Select the table on which the business rule runs
Example: Incident to create an incidentActive: Select Active
Advanced: Select Active
When to run: Specify when to run the business rule.
- When: Default value - after. Select after and then Insert. The option specifies that run the business rule after a record is inserted into the database.
- Order: Default value - 100. Order specifies the sequence in which the rule is executed.
- Insert: Select Active
- Update: Select Active
- Delete: Optional
- Query: Optional
- Filter Conditions:
- Created by is not System Administrator AND/OR
- Updated by is not System Administrator
Note: The filter condition is designed to avoid looping. For example, when the OpsRamp API creates or updates an incident in ServiceNow, the script does not invoke the integration to OpsRamp.
- Actions: No configuration required
- Advanced:
- Condition: Optional
- Script: Provide the script
Click Submit.
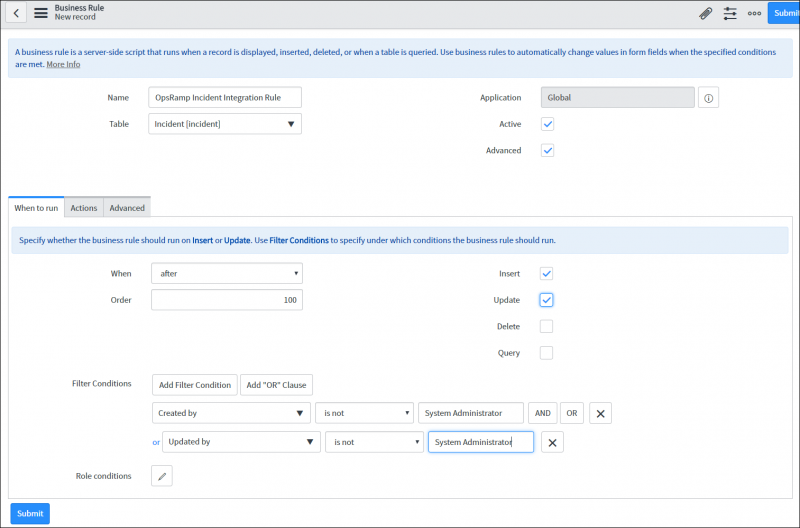
When to Run the Business Rule
Notes
- Create a custom field OpsRamp Incident ID in the ServiceNow incident table to save the OpsRamp incident ID. In the sample script, the custom field is u_opsramp_incident_id.
- If integration is at the OpsRamp client level, then replace the variable OpsRampClientId
with the OpsRamp client ID in the sample script.
Example:var opsRampClientId = 'client_12345' - If integration is at the OpsRamp partner level:
- Create a custom field OpsRamp Client ID in the ServiceNow Company table to save the OpsRamp client ID. In the sample script, the custom field is u_opsramp_client_id.
- The custom field should take the value OpsRampClientId. Example:
var opsRampClientId _=_ current.company.u_opsramp_client_id.
Sample Business Rule Script
Note
If the activity has multiple rules running, then rules are run priority order from low to high.CMDB integration
For the ServiceNow CMDB integration with OpsRamp, the following shows how to do ServiceNow Integration with OpsRamp.
OpsRamp configuration
This section describes the configuration steps for ServiceNow CMDB integration.
- From All Clients, select a client.
- Go to Setup > Integrations > Integrations.
- From Available Integrations, select Collaboration > ServiceNow.
- Click Install.
- In the Inbound Configuration tab, provide the following:
- In the Authentication section, select authentication type as OAuth2.
Retain the Tenant ID, Key, and Secret information. This information is used in ServiceNow to create the OAuth provider. - Click Save.
- In the Authentication section, select authentication type as OAuth2.
- In the Outbound Configuration tab, provide the following:
- Prerequisite: The OAuth Client needs to be created in ServiceNow first.
- In the Integration Basic Configuration section, configure basic notification details to trigger events defined:
- Notification type: REST API
- Base URI: Base URL of ServiceNow instance
Example:https://demo2577.service-now.com - Authentication type: OAuth2
- Grant Type: Password Credentials
- Access Token URL: Access Token URL of ServiceNow instance
Example:https://{subdomain}.com/oauth_token.do - Key, Secret, Username, and** Password.
- Click Save.
- In the Integration Event section do the following steps to create an integration event:
- Click Add. The Add Integration Event page appears.
- Provide a name for the integration event.
- Select (resource/Any Resource/Create) for the field On.
- Select the Entity from the first drop-down list.
- Select the Entity Type from the second drop-down list.
- Select the Entity type event from the third drop-down list.
- Depending on the combination of selected Entity and Entity Type, the placeholders are updated in the right pane. Placeholders are the attributes that are used in the integration event API payload. Placeholders are categorized into Native, Additional, and Custom Attributes.
- Select Parent Configuration to assign the configured basic integration details.
- Select the web method as POST and provide the headers name and value. Go to Integration Event Payloads under Verify Integration to view the URL, headers, and payloads.
Prerequisite: Configure Import Sets - Provide the payload for the respective action and then click Save.
- A custom field already configured as response payload attribute for a given integration is not available for configuration in any other integrations. Remove the existing mapping from the integration to make the custom field available for mapping in response payload of any other integration.
- To add more tokens to the payload, click the token in the placeholder list.
- To parse the properties returned in response for the configured API payload, select the property from the drop-down menu and provide the value.
Verify integration
To validate if the integration is successful, do the following:
- Select the event from the drop-down and select the payload type.
- Provide the payload and then click Verify. A 200-OK success response is generated if the integration is successful.
Integration failures
In case of a failure in integration, a message is sent to the user. Select notification type Email, provide the email address, and click Save.
Integration event payloads
In event configuration, define web methods, payload data, and the endpoint URL to post the data to ServiceNow.
Refer to the integration event payload below to create CMDB in ServiceNow.
| Fields | Values |
|---|---|
| Endpoint URL | {ServiceNow Base URI}/api/now/import/u_opsramp_ciExample: https://demo2577.service-now.com/api/now/import/u_opsramp_ci |
| Headers |
|
| Method | POST |
Sample request
{
	"u_caller_id": "6816f79cc0a8016401c5a33fdfdbe07441",
	"u_opsramp_resource_id": "$defaultresource.uniqueId",
	"u_ipaddress": "$defaultresource.ipAddress",
	"u_macaddress": "$defaultresource.macAddress",
	"u_dnsname": "$defaultresource.dnsName",
	"u_hostname": "$defaultresource.name",
	"u_make": "$defaultresource.make",
	"u_model": "$defaultresource.model",
	"u_resourcetype": "$defaultresource.resourceTag.name",
	"u_systemuid": "$defaultresource.systemUID"
}
Sample response
External Entity ID : $result[0].sys_idResponse from ServiceNow
{
	"import_set": "ISET0010019",
	"staging_table": "u_opsramp_ci",
	"result": [{
		"transform_map": "OpsRamp CI Trans Map",
		"table": "cmdb_ci",
		"display_name": "name",
		"display_value": "Test_CI",
		"record_link": "https://demo.service-now.com/api/now/table/cmdb_ci/7a528149db8e27808fad9b3c8a961978",
		"status": "inserted",
		"sys_id": "7a528149db8e27808fad9b3c8a961978"
	}]
}
ServiceNow configuration
ServiceNow Kingston version supports OAuth2 authentication. Configuring OpsRamp API in ServiceNow involves the following:
- Configuring custom fields
- Configuring OAuth
- Configuring REST message
- Configuring import sets
- Configuring transform map
- Configuring business rule
Configure custom fields
Create the following custom fields:
- OpsRamp Resource ID Custom Field
- OpsRamp Client ID Custom Field
OpsRamp resource ID custom field
Create a custom field in ServiceNow cmdb_ci table to save OpsRamp resource ID in ServiceNow CI.
To create OpsRamp Resource ID Custom Field:
- Log into ServiceNow.
- Click System Definition on the left pane and click Dictionary.
- Select New to create a new field.
- Provide the required details:
-Table: Select
Configuration Item[cmdb_ci]table- Application: Default value
- Type: Select
String - Active: Active
- Column label: Provide a name to custom field
Example: OpsRamp Resource ID - Function Field: Default value
- Column name: Auto-generated when if Column label is provided
- Read only: Default value
- Max length: 64
- Mandatory: Default value
- Display: Default value
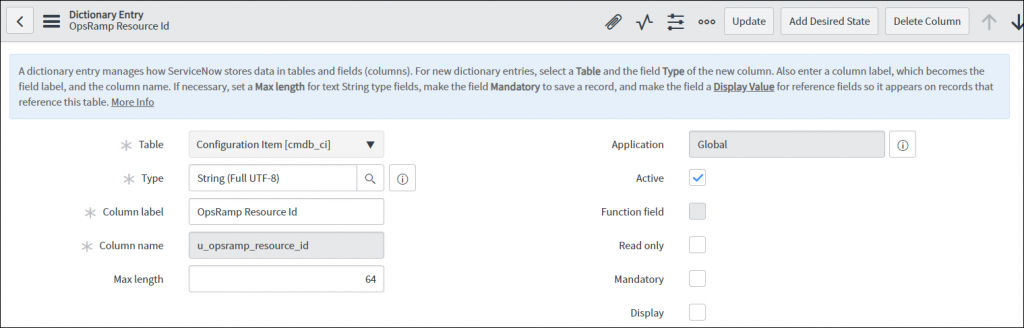
Create a Resource ID Custom Field
- Click Submit to save details.
- Configure the Form Layout to ensure that the OpsRamp Resource ID column is visible in the CI form.

Verify the Resource ID Column Is Visible
OpsRamp Client ID Custom Field
Create a custom field (OpsRamp Client ID) in the ServiceNow Company table to save the OpsRamp Client ID as follows:
- Create OpsRamp Client ID if integration is performed at the OpsRamp partner level.
- Do not configure the OpsRamp Client ID if integration is performed at the client level.
To create the OpsRamp Client ID custom field:
- Click System Definition on the left pane and click Dictionary.
- Select New to create a field.
- Provide the required details:
- Table: Select
Company[core_company]table - Application: Default value
- Type: Select String
- Active: Active
- Column label: Provide a name to custom field
Example: OpsRamp Client ID - Function Field: Default value
- Column name: Auto-generated when if Column label is provided
- Read only: Default value
- Max length: 64
- Mandatory: Default value
- Display: Default value
- Table: Select
- Click Submit to save details.
- Configure Form Layout to ensure that OpsRamp Client ID column is visible in the Company form.
Configuring the Company Form Layout
After creating OpsRamp Client ID custom field, update OpsRamp client ID column for each company in ServiceNow.Updating the Client ID with Each Company in ServiceNow
Configure OAuth
To configure OAuth2 in ServiceNow:
- Create a user account
- Configure an OAuth Profile
- Create the OAuth client
- Create the OAuth provider
Create a user account
To create a user account:
- Click Organization on the left pane and click Users.
- Select New to create a user.
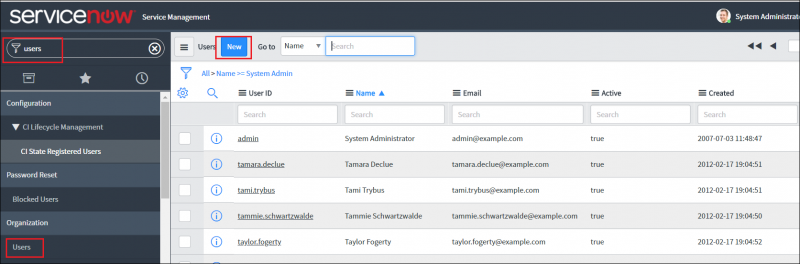
Create a Company in ServiceNow
- Provide the user details and click Submit.
- In User profile, click the Roles > Edit.
Create a Company in ServiceNow
- Select the roles required (rest_service and web_service_admin) and click Done.
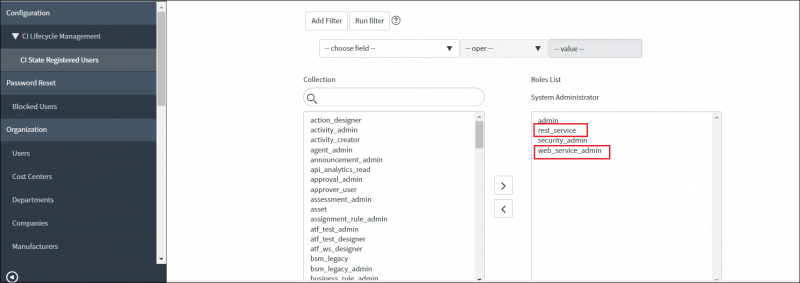
Role Selection in ServiceNow
Configure the OAuth profile
Validate if OAuth2 plugin is Active.
To do validation:
- Click System Definition on the left pane and click Plugins.
- Check the status of OAuth2 plugin.
Create OAuth Client
OAuth client is required to generate Client ID and Client Secret that are in turn required to configure ServiceNow authentication details in OpsRamp.
To create an OAuth client:
- Click System OAuth on the left pane and then click Application Registry.
- Click New to create an Application Registry.
- Click Create an OAuth API endpoint for external client.

Creating an OAuth API Endpoint
- Provide the following details in the Application Registries page:
- Name: Provide a name
Example: SNOW OAuth2 Client - Application: Default value -Global
- Client ID: Auto-generated
- Accessible from: Default value - All application scopes
- Client Secret: Auto-generated
- Active: Select Active
- Refresh Token Lifespan: Default value - 8,640,000
- Access Token Lifespan: Default value - 1800
- Redirect URL: Optional
- Logo URL: Optional
- Comments: Provide comments about the client.
Example: SNOW OAuth2 client details required for OpsRamp to call SNOW APIs
- Name: Provide a name
- Click Submit.
Creating an OAuth Client in ServiceNow
Create OAuth Provider
An OAuth provider is required to configure the OpsRamp OAuth details to call APIs from ServiceNow. Before creating an OAuth Provider, do Inbound configuration in OpsRamp.
To configure OAuth provider:
Click System OAuth on the left pane and click Application Registry.
Click New from the Application Registry drop-down.
Click Connect to a third party OAuth provider.
Connecting to an OAuth Provider
Provide the details in Application Registries page:
- Name: Give a name
Example: OpsRamp OAuth2 Provider - Application: Default value - Global
- Client ID: Provide OpsRamp OAuth2 key
- Accessible from: Default value - All application scopes
- Client Secret: Provide OpsRamp OAuth2 secret
- Active: Select Active
- OAuth API Script: Optional
- Authorization URL: Optional
- Logo URL: Optional
- Token URL: Provide OpsRamp OAuth token URL -
https://{Your OpsRamp domain}/auth/oauth/token.
Example:https://api.vistanet.jp/auth/oauth/token - Default Grant Type: Select Client Credentials
- Token Revocation URL: Optional
- Refresh Token Lifespan: Optional - 7200
- Redirect URL: Optional
- Comments: Provide SNOW OAuth2 client details required for OpsRamp to call SNOW APIs
- Name: Give a name
Click Submit to save the details.
Configuring an OAuth Provider
Configure a REST message
REST messages are used to configure OpsRamp API details. REST messages can be invoked from a business rule script depending on certain criteria.
Perform the following steps to configure a REST message:
- Configure a REST message
- Configure a REST message using the HTTP method:
- Create a resource using the HTTP method
- Update a resource using the HTTP method
Procedure to configure a REST message
- Log into ServiceNow.
- Click System Web Services on the left pane and then click REST Message.
- Select New to create a REST message.
Configuring a REST Message
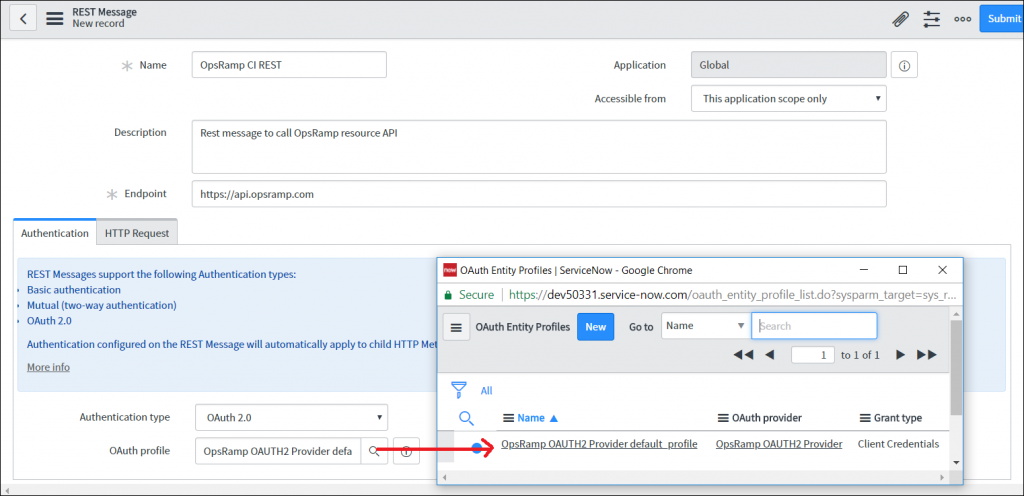
- Provide the details for the REST message.
- Name: Provide a name for the REST message. This name is required in the business rule script (Example: OpsRamp CI REST)
- Application: Default value - Global
- Accessible from: Default value - This application scope only
- Description: Provide description about REST message
Example: Rest message to call OpsRamp resource API - Endpoint:
https://{your OpsRamp domain}
Example:https://api.vistanet.jp - Authentication:
- Authentication type: Select OAuth 2.0
- OAuth profile: Search profiles and select OAuth provider profile created in OAuth section
Example: OpsRamp OAuth2 Provider default profile
- HTTP Request: No configurations required
Note
To learn more about APIs, view [Getting started with APIs](/api/api-getting-started/).
- Click Submit to save the details.
Configure a REST message using the HTTP Method
After creating the REST message, use the following HTTP methods to configure the OpsRamp resource API details:
- Create the resource using the HTTP method
- Update a resource using the HTTP method
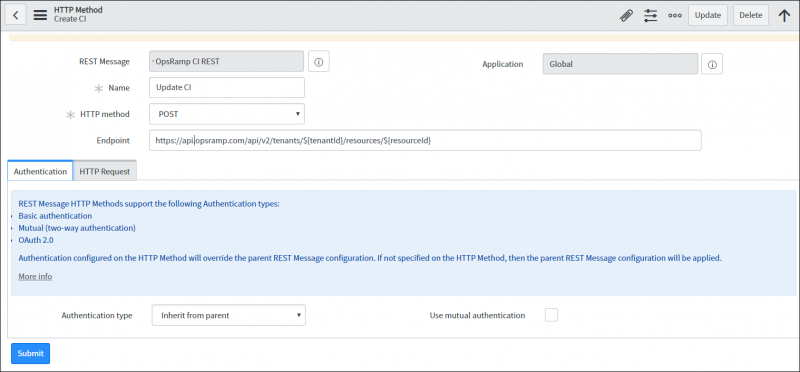
Step 1: Create the resource using the HTTP method
- Click New on the HTTP method page.
- Provide details in the HTTP Method page.
- REST Message: Automatically populates OpsRamp CI REST
- Application: Default value - Global
- Name: Provide a name (Example: Create)
- HTTP Method: Select
POST - Endpoint:
https://{your OpsRamp domain}/api/v2/tenants/${tenantId}/resources
Example:https://api.vistanet.jp/api/v2/tenants/${tenantId}/resources - Authentication: Authentication type - Select Inherit from Parent. Since authentication details are pre-configured in the REST message, the details are automatically inherited.
- Click Submit.
Create Using the Resource HTTP Method
Note
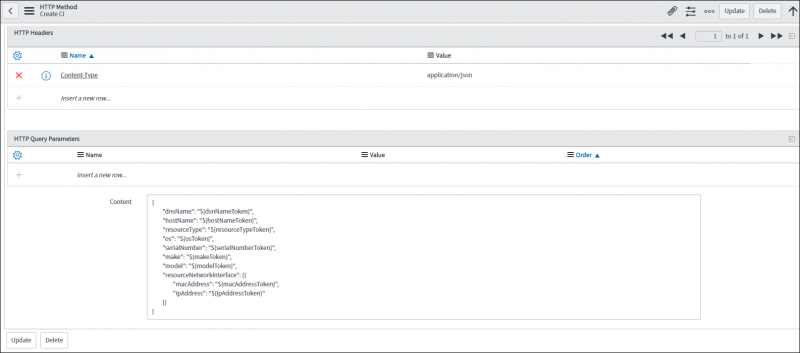
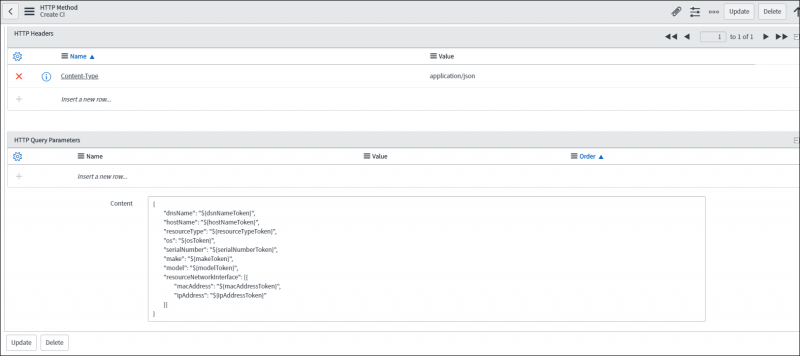
The placeholder in Endpoint is replaced in the business rule script.HTTP Request
| Fields | Values |
|---|---|
| HTTPS Headers | Create Content-Type header
|
| HTTP Query Parameters | Provide OpsRamp create resource payload |
Sample payload
{
	"dnsName": "${dsnNameToken}",
	"hostName": "${hostNameToken}",
	"resourceType": "${resourceTypeToken}",
	"os": "${osToken}",
	"serialNumber": "${serialNumberToken}",
	"make": "${makeToken}",
	"model": "${modelToken}",
	"resourceNetworkInterface": [{
		"macAddress": "${macAddressToken}",
		"ipAddress": "${ipAddressToken}"
	}]
}
Resource HTTP Method Sample Payload
Step 2: Update a resource using the HTTP method
To configure OpsRamp update resource API:
Click New on the HTTP method page.
Provide details:
- REST Message: Automatically populates OpsRamp CI REST
- Application: Default value - Global
- Name: Provide a name
Example: Update - HTTP Method: Select
POST - Endpoint:
https://{your OpsRamp domain}/api/v2/tenants/${tenantId}/resources/${resourceId}
Example:https://api.vistanet.jp/api/v2/tenants/${tenantId}/resources/${resourceId} - Authentication: Authentication type - Select Inherit from Parent. As authentication details are configured already in REST message, the details are inherited.
Update Resource HTTP Method
Click Submit.
Note
The placeholder in Endpoint is replaced in the business rule script.Sample HTTP Request
| Fields | Values |
|---|---|
| HTTPS Headers | Create Content-Type header
|
| HTTP Query Parameters | Provide OpsRamp update resource payload |
Sample payload
{
    "dnsName": "${dsnNameToken}",
        "hostName": "${hostNameToken}",
        "resourceType": "${resourceTypeToken}",
        "os": "${osToken}",
        "serialNumber": "${serialNumberToken}",
        "make": "${makeToken}",
        "model": "${modelToken}",
        "resourceNetworkInterface": [{
                 "macAddress": "${macAddressToken}",
                 "ipAddress": "${ipAddressToken}"
           }]
}
Update Resource HTTP Method Sample Payload
Configure import sets
Import sets allows data to be imported from various data sources and map the data into ServiceNow tables. This can be achieved by creating a staging table to save OpsRamp Resource columns.
To configure import sets, do the following:
- Create a table
- Create table columns
Create a table
To create a table:
- Click System Definition on the left pane and click Tables.
- Select New to create a table.
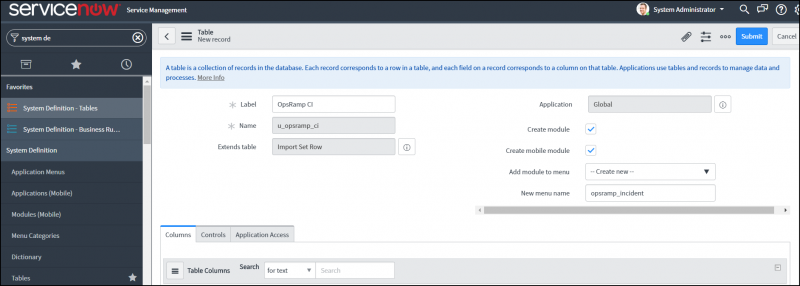
Creating a Table
- Fill required details:
- Label: Provide a label to the table (Example: OpsRamp CI)
- Application: Default value
- Name: Auto-generated when if a Label value is provided
- Create module: Default value
- Create mobile module: Default value
- Add module to menu: Default value
- Extends table: Select
Import Set Row
- Click Submit to save table.
Create table columns
To create table columns:
- Select the created table name
OpsRamp CI[u_opsramp_ci]from the Table drop-down. - On the Columns tab, click New to create a table column.
| Column Label | Table | Application | Type | Active | Function Field | Column name | Read only | Max Length | Mandatory | Display |
|---|---|---|---|---|---|---|---|---|---|---|
| Host Name | OpsRamp CI[u_opsramp_ci] | Default Value | String | Active | Default Value | Auto-generated value | Inactive | 255 | Active | Inactive |
| IP Address | OpsRamp CI[u_opsramp_ci] | Default Value | String | Active | Default Value | Auto-generated value | Inactive | 255 | Inactive | Inactive |
| MAC Address | OpsRamp CI[u_opsramp_ci] | Default Value | String | Active | Default Value | Auto-generated value | Inactive | 255 | Inactive | Inactive |
| DNS Name | OpsRamp CI[u_opsramp_ci] | Default Value | String | Active | Default Value | Auto-generated value | Inactive | 255 | Inactive | Inactive |
| Make | OpsRamp CI[u_opsramp_ci] | Default Value | String | Active | Default Value | Auto-generated value | Inactive | 255 | Inactive | Inactive |
| Model | OpsRamp CI[u_opsramp_ci] | Default Value | String | Active | Default Value | Auto-generated value | Inactive | 255 | Inactive | Inactive |
| OpsRamp Resource ID | OpsRamp CI[u_opsramp_ci] | Default Value | String | Active | Default Value | Auto-generated value | Inactive | 64 | Active | Inactive |
| System UID | OpsRamp CI[u_opsramp_ci] | Default Value | String | Active | Default Value | Auto-generated value | Inactive | 255 | Inactive | Inactive |
| Resource Type | OpsRamp CI[u_opsramp_ci] | Default Value | String | Active | Default Value | Auto-generated value | Inactive | 255 | Active | Inactive |
Note
This table only shows mandatory fields. Add more columns if needed.Here is a sample output table: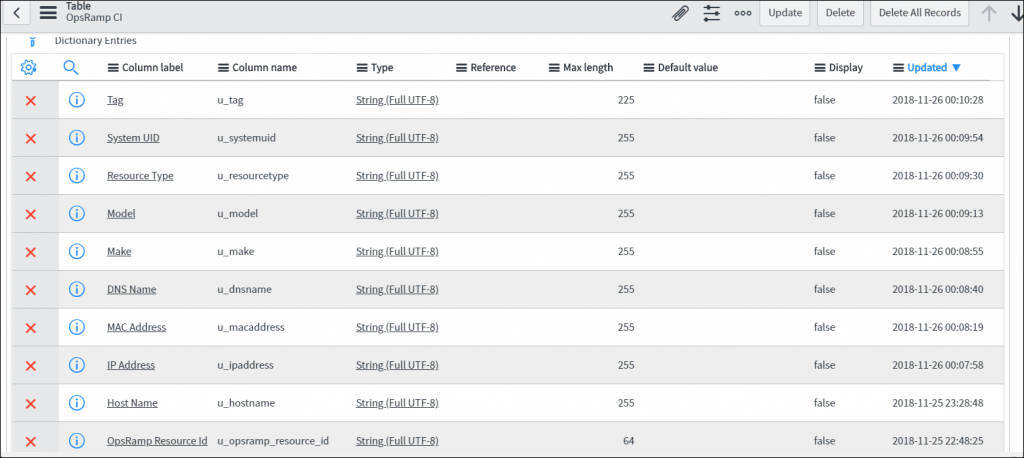
Sample Output Table
Configure the transform map
Configuring the transform map involves the following:
- Create a transform map.
- Configure field maps.
Create a transform map
A transform map is a set of field maps that determines the relationships between fields in an import set and fields in an existing ServiceNow table. These relationship needs to be defined between the staging table and the CI table. The staging table is created using import sets.
To create a transform map:
- Click System Import Sets on the left pane and click Transform Maps.
- Select New to create a new Transform Map.
- Provide the required details:
- Name: Provide a name to transform map
Example: OpsRamp CI Trans Map - Created: Default value
- Source table: Select staging table created
Example:OpsRamp CI[u_opsramp_ci] - Target table: Select
Configuration Item[cmdb_ci] - Active: Active
- Order: Default value
- Run business rules: Active
- Run script: Active and place
CI_Trans_map_script.jsin the script field - Enforce mandatory fields: Select
No - Copy empty fields: Default value
- Name: Provide a name to transform map
- Click Submit to save the details.
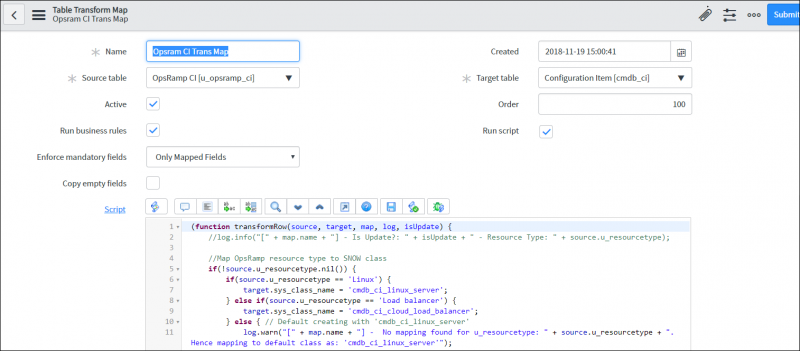
Creating a Transform Map
Note
The sample script is configured for Linux and Load Balancer. A script can be customized for other resource type mappings.Configure field maps
After creating a transform pap, configure field maps for each column in the staging table
u_opsramp_ci **with the** cmdb_ci table.
To configure field maps:
- Select the transform map created (
OpsRamp CI Trans Map) from the Map drop-down. - Click New on the Field Maps page.
- Create map for the following columns:
| Map | Source Table | Target Table | Source Field | Target Field | Coalesce | Use Source Script |
|---|---|---|---|---|---|---|
| OpsRamp CI Trans Map | OpsRamp CI[u_opsramp_ci] | Configuration Item[cmdb_ci] | Host Name | Name | Inactive | Default |
| OpsRamp CI Trans Map | OpsRamp CI[u_opsramp_ci] | Configuration Item[cmdb_ci] | IP Address | IP Address | Inactive | Default |
| OpsRamp CI Trans Map | OpsRamp CI[u_opsramp_ci] | Configuration Item[cmdb_ci] | MAC Address | MAC Address | Inactive | Default |
| OpsRamp CI Trans Map | OpsRamp CI[u_opsramp_ci] | Configuration Item[cmdb_ci] | DNS Name | DNS Domain | Inactive | Default |
| OpsRamp CI Trans Map | OpsRamp CI[u_opsramp_ci] | Configuration Item[cmdb_ci] | Make | Make | Inactive | Default |
| OpsRamp CI Trans Map | OpsRamp CI[u_opsramp_ci] | Configuration Item[cmdb_ci] | Model | Model | Inactive | Default |
| OpsRamp CI Trans Map | OpsRamp CI[u_opsramp_ci] | Configuration Item[cmdb_ci] | OpsRamp Resource ID | OpsRamp Resource ID | Active | Default |
| OpsRamp CI Trans Map | OpsRamp CI[u_opsramp_ci] | Configuration Item[cmdb_ci] | Resource Type | Class | Inactive | Default |
Configure business rules
A business rule is a server-side script that is run to display, insert, update, or delete a record or to query a table. To call OpsRamp APIs when a configuration item is created or updated, do the following:
- Define the conditions to trigger the rule.
- Provide the script to invoke the API.
The details on configuring is in the REST messages section.
To configure a business rule:
- Click System Definition on the left pane and click Business Rule.
- Select New to configure the business rule.
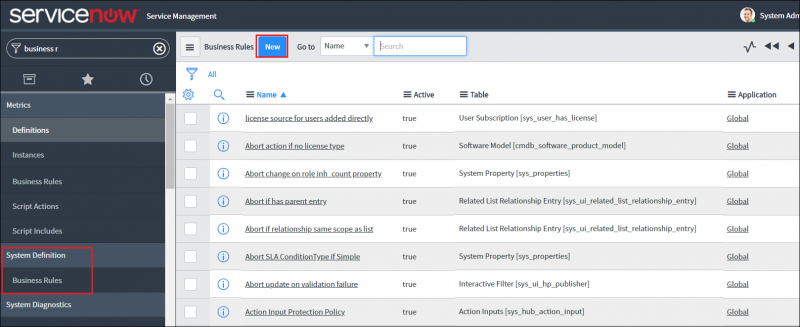
Configuring a Business Rule
- Provide details in the Business Rule page:
- Name: Provide a name for the business rule
Example: OpsRamp CMDB Integration Rule - Application: Default value – Global
- Table: Select the table on which the business rule runs from the list.
Example: CMDB CI Actions [statemgmt_cmdb_actions] - Active: Select Active
- Advanced: Select Active
- When to run: Specify when to run the business rule.
This filter condition is given to avoid looping so that when OpsRamp API created or updated CI in ServiceNow, the script does not invoke the integration back to OpsRamp. The System Administrator is the user created during authentication.- When: Default value – after. Select after and then Insert. The option specifies that run the business rule after a record is inserted into the database.
- Order: Default value – 100. The order specifies the sequence in which the rule is executed.
- Insert: Select Active
- Update: Select Active
- Delete: Optional
- Query: Optional
- Filter Conditions:
- Created by is not System Administrator AND/OR
- Updated by is not System Administrator
- Actions: No configuration required
- Advanced:
- Condition: Optional
- Script: Provide the script here.
- Name: Provide a name for the business rule
- Click Submit.
The following are usage notes:
- Create custom field OpsRamp Resource ID in ServiceNow cmdb_ci table to save OpsRamp resource ID.
In sample script field for this is
u_opsramp_resource_id - If integration is at OpsRamp Client level, then replace variable OpsRampClientId
with OpsRamp client ID in sample script.
Example:var opsRampClientId = ‘client_12345’ - If integration is at an OpsRamp partner level:
- Create a custom field OpsRamp Client ID in the ServiceNow company table to save the OpsRamp client ID.
In the sample script, the custom field is
u_opsramp_client_id. - The custom field should take the value OpsRampClientId.
Example:var opsRampClientId_ = _current.company.u_opsramp_client_id.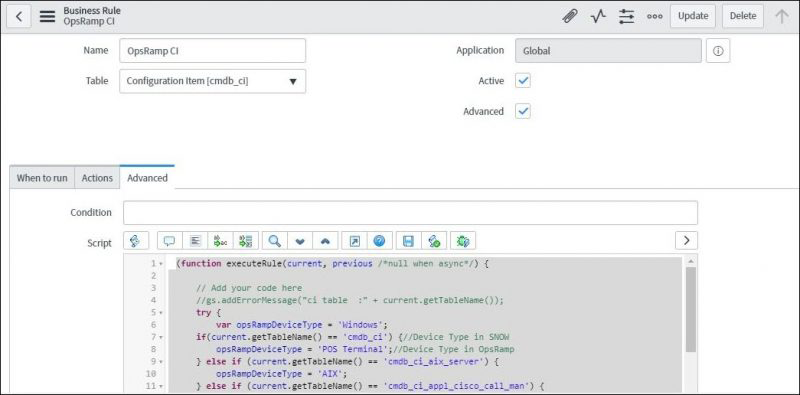
Sample Business Rule Script
- Create a custom field OpsRamp Client ID in the ServiceNow company table to save the OpsRamp client ID.
In the sample script, the custom field is
Note
If the activity has multiple rules running, then rules are run priority order from low to high.Configuration items can be viewed in Service (or vice versa).