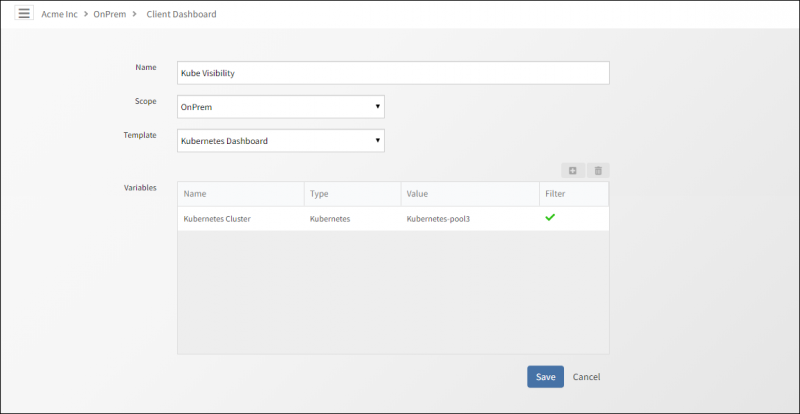
Create a dashboard
Select a client from the All Clients list.
Select Dashboard > Dashboard Menu.
Click New Dashboard.
Provide the following details and Save:
- Name: Refers to the Dashboard name.
- Scope: Refers to the selection of the client name.
- Template (Optional): Refers to the predefined widgets created in certain templates.
- Variables (Optional): Refers to the values displayed according to the chosen template.
Click Save to create and display the new dashboard:
Create a Dashboard
Edit a dashboard
If you are the dashboard owner, you can edit the dashboard properties.
To edit a dashboard:
- Select a client from the All Clients list.
- Go to Dashboard > Dashboard Menu.
- Click Edit.
Remove a dashboard
Limitations on removing a dashboard:
- A dashboard owner can delete a dashboard from their account. Non-owners cannot remove a dashboard.
- A client administrator can delete dashboards shared by other users within the client.
- A partner administrator can delete dashboards shared by other clients within the partner.
To delete a dashboard:
- Select a client from the All Clients list.
- Go to Dashboard > Dashboard Menu.
- Click Remove.
Clone a dashboard
You can use the cloning property to create a new dashboard from an existing dashboard.
When a partner or client clones a dashboard and selects the current client from the scope, the dashboard becomes a private dashboard for the particular client.
When a client clones a dashboard with the scope of Any Client, the dashboard is available for all clients.
To clone a dashboard.
- Select a client from the All Clients list.
- Go to Dashboard > Dashboard Menu.
- Click Save As.
The cloned Dashboard Layout screen displays the same details as the parent dashboard except for a different Name field value.
Set the default dashboard
To set a dashboard as the default dashboard:
- Go to Dashboard > Dashboard Menu.
- Select Set as my default or Set as system default, as applicable.
- Click Save.
Share a dashboard
A dashboard can be shared with any client in your organization. A dashboard can also be shared when you create a role that permits all users assigned to the role to access that dashboard.
To share a dashboard:
- Select a client from the All Clients list.
- go to Dashboard > Dashboard Menu
- Click Share. For Dashboard 2.0, click the share icon in the upper-right.
- Enter the client you want to share the dashboard with and select a role, if applicable.
The following sharing rules apply:
- Service provider users using Dashboard 2.0 cannot share dashboards.
- You can share a private dashboard.
- A partner user can share a client dashboard with a client.
- A client user can share the private dashboard with other users within the client.
- When the dashboard is shared with one or more roles, any user assigned to that role can access the shared dashboard.
- If you are the dashboard owner, you can view and edit the number of roles shared with the dashboard using the share option.
- A partner administrator or a client administrator can modify the details of a dashboard that a partner user or client user shares.
Share a dashboard link
Use the Share Link option to share the dashboard URL with another user by emailing the user.
Unshare a dashboard
A partner or client can unshare a dashboard. After a dashboard is unshared, the unshared user can no longer view the dashboard.
To unshare a dashboard:
- Select a client from the All Clients list.
- Go to Dashboard > Dashboard Menu.
- Click UnShare.
View dashboard information
You can view dashboard details, such as the type of dashboard and owner information.
To view dashboard information:
- Select a client from the All Clients list.
- Go to Dashboard > Dashboard Menu.
- Click Info to view the Dashboard Details window.