Limited Availability Notice
Gateway clustering is not a generally available feature at this time. This feature is visible within your OpsRamp account only if you are participating in OpsRamp’s limited availability program. This feature will be generally available in future releases. Please contact OpsRamp Support for additional information.Introduction
A gateway cluster is a set of virtual machines running gateway software that function as a single logical machine. The gateway cluster provides:
- High availability against the failure of a node in the cluster.
- High availability against the failure of a physical server on which nodes run.
- Flexible horizontal scaling of nodes to manage more IT assets.
How a gateway cluster works
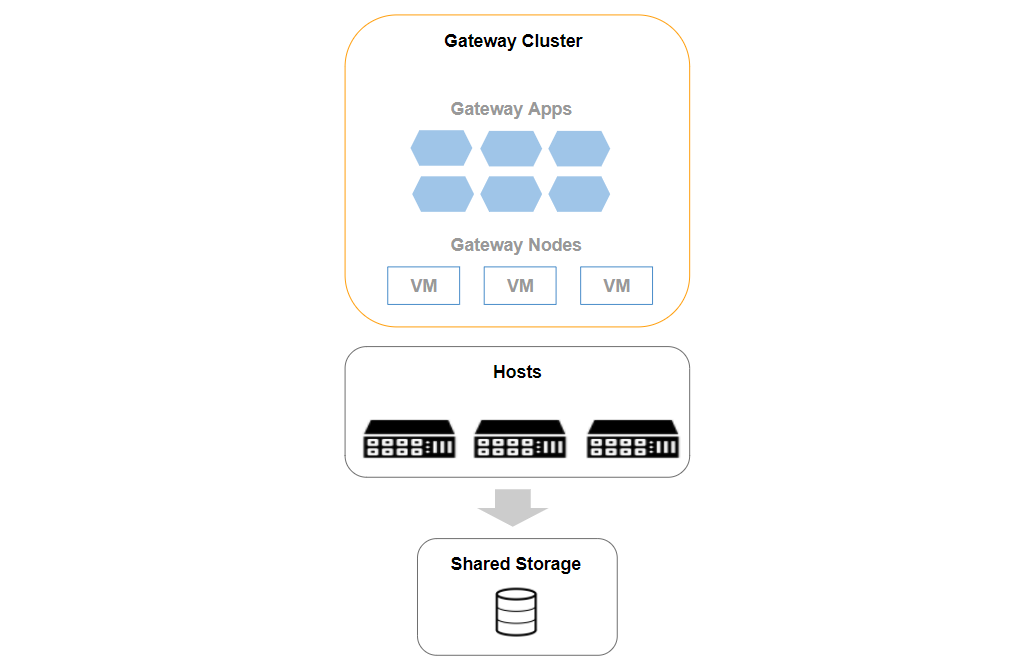
A gateway cluster is a set of virtual machines (VMs), which run applications that discover and monitor your environment. Gateway nodes run on physical servers that run a hypervisor, typically, with other VMs unrelated to the gateway. Nodes use a shared NFS storage volume to persist states shared among gateway nodes.

Gateway Cluster
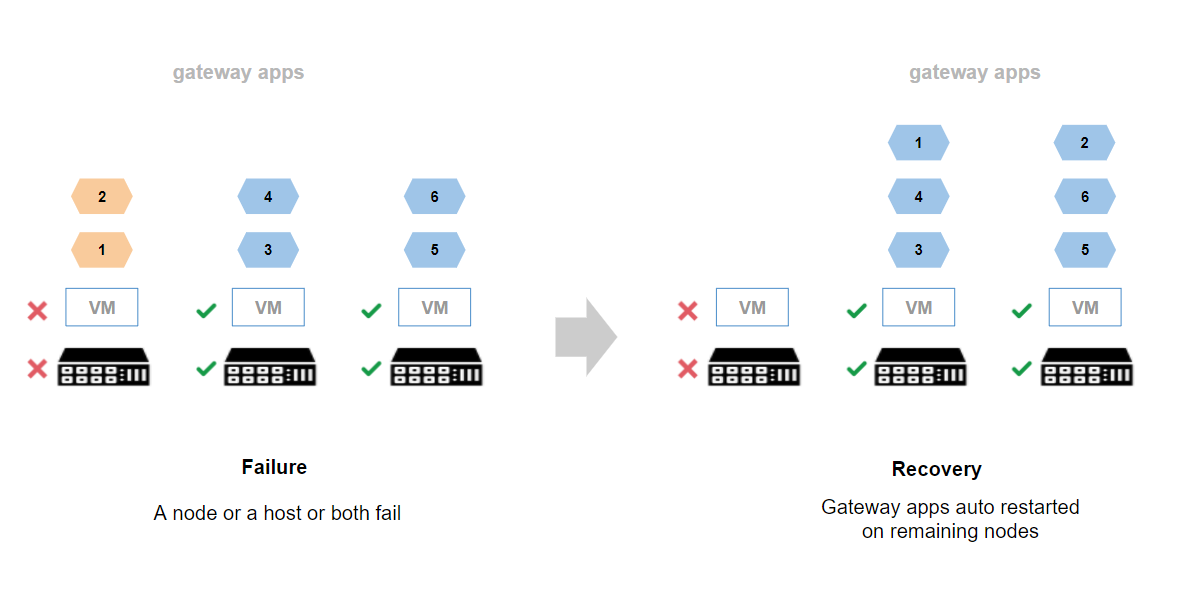
Each node also runs a lightweight Kubernetes - MicroK8s distribution. Kubernetes enables gateway nodes to work as a single, logical machine, which automatically schedules gateway applications between nodes. If a node fails or the host on which the node runs fails, or both a node and a host fail restarts applications on a different node, the logical node restarts the applications. The following figure illustrates how a gateway cluster works:

Gateway Cluster: failure and recovery
Deployment options
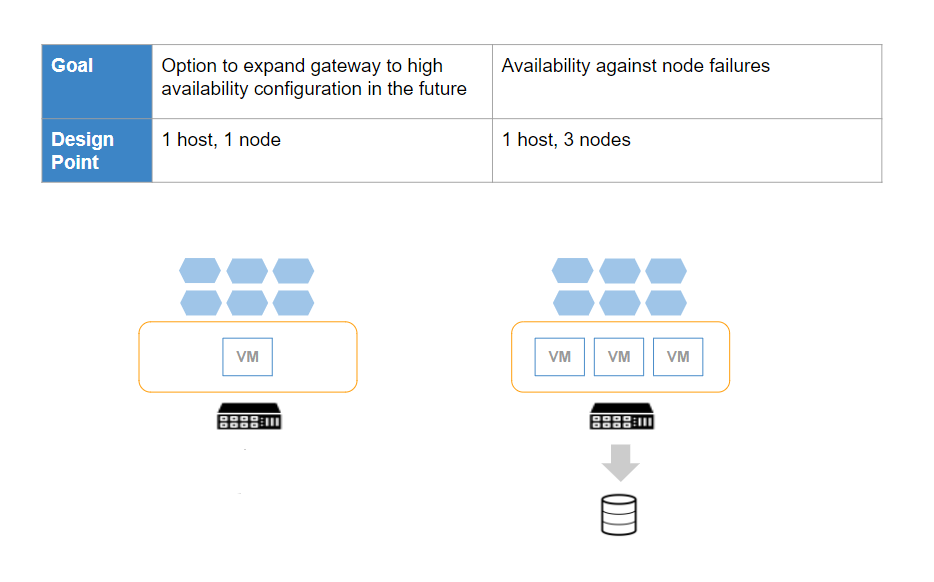
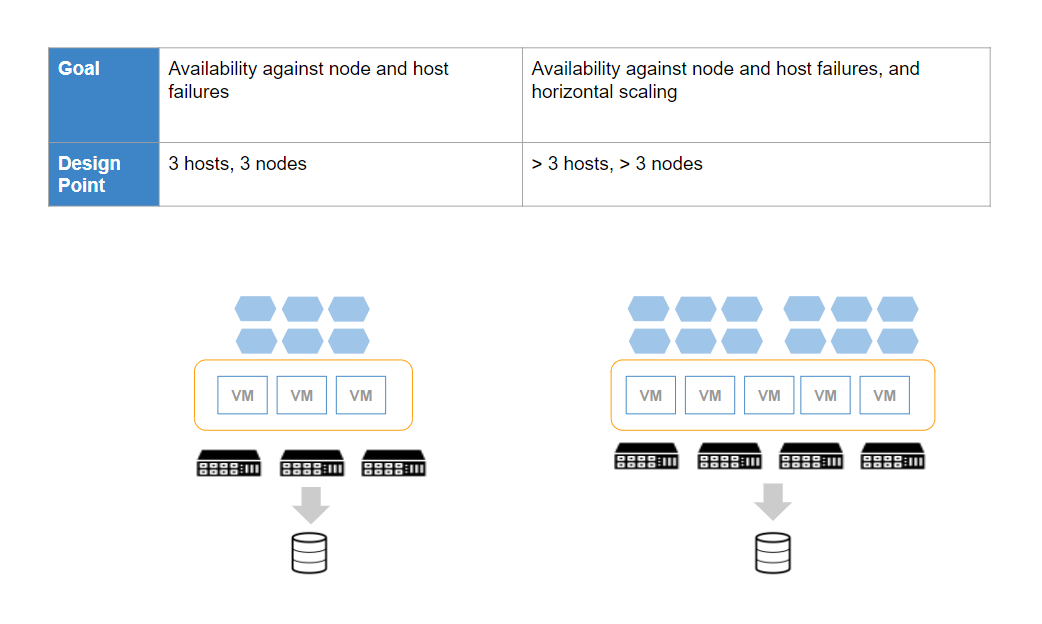
Gateway clusters can be deployed in several configurations, depending on availability and horizontal scaling goals. The following figures illustrate three design points:

Gateway Cluster

Gateway Cluster
Prerequisites
To deploy a gateway cluster, make sure your environment meets these requirements:
| Component | Attribute | Requirements |
|---|---|---|
| Nodes | Size | 4 CPU cores, 8 GB RAM, and 40 GB Disk |
| Nodes | IP addresses | Static IP address allocation requirement:
|
| Nodes | Hostname | Each node should have a unique hostname. All nodes should be pingable with IP address and hostname. |
| Nodes | Network access | All VMs should have outbound internet access to `*.opsramp.com` for connectivity, k8s.gcr.io and Google Artifact registry `us-docker.pkg.dev` to download gateway applications. |
| Nodes | Number of nodes | Minimum of three nodes for high availability. |
| Hosts | OS | VMWare vSphere ESXi v6.0 or later versions. |
| Hosts | Number of hosts | Minimum of three hosts, running one gateway node on each host for high availability. |
| Storage | Type | NFS storage volume, with read/write access from all nodes. |
Set up a multi-node cluster
To set up a gateway cluster:
- Spin up nodes.
- Join nodes to the cluster
- Deploy gateway services on nodes.
- Register the cluster.
The following description assumes a 3-node gateway cluster with each node running on a separate host.
See the troubleshooting section if you encounter problems.
Spin up nodes
The gateway is available as an Open Virtual Machine Appliance (OVA).
- Download the OVA.
- Spin up identical VMs on separate hosts, from the OVA, one VM for each node of the cluster.
- Log in to each VM with the default credentials provided to you.
- Make sure to change the password.
- You now have a VM for each node of the cluster.
- Verify that each VMs is running on its own host.
- Gateway nodes can run on hosts with other VMs unrelated to the gateway.
- Dedicated hosts are not needed.
- Set the new unique hostname on each node
> sudo hostnamectl set-hostname <name> - Restart the microk8s service to reflect the changes
> microk8s stop > microk8s start - Run the command to find the old hostname on each node
> microk8s kubectl get nodes - Delete the node running with the old hostname on each node
> microk8s kubectl delete node <node_name e.g. gateway-node> - Check the MicroK8s status on all nodes, it should be in a running and ready state with the new hostname.
microk8s status
Join nodes to the cluster
With three gateway nodes running, join them to create a cluster.
Join node 1
Select one of the nodes as your first node in the cluster, called node 1. You do not need to take any action to add the first node to the cluster.
Join node 2
Add a second node, called node 2, to the cluster. On node 1, run:
> microk8s add-nodeThis returns joining instructions:
> microk8s join ip-172-31-20-243:25000/DDOkUupkmaBezNnMheTBqFYHLWINGDbfIf the node you are adding is not reachable through the default interface, use:
> microk8s join 10.1.84.0:25000/DDOkUupkmaBezNnMheTBqFYHLWINGDbf
> microk8s join 10.22.254.77:25000/DDOkUupkmaBezNnMheTBqFYHLWINGDbf
Copy the above command and run it on node 2.
> microk8s join ip-172-31-20-243:25000/DDOkUupkmaBezNnMheTBqFYHLWINGDbfWait for the process to complete on node 2.
To check that the node is successfully added, run:
> microk8s kubectl get nodesJoin node 3
To join the third node, called node 3, to the cluster, repeat the steps for joining node 2.
Deploy gateway services on nodes
With the cluster set up, deploy applications to the cluster.
Enable MicroK8s add-ons
Run the following commands on any node to enable MicroK8s add-ons:
microk8s enable dnsmicrok8s enable metallb:<ip_address in CIDR format- e.g. 172.25.252.5/32>Configure storage
Download and run the helm chart on any node to configure it to access persistant storage:
> helm chart pull us-docker.pkg.dev/opsramp-registry/gateway-cluster-charts/gateway-persistent-storage:0.9.6
> helm chart export us-docker.pkg.dev/opsramp-registry/gateway-cluster-charts/gateway-persistent-storage:0.9.6
> helm install gateway-persistent-storage gateway-persistent-storage \
-f gateway-persistent-storage/cluster.yaml \
--set nfs.server=<IP address of NFS server - e.g. 172.26.111.203> \
--set nfs.path=<folder name - e.g. /shared/gateway-cluster-1> --debug
Deploy Gateway Manager
The Gateway Manager application helps you manage the gateway cluster. It is the first application to deploy on your cluster.
- Download and install the application:
> helm chart pull us-docker.pkg.dev/opsramp-registry/gateway-cluster-charts/gateway-manager:0.9.6 > helm chart export us-docker.pkg.dev/opsramp-registry/gateway-cluster-charts/gateway-manager:0.9.6 > helm install gateway-manager gateway-manager \ -f gateway-manager/cluster.yaml \ --set secrets.defaultPassword=<password> --debug - Log in to Gateway Manager using the following:
- Your browser with the IP address assigned to metallb.
- Port 5480.
- The default password you previously set.
Register the cluster
Log in to Gateway Manager to register the cluster:
- Go to Setup > Management Profiles.
- Create a new management profile and copy the activation token.
- Enter the activation token into the Gateway Manager.
Wait for the cluster registration to complete. You should see the status of the management profile turn to connected in the UI.
Set up a single-node cluster
Set up a gateway cluster on a single node:
- Spin up the node.
- Deploy gateway services on the node.
- Register the single-node cluster.
High availability is not supported in this model.
Spin up the node
The gateway is available as an Open Virtual Machine Appliance (OVA).
- Download the OVA.
- Spin up the VM on a host, from the OVA.
- Log in to the VM with the default credentials provided to you.
- Make sure to change the password.
- Gateway node can run on hosts with other VMs unrelated to the gateway.
- Dedicated hosts are not needed.
- Check the MicroK8s status on the node, it should be in running state.
microk8s status
The gateway is available as an Open Virtual Machine Appliance (OVA).
Deploy gateway services on the node
After the single-node cluster is set up, run the following commands on the node to deploy applications:
microk8s enable dnsmicrok8s enable metallb:<ip_address in CIDR format- e.g. 172.25.252.5/32>Configure storage
Download and run the helm chart to install persistant storage on the node:
> helm chart pull us-docker.pkg.dev/opsramp-registry/gateway-cluster-charts/gateway-persistent-storage:0.9.6
> helm chart export us-docker.pkg.dev/opsramp-registry/gateway-cluster-charts/gateway-persistent-storage:0.9.6
> helm install gateway-persistent-storage gateway-persistent-storage
Deploy Gateway Manager
The Gateway Manager is an application that helps you manage your gateway cluster. It is the first application that you want to deploy on the cluster.
- Download and install the application:
> helm chart pull us-docker.pkg.dev/opsramp-registry/gateway-cluster-charts/gateway-manager:0.9.6 > helm chart export us-docker.pkg.dev/opsramp-registry/gateway-cluster-charts/gateway-manager:0.9.6 > helm install gateway-manager gateway-manager \ --set secrets.defaultPassword=<password> --debug - Log in to Gateway Manager using the following:
- Your browser with the IP address assigned to metallb.
- Port 5480.
- The default password provided to you.
- Be sure to change your password.
Register the single-node cluster
Follow the steps in the Register the cluster section.
Migrate from a classic gateway
You can migrate an existing non-clustered, classic, gateway to a gateway cluster without re-onboarding the resources managed by the classic gateway. To migrate from classic to clustered gateway:
- Create a new gateway cluster. Follow the steps to set up a single-node cluster.
- Select the management profile associated with the classic gateway.
- De-register the classic gateway from the management profile.
- Register the new gateway cluster with the same management profile.
Existing configurations in the classic gateway are automatically migrated to the gateway cluster. Discovery and monitoring resumes automatically after a few minutes.
Upgrading gateway firmware
To upgrade the gateway firmware:
- Swap out the existing VM.
- Deploy a new VM with the latest OVA.
- Attach the new VM to the same management profile.
FAQs
Can I roll back to the classic gateway from a gateway cluster?
- Yes, you can roll back from a gateway cluster to the classic gateway without re-onboarding your managed resources and without loss of monitoring data.
- De-register the gateway cluster from its management profile and register a classic gateway in its place.
How do I validate the multi-node cluster gateway setup?
Validate that your cluster is set up correctly by:
- Running network discovery on a few managed resources.
- Applying ping monitors on the resources.
How do I validate that the cluster can successfully recover from a node failure?
- Select one of the nodes.
- Power the node off to simulate node failure. The cluster recovers from the failure by restarting monitoring applications running on the failed node on the remaining nodes.
- Verify that monitors resume monitoring by observing the metric graphs in the UI.
Troubleshooting
If you can not ping the other nodes with the hostname, add the IP address and hostname of other nodes in the /etc/hosts file. See the MicroK8s documentation for tips on troubleshooting cluster setup related issues.