Introduction
The gateway is deployed in Google Cloud environment to monitor and manage your resources.
Prerequisites
- Obtain a Google Gateway VMI: Submit a ticket to the OpsRamp Support team.
A Google URL is provided by OpsRamp Support to download a gateway image file. The image file is required when creating a storage bucket.
GCP configuration
In GCP, configuration includes the following:
- Creating a storage bucket.
- Creating an image.
- Creating a VM instance.
Step 1: Create a storage bucket
Buckets are the basic containers that hold your data. Everything that is stored in Cloud Storage must be contained in a bucket.
To create a new storage bucket:
- Log into GCP with your credentials.
- From Projects drop-down list, select the desired project to deploy the gateway.
- On the left pane, from Storage menu, click Storage and then click Create Bucket.
- From Create a bucket, enter a bucket name (Example: opsramp-gateway) and click Continue.
- From the available default storage class options, select Multi-Regional and click Continue.
- (Optional) Configure Control access to objects and Advanced settings.
- Click Create. The bucket you created now appears in the Buckets list.
- Click name of the bucket. The Bucket details screen appears.
- From the Objects tab, click Upload Files and select the gateway image file. Gateway image file gets uploaded to the bucket.
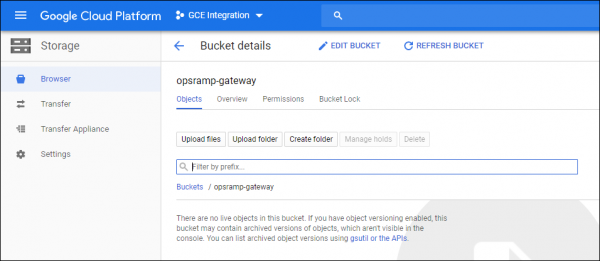
Bucket Details
Step 2: Create an image
A virtual machine image is a single file that contains a virtual disk with a bootable operating system. Google allows you to define virtual machine images or use pre-defined images which can be used to create one or more virtual machine instances that look alike.
To create a new image for the gateway:
- On the left pane, from Compute Engine menu, click Images. Images list is displayed.
- Click Create Image. Create an image screen appears.
- Provide the following details:
- Name: Enter a unique name for the gateway image.
- Source: Select Cloud Storage file from the drop-down options.
- Cloud Storage file: Select the gateway image file that is attached to the storage bucket.
- Encryption: Google-managed key is selected by default.
- Click Create. The new image appears in the images list.
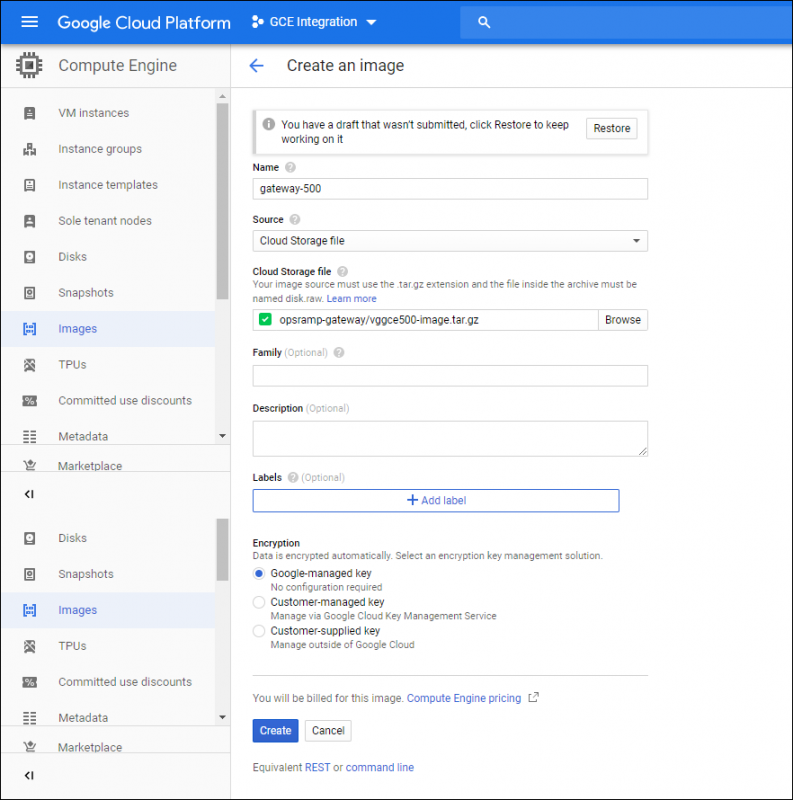
Create an Image
Step 3: Create a VM instance
An instance is a virtual machine hosted on Google’s infrastructure. A virtual machine instance is created for the gateway using the gateway image.
To create a new VM instance:
- On the left pane, from Compute Engine menu, click VM Instances.
- Click Create Instance. Create an instance screen appears.
- Provide the following details and click Create.
- Name: Enter a unique name for the gateway instance.
- Region: Select US-central1 from the drop-down options.
- Machine Type: Minimum requirement is 2 vCPU, 4GB.
- Access scopes: Allow default access is selected by default.
- Firewall: Ensure that port 22 and port 5480 are allowed on the gateway to access the Web and Serial user interface.
- Verify if the gateway is installed in Google Cloud Platform (GCP).
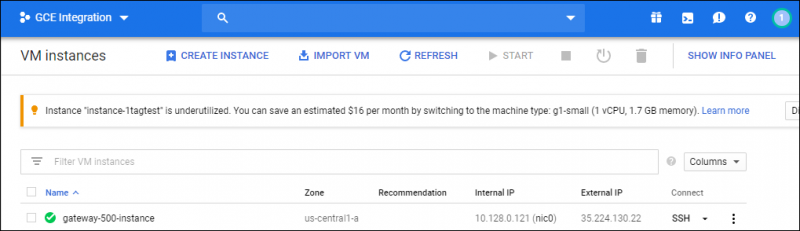
Gateway Installed
Gateway registration
Gateway registration includes the following steps:
- Creating a management profile
- Configuring the gateway registration
Step 1: Create a management profile
To create a management profile:
- Select Setup > Device Management > Management Profile.
- Select the client with which you want to register the gateway.
- Click +Add to create a profile.
- From the Management Profile page, select Profile type as OpsRamp Gateway.
- Enter Profile Name and click Submit. The activation token is automatically generated.
- Copy the Activation token.
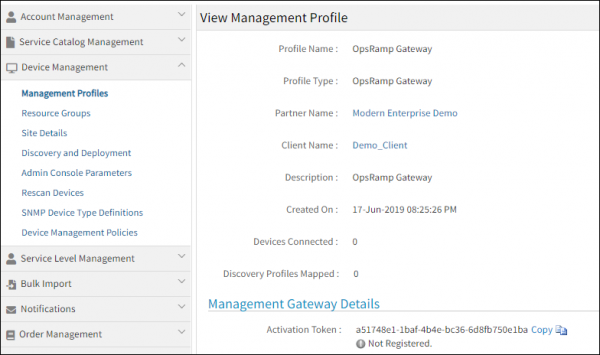
Management Profile - Register Gateway
Step 2: Configure the gateway registration
After creating a management profile, configure the gateway registration using one of the following methods:
- Gateway administration console
- Gateway web user interface
Configuring with the administration console
To configure the gateway using the administration console:
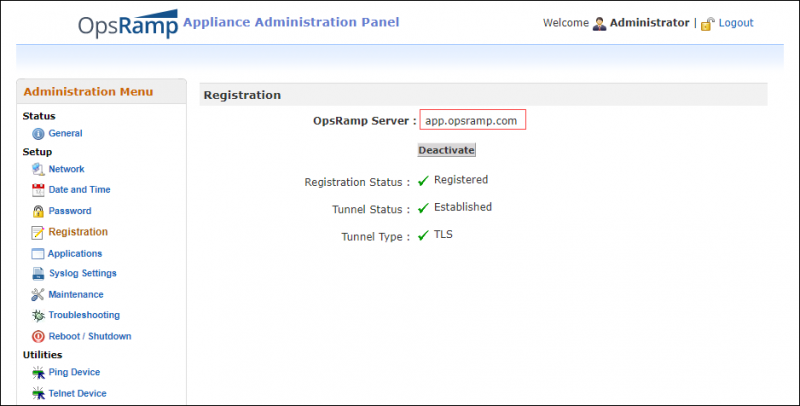
- Log into the Gateway VM with the provided username and password.
For default login credentials to log into the administration console, contact OpsRamp Support. - From the left pane, click General.
- Verify if the Registration Status is Not Registered and the Tunnel Status is Not Established.
- During the installation of the gateway, the first screen prompts you to set a hostname for the gateway.
- If the hostname is not provided, the gateway is identified based on the MAC Address that is displayed across the user interface.
- Click Network, select Use Static IP address and then click Save.
- To configure gateway to use Proxy, use CTRL+P to navigate to Proxy Settings. By default, Direct connection to the Internet is selected. You can configure manual proxy if required.
- Provide details of OpsRamp Server (api.vistanet.jp) and enter Activation Token as per topic Profile in OpsRamp and get activation token.
- Click Update Now to register the gateway to OpsRamp.
- Verify if the gateway is registered with OpsRamp.

Gateway Registration Success
Configuring with the web user interface
To configure the gateway using the web user interface:
- On the web browser, type the URL as
https://<enter Gateway IP address>:5480. - From the gateway login screen, provide a default Username and password.
- Click Network. If required, clear the Obtain an IP Address from DHCP selection and provide the static address.
- (Optional) Enter VLAN, Static Routing, Proxy details.
- From the Administration menu, click Registration.
- From the Registration screen, provide the activation token that you copied while creating the management profile.
- Enter SaaS Endpoint details (app.vistanet.jp) and click Activate.
- Verify if the Registration Status appears as Registered.
- Verify if the status appears as success in OpsRamp.