Introduction
A browser console allows you to access a remote server through a web browser.
To add or launch a browser console, enable Browser Consoles for a client.
Notes
- A user with Consoles Manage permission can add, edit, or remove a console.
- A user with Consoles View permission can view consoles created by other users.
- A user can configure preference of browser console setting from the user preference setting option.
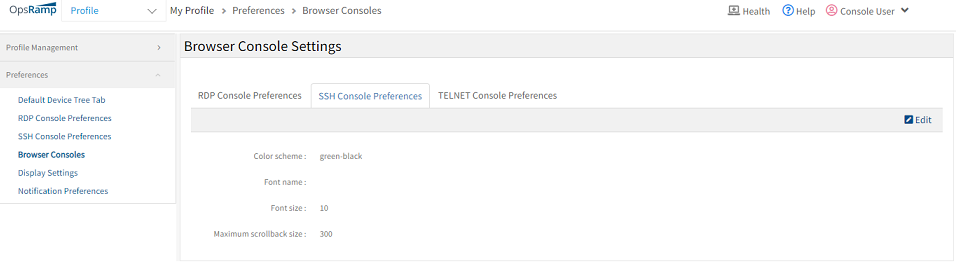
Launch Browser Console Settings
Prerequisites
The following are prerequisites for launching browser consoles:
- An HTML-enabled browser is required to launch a browser console.
- Browser consoles (and its related features) should be activated for the client.
- Verify that you have whitelisted specific IPs. If you have not whitelisted the IP addresses, see Public IP addresses for the list.
- Whitelisted IPs must have both inbound and outbound communication to access remote consoles.
- Device Manager and Console Manage permissions are enabled.
- Protocol is enabled on the target device. Example: SSH, RDP
- Port numbers are checked for launching the remote console.
- The agent and gateway are active on the target device or on the managed device.
- Login information is available for the target device.
- Target device status is active.
Note
When launching console on a gateway, provide the local host IP address (127.0.0.1).| Gateway Version | Agent Version | Features available |
|---|---|---|
| 7.00 | 7.00 | All features except SSH-based shared drive |
| 8.00 | 8.00 | All features |
Type of supported protocols
The types of supported protocols supported by the browser console are the following:
- RDP
- SSH
- Telnet
Key highlights
Browser consoles provide the following key features:
- Playback console recording
- Clipboard access
- Shared Drive
Adding Browser consoles for SSH/Telnet/RDP
Add the details of the remote device on which you want to launch a console. You can also edit or delete the configured remote console.
Note
The procedure is the same for adding a Java console or a Browser console.To add a console:
- Go to Infrastructure.
- Click the category to which the target resource belongs.
- Click the required resource name.
- From the resource Overview page, click the settings icon and select Add Console.
- Click +Add to add new set of console details.
Note: You can also edit the existing sample details to add a remote console. The existing sample details are configured for the agent. - Configure the following details on the consoles window:
- Connector: Refers to the element (Agent or Gateway) managing the target device.
- Protocols: Refers to the protocol that you want to use to communicate with the target device.
- Port: Refers to a port that transmits and receives data. The port numbers vary with Services.
- Username: Refers to the login information of the target device.
Note: Providing username is optional. - Password: Refers to the login information of the target device.
- IP Address: Refers to the IP Address of the target device.
- Name: Refers to the name of the console.
Note: You can add the name in the format RDP IP Address of the target device: Port number. Example:RDP 12.171.1:3389
- Click Save.
The console is added to the consoles list.
Note
You can click Add Consoles again from the settings icon to add more consoles or to remove existing consoles.Launching browser consoles for RDP
Add the details of the remote device to launch a browser console. Remote device information must be provided to launch browser consoles.
A general recommendation is to select the Network Level Authentication (NLA) option on the remote Windows device for secure communication. RDP operates on NLA which is a secured channel of communication. Connecting users must be aware of NLA settings on the target device.
If NLA is enabled on the target device, connecting users can access the target device only with certain authentication. The following are the key considerations for adding consoles:
- With domain: (Mandatory) Provide username, password, and domain values for credential sets.
- Without domain: (Mandatory) Provide username and password for manual login.
If NLA is disabled on the target device, connecting users can access the target device without any authentication. Username and password fields can be left empty in manual login.
Note
NLA is mandatory for Windows 2016 and above versions.Launching Secure Shell consoles
To launch Secure Shell (SSH) consoles:
- Go to Infrastructure, select the resource name to add the console.
- Click Launch Remote Console button and click SSH or SSH with certificate.
- From the Launch Browser Console dialog box, provide Ticket ID/Alert ID to associate the console activity to a ticket and add Activity Log Notes.
- Select one of the following checkboxes:
- Use Credentials: If credentials are available in credentials sets. Simply, select the option from Credentials drop-down option.
- I have Credentials: If you have credentials, select the option.
Note: For SSH, enter User name and password. For SSH with certificate, select Choose File to upload Certificate and enter Pass Phrase. Note: Private keys are mandatory for SSH keypair-based authentication.
- Click Launch.
- Provide the credentials in the browser console.
The target remote device should now be connected enabling activities to be performed on the device.
Launching Telnet consoles
To launch telnet consoles:
- Go to Infrastructure, click the resource name to add the console.
- Click Launch Remote Console button and click Telnet.
- From the Launch Browser Console dialog box, provide Ticket ID/Alert ID to associate the console activity to a ticket and add Activity Log Note.
- Click OK.
Disconnecting browser consoles
After activities have been performed on the console, disconnect from the session.
To disconnect a browser console:
- Press the Ctrl+Alt+Shift keystroke combination to display the Clipboard window.
- From the username drop-down menu, click Disconnect.
The session is disconnected.
Launching consoles from different pages in OpsRamp
Besides launching a console from th Infrastructure page, you can also launch consoles from the following areas/pages in OpsRamp.
Launch console from the alert details page
To launch console on a resource directly from the alert details page:
- Go to Alerts.
- Click the required alert ID.
Alert Details page is displayed. - Click the consoles icon.
- Click the Java console icon or Browser console icon to launch the selected console.
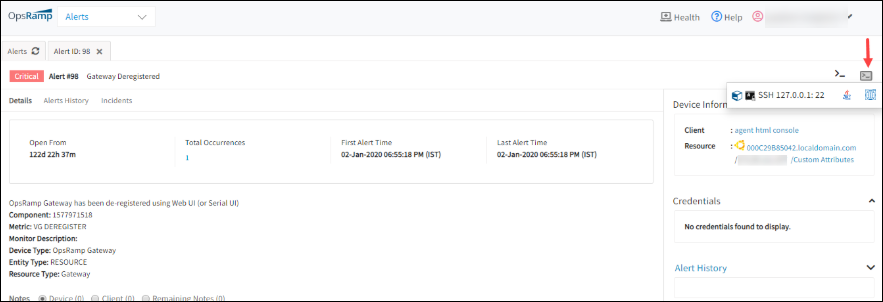
Launch Console from Alert Details Page
Launch console from the Gateway Details page
To launch consoles on devices managed by a Gateway:
- Go to Setup > Resources > Management Profiles.
- Click the required management profile name.
- From the Management Gateway Details section, click the Gateway UUID.
GATEWAY DETAILS page is displayed. - Click the Consoles icon.
- Click the Java console icon or Browser-based console icon to launch the selected console.
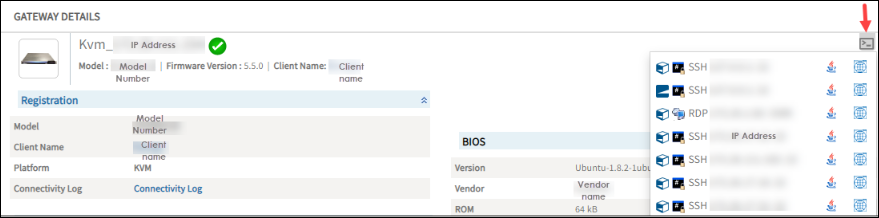
Launch console from Gateway Details page