Introduction
The device management policies help manage your resources. You can assign monitoring templates, knowledge base articles, and even custom attributes through the policy. The device management policy can be applied to one resource or a set of resources. For example, you can group all your resources based on a particular criteria and then apply the Availability rule or assign credentials.
Creating policies
To create a device management policy:
- Go to Setup > Resources > Device Management Policies.
- Click Create New to create a device management policy for the first time.
- On the DEVICE MANAGEMENT POLICY page, for Scope select one of the following options:
- Click Partner if you are a partner and select one of the following options:
- Include All Clients: Applies Device Management Policy to all the clients.
- Include Clients: Applies Device Management Policy to the clients specified by you. To select the clients,
- Click +Add Include Clients.
- Choose the clients from the list and click Add Include Clients.
- Exclude Clients: Applies Device Management Policy to all except the clients specified by you. To exclude some clients,
- Click +Add Exclude Clients.
- Choose the clients from the list and click Add Exclude Clients.
- Click Client if you are a client.
- Click Partner if you are a partner and select one of the following options:
- Provide a suitable name for the policy.
- For Filter Criteria Type, select Resource Filters or Smart Filters.
- If you select Resource Filters:
- Click Any or All to match any one or all of the conditions you define for filtering, respectively.
Note
For Match All, ensure that resource type is the same for all the criteria. - Select the options for the following filter criteria fields:
- Resource Type: Lists all the resource types supported by OpsRamp.
- Attribute Name: Lists all the attributes pertaining to the resource selected.
- Logic condition: Refers to a logical match criterion.
Choose from Contains, Not Contains, Equals, Not Equals, Starts With, Ends With, and Regex depending on your requirements. - Value: Refers to a suitable value corresponding to the attribute name.
- Click Add Criteria to add more filter criteria.
- Click Show Matching Members. A list of all the resources matching the criteria is displayed.
Example 1: Select resource type as Device, attribute as Interface Name, and define the condition as Containsport. The matching resources are displayed that share a common port with the interfaces that support a service. To verify, click the name of the resource. The details are displayed in the attribute section.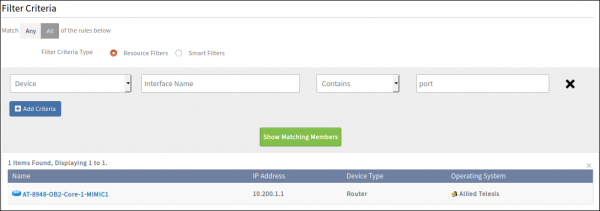
Filter Criteria Example 1
Example 2: Select resource type asDevice, attribute asName, and define the condition as Containslocaldomain. TheNameattribute is populated according to the priority- Alias Name, Host Name and Resource Name.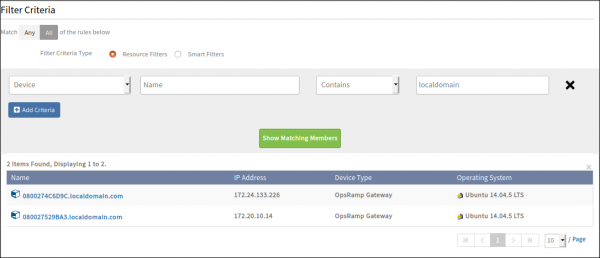
Filter Criteria Example 2
- Click Any or All to match any one or all of the conditions you define for filtering, respectively.
- If you select Smart Filters, click to select the types of devices or resources from the list.
Note: If you select Any Resources, all the other options are disabled except Any Device, Any Linux, and Any Windows options.
- If you select Resource Filters:
- From the Perform Actions section, select one or more resource actions.
| Options | Available for | Force Assign/Unassign | Description |
|---|---|---|---|
| Assign Monitoring Templates | Partner, Client | Available |
|
| Assign Knowledge Base Article | Partner, Client | Available |
|
| Assign Availability Rule | Partner, Client | Not Available |
|
| Assign Custom Attributes | Partner, Client | Available |
|
| Assign Jobs | Client | Available |
|
| Assign Credentials | Client | Available |
|
- Click Save & Run Now.
The Device Management policy is assigned to the group of resources.
Editing policies
To edit a policy:
- Select Setup > Resources > Device Management Policies.
- Click the policy name and click Edit at the top right corner.
- Change the name of the policy, filter criteria, or assign/unassign rules.
- Click Save & Run Now.
The updated policy appears in the list of Device Management Policies.
Deleting policies
To delete a single or multiple policies:
- Select Setup > Resources > Device Management Policies.
- Click the checkbox against the policy to select it. You can select multiple policies.
- Click the checkbox beside the Policy Name on the title bar to select all the policies.
- Click Remove.
Note
The actions already performed on the resources due to the execution of the policy are not rolled back.The Device Management Policies page displays all the policies created for various resources and rules applied to them. The following columns are displayed:
| Fields | Description |
|---|---|
| Policy Name | Name of the policy. |
| Organization Name | Name of the Organization. |
| Execution Order | The order in which the policy is executed. |
| Last Updated Date | Date and time when the policy was last updated. The time zone displayed is the time zone of the organization while creating the user/client/partner profile. |
| Last Updated By | Name of the partner or client. |
| Last Action Time | Date and time when the policy was last executed. |
| Logs | Logs of the executed policy. Click to see the logs.
A dialog box appears asking for the following details:
|
| Apply Policy Now | Run the policy. Click the symbol to execute the policy. |