Introduction
Service maps help organize IT services into a hierarchical structure and provides clear visibility to services and resources (dependent on the services).
Creating service maps
Rules need to be defined to interlink a parent node with its child nodes. Service Map automatically tracks service impacts based on the defined rules.
Best practices for creating service maps include:
- Identify the dependencies of a service.
- Assess the topology for high availability or point of failures that determine the health of a service or a critical application.
Creating a service map involves:
- Creating a service map with a parent node.
- Adding a child node to the service map.
Step 1: Create a service map with a parent node
- From All Clients, select a client.
- Go to Infrastructure > Services,
- If you see Welcome to Service Maps, click Create Service Map.
- If the main Service nodes, click +New.
- Provide a service name and Save.
- Click the Settings icon, define availability and assign articles to the node.
- Name: Provide a parent node name.
- Node Type: By default, the type is
SERVICE. - Availability Threshold: Availability helps you to define
the status of a node. Supported nodes statuses are: Up, Down or Degraded.
- % of down members: Define the availability on the basis of the percentage of services in a group. For example, if 50% of services in a group are down, then the status of a service node is considered to be Down.
- # of down members: Define the availability on the basis of the number of services in a group. For example, if 10 services in a group are down, then the status of a service node is considered as Down.
- Send an alert when this service is down: Select to receive an alert notification.
- Assign knowledge base articles to the node.
- Click Save.
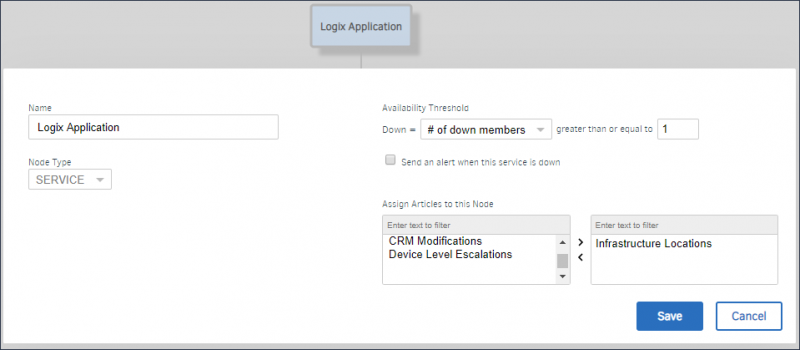
Service Group Definition
Step 2: Adding child nodes
To add a child node to the service map:
- Click the Add icon on the parent node.
- Add a child node using one of the following methods:
- Add resources or services to the node
- Import a node from another service map
- Link a node that exists in another service map
Add resources and services
To add resources and services to a node:
Provide a name for the node and click Save.
Click Settings icon to configure the node.
Select the required Node Type from the drop-down list. To add a Web service to a node, select Node Type > Others and select Resource > Web Service.
Add resources to the node. From the Resource Selection field, select either of the following options:
- Select Rule-based to add resources automatically using a policy.
The service groups dynamically shrink or expand based on new or decommissioned resources. - Select Manual to add resources manually.
- Select Rule-based to add resources automatically using a policy.
If you select Rule-based, do the following steps:
- Choose from All or Any rules to apply as filter for the resources/services.
- You can filter for resources using resource attribute name, a logical expression, and value. to filter resources using the logical expression Regex. List of matching resources appears in the Matching Members section.
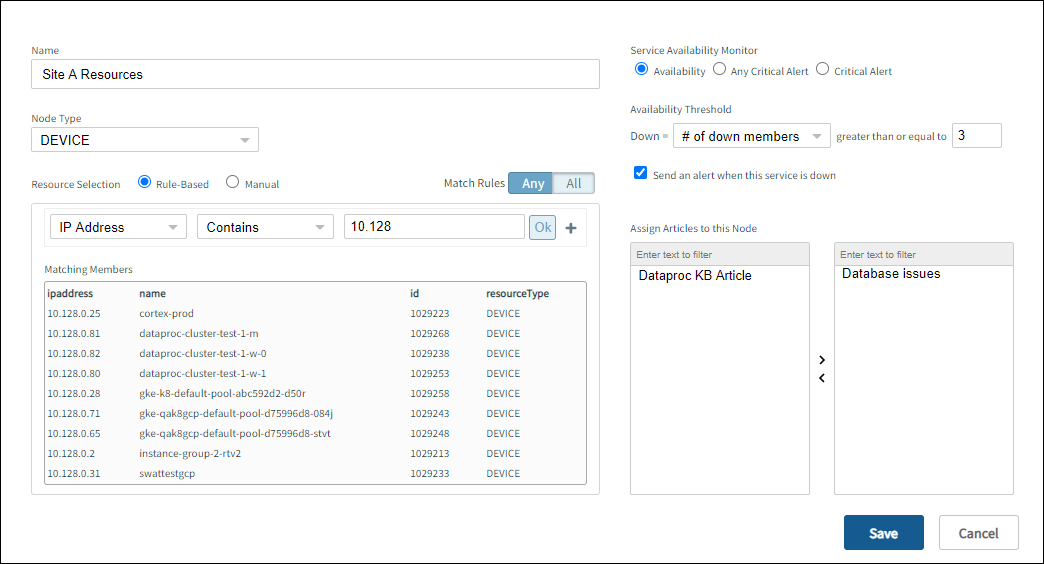
Child Node Configuration
If you select Manual, from Manually Assign Resources section, select the resources from the left box and click > icon. The selected resources are added to the right box.
From Service Availability Monitor, select one of the following options to define the node status:
- Availability: If an availability alert triggers on a resource, then the status of a node also is impacted.
- Any Critical Alert: If any critical alert is triggered by the service group, then the status of a node also is impacted.
Note: Ensure to define availability rule on the resource/service. Any critical alert triggered on the resource/service raises an availability alert and impacts a node. - Critical Alert: If a critical alert is triggered on the selected metrics, then the status of a node also is impacted.
Note: All selected metrics on the individual resources need to be in a critical alert state in order for the service node to be marked as down, or unavailable. In the case there is a healed alert, the service node is displayed as available, or in green, since this option requires the alerts to be in a critical state.
- Availability: If an availability alert triggers on a resource, then the status of a node also is impacted.
Provide the values in Availability Threshold.
The status of a node is defined by the Service Availability Monitor and Availability Threshold. In addition to the options in service availability monitor, if a certain number of resources are Down in the availability threshold, then the node status appears Down.
Note: Be sure to define availability rule on the resource/service. Any critical alert triggered on the resource/service raises an availability alert and impacts a node.Click Save.
The child node is added to the parent node and appears on the Service Maps screen.
Importing nodes
An imported service group is local to the service map to which it is imported. A parent level node or a child level node can be imported.
Note
As the imported service group acts as a local node within a service map, any update made on the imported group is applicable only to the current service map and not to other service maps using the service group.To import a node:
- Click the Import icon on the child node.
- From Import Node and Subhierarchy, provide the following:
- From the Service Map drop-down, select the required service map to which the node belongs.
- From the Node drop-down, select the required node.
- Click Save.
Linking and sharing nodes
This option allows linking or sharing of an existing service group with other service groups. Any change performed on the linked service reflects on the parent service as well. A user cannot edit a shared service within a parent service group.
To link a node:
- On the child node, click the Link icon.
- Select the required service map from the drop-down list.
- Click Save. The service map is linked to the child node and link icon appears on the node.
Note
A user can only link or share a parent level node. If a parent node is shared, then the child nodes are also shared.Unlinking shared nodes
To unlink a shared node:
- From the service maps page, click the Edit icon, mouse hover the node and then click the Delete icon.
- On the confirmation message, click Unlink.
- Click OK.
Viewing service maps
All the configured services appear on the Service Maps page. You can search, view the details, and also filter for service maps.
Search
From the Service Maps page, in the Search Service Maps box, provide the required service name. The service map node is displayed.
Node summary
The node summary provides entity information that is impacting a service group.
To view node summary:
- From the Service Maps page, click the required service node.
- Click the required node to view summary and resource details.
- The Summary of the node appears on the right pane displaying the following details:
- Articles: Refers to the knowledge base articles linked to the node.
- Down Since: Refers to the date and time when the node is Down.
- Services: Refers to the number of nodes/services that are impacted due to the selected node.
- Alerts: Refers to the number of alerts triggered on the node.
- Tickets: Refers to the number of Incidents created on the node
- Service Impacting Resources: Refers to the list of resources/services available in the node.
- The Resources tab includes the resources in the node along with their status. A user can further filter for resources based on the resource state. For example, to view resources which are Up, select the status Up from the drop-down list.
- The Summary of the node appears on the right pane displaying the following details:
Filters
The filter option filters services that are standalone or linked.
To filter, from the Service Maps page, click the Filters drop-down menu. By default the two types of services are selected. - Standalone Services: Refers to the services that are individual and are not linked with another service map. - Linked Services: Refers to the services that are linked to other service maps.

Standalone and Linked Service
Managing service maps
You can do various actions on the service map. For example, you can view the horizontal or vertical layout of the service map.
| Property | Description |
|---|---|
| Refresh | Used to force a refresh of the service map. The Refresh icon is located at the top right corner of the service map. |
| Expand | Used to view all the nodes. This functionality is useful if the nodes are collapsed and hidden. The Expand icon is located at the top right corner of the service map. |
| Edit | Used to edit any node in a service map. The Edit icon is located at the top right corner of the service map. |
| Toggle | Used to view the horizontal or vertical layout of a service map. The Toggle icon is located at the top right corner of the service map. |
| Full Screen | Used to view the service map in full screen mode. The Full Screen icon is located at the top right corner of the service map. |
Scenarios
Track the health of an IT service
You may want to track the Wi-Fi service availability. The Wi-Fi service constitutes two components:
- Wireless Controllers
- Wireless Access Points
Questions for this IT service:
- Is the service available?
- If the service goes down, which component is causing the issue?
- How much of the service’s downtime depends on each of the components?
Solution
- Create a service map with node Wi-Fi service as the service type and the other nodes as the network resource types.
- Indicate the availability of a Wi-Fi service by defining the availability on Wireless controller and Wireless access points.
- Formulate their health to the overall availability of Wi-Fi service.
When a Wi-Fi service experiences a degradation, it indicates that the components are unavailable.
Identify users impacted by an IT service
An organization has an IT service in the form a web application having three components: Load Balancer, Application Servers, and Database Servers. The application administrator wants to know what are the components impacting the web application in case the application goes down.
Solution
- Create a node (service group).
- Provide the name of the web application,
- Create another three nodes representing each application component.
- Add resources or services to the nodes.
- Define the availability monitor on the three nodes.
The web application node experiences degradation when any of the three components become unavailable.
