Introduction
Service Desk is a communications interface that provides a contact point for users to log, track and manage issues. Best practices and operational frameworks can be established using the Service Desk to implement efficient and reliable IT service management processes.
The main functions include:
- Management and ownership of ticket entities throughout the lifecycle.
- Providing a customizable interface between users.
The main terms include:
- Requester: User who reports an entity.
- Creator: User who creates the entity on behalf of the requester.
- Assignee: User who acts on the entity.
- Assignee group: User group who are required to act on the incident based on priority.
- Change approval group: User group who approves the change request.
Prerequisites
Be sure to create users and user groups before configuring Service Desk.Service desk entities
The following entities are available on service desk to address user requirements.
| Entity | Description |
|---|---|
| Service Request | A Service Request is a user request for a pre-approved change that is of low-risk and follows a standard procedure. |
| Incident | Any event that disrupts, or could disrupt, an IT service and/or business operations is an incident. Incident is created when there is an interruption or failure in service. |
| Problem | Problem is a condition from numerous related incidents or have common issues. One or more incidents with an unknown root cause are reported as a problem. |
| Change | Change is any addition, modification or removal of service and its associated documentation. Change requests follow a change approval process. |
| Task | Task is created when user wants to schedule a one-time activity on selected resources for a specific time. |
| Time Bound | Time bound is a recurring or non-recurring activity which helps you access remote resources. |
Configuring service desk
You can configure and customize the Service Desk to suit your requirements through the following features.
You can configure Service Desk features at client level or partner level.
- Configurations done at partner level applies to all clients under the partner.
- Configurations done at client level applies to the specific client.
To configure Service Desk:
- From All Clients, select a client.
- Go to Setup > Service Desk > Configuration > Settings.
- Configure the property settings.
- Click Update.
Configuring categories
Categories help you organize similar entities. For example, the appropriate Hardware category helps you to track all Hardware related change requests triggered within a week.
To create a category:
- Go to Setup > Service Desk > Configuration section > Categories.
- From CATEGORIES, click +.
- From NEW CATEGORY, provide the following:
- Scope: Partner or client.
- Client: Select from drop-down menu.
- Type: Select type of ticket.
- Category Type: Select either parent or child.
- Parent Category: Available if child category type is selected.
- Category Name: Select one or more category names.
- Click Submit.
Configuring status flows
A status represents the state of an entity at a specific point in your workflow. A transition is a link between two statuses that enables an issue to move from one status to another.
To configure status flow for each entity:
- Go to Setup > Service Desk > Configuration > Status Flows.
- From STATUS FLOWS, click +.
- Drag the required statuses from Available Statuses into Selected Statuses and click Next.
- From MODIFY STATUS FLOW, select the possible status transitions for both the requester and assignee and click Next.
- From Select Entities, select the entity.
- Click Save.
Only one workflow can be defined for each entity. However, you can modify an existing workflow through the edit option.

Status Flow
| Status | Description |
|---|---|
| New | Requester creates an entity and assigns the status New. |
| Open | Assignee begins to work on the entity and changes the status to Open. |
| Pending | Assignee moves the entity status to Pending while awaiting a pending authorization or response from Requester so that SLA response deadlines are not exceeded while waiting for approval. |
| On-Hold | Assignee moves the entity status to On-Hold when the time required to resolve the entity is longer than estimated. |
| Resolved | Assignee moves the entity to Resolved Status once the resolution is achieved and Requester's service is restored to SLA levels. |
| Reopen | Requester can move an entity in Resolved status to Reopen status if the resolution needs to be further reviewed. |
| Closed | Requester/Assignee can move entity status to Closed after the entity is resolved and verified by Requester. No further actions are possible in Closed status. |
Defining priorities
Priorities are used to establish the relative importance of an entity. Entity priorities are derived from a Priority Matrix that is based on Business Impacts and Urgencies settings. You define the Business Impact and Urgency and map them to the priority levels.
- Business impact: The degree to which the issue affects the service levels until it is resolved.
- Urgency: Measures how soon the issue needs to be resolved.
The following priority levels are supported:
- Very Low
- Low
- Normal
- High
- Urgent
To define business impact:
- Go to Setup > Service Desk > Configuration section > Business Impacts.
- From BUSINESS IMPACTS, click + and provide the name and description.
- Click Create.
To define urgency:
- Go to Setup > Service Desk > Configuration section > Urgencies.
- From URGENCIES, click + and provide the name and description.
- Click Create.
Forward mapping
In forward mapping, you can define the possible Business Impacts and Urgencies and map them to a certain priority level. For example, when urgency is Urgency 1 and Business Impact is Affecting all users, priority is selected as High.
Reverse mapping
In reverse mapping, you can choose a certain priority level and assign the possible Business Impacts and Urgencies. For example, for Urgent priority, Business Impact is set as Affecting all users and Urgency is set as Urgency 1.
Creating custom forms
Custom fields help you to provide more business-relevant information while creating an entity in Service Desk. User can create custom fields in the entity forms apart from the available predefined fields. Custom fields can be created at partner level or client level.
To create custom fields:
- Go to Setup > Service Desk > Configuration section > Custom Forms.
- Click the entity tab and select the field icons to add required fields.
- Click Save.
Creating canned responses
Canned Responses are pre-set answers created to address frequently asked queries. You can insert or edit the canned response as per requirements in text-based responses. Canned Response templates are created under specific categories for different entities. The shared templates are available to all the users across the organization.
To create a canned response template:
- Go to Setup > Service Desk > Automation > Canned Response.
- From CANNED RESPONSE, click +.
- From NEW CANNED RESPONSE, provide the required template information.
- Click Submit.
Canned responses can be used:
- While creating a new entity
- While updating an existing entity
Managing notifications
Service desk notifications keep the users updated about the progress of entities. The entities are the tickets managed by service desk such as service request, incident, problem, change request, task, and time-bound.
Notifications are triggered:
- When an entity is created
- When an entity is updated
- When user action is expected
Notifications can be configured based on different attributes of the entity such as:
- The source from which entity is created.
- The priority of the entity.
- Source Policy Type, if the entity is triggered by a policy.
- Assignee
- Status of the entity.
For example, an incident notification can be:
- Created for incidents with high priority.
- Generated by an auto-incident policy.
- Be in open status.
Creating notifications
Notification template is used to configure the notification content for Service desk entities. The template supports custom tokens to add the properties of entities. Partner user can create and edit notification templates.
To create a notification template:
- Select a client from the All Clients list.
- Go to Setup > Service Desk > Automation > Notifications.
- From NOTIFICATIONS, click the Add button.
- From ADD NOTIFICATIONS, provide general details, draft the notification email, and add users to be notified.
- Click Finish.
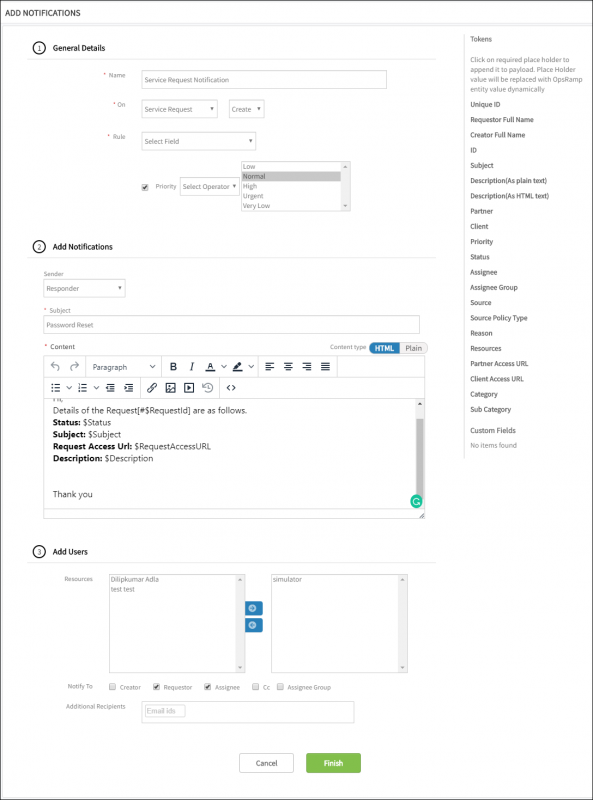
Add Notifications
Note"
You can also send notifications on behalf of a user using the Custom option in Sender drop-down in the Add Notification section.Editing notifications
To customize email notification:
- Select a client from the All Clients list.
- Go to Setup > Service Desk > Automation > Notifications.
- Click Customize Email option for an existing notification, provide the details, and click the required tokens.
- Click Add.
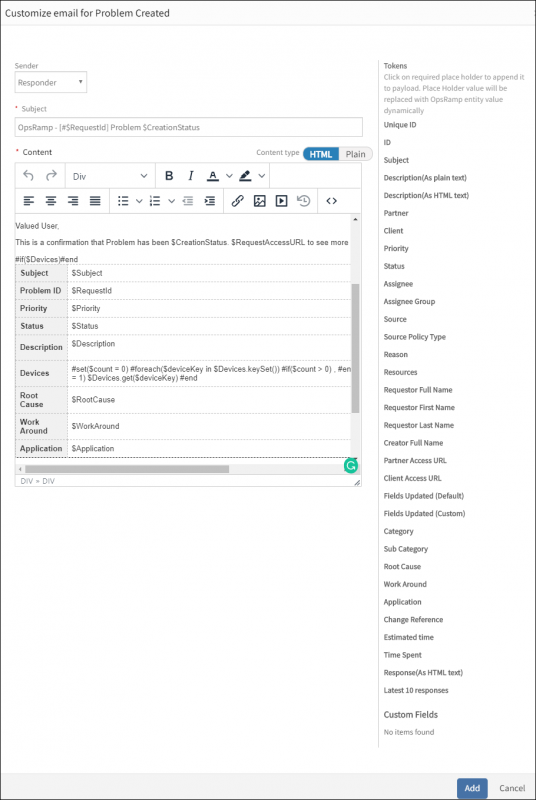
Edit Notifications
The following are more customizations:
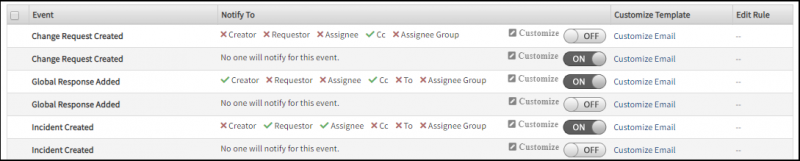
- To change notification rules, click Edit rule for the notification event.
- To change the users to be notified, click Customize.
- User can also include custom fields while configuring notification.
Enabling notifications
The configured notification is in enabled mode by default. However, the notification can be saved in disabled mode if you do not want the notifications to be triggered.
Enable Notifications
Viewing notifications
Views enable you to see a list of Service Desk entities based on certain attributes.
- Create View for tickets assigned to a specific user
- Create View for all tickets with resolved status
- Use the public option to allow all the users within the organization can see the View.
- Use the private option to make the view private for the user who creates it.
To create a new view:
- Go to Service Desk > Automation > Create View.
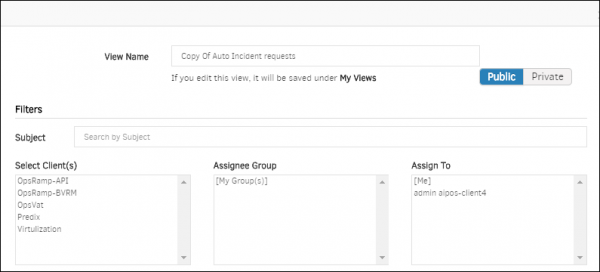
- In the New View page, provide a Name for the view and select the attributes.
- Click Save.
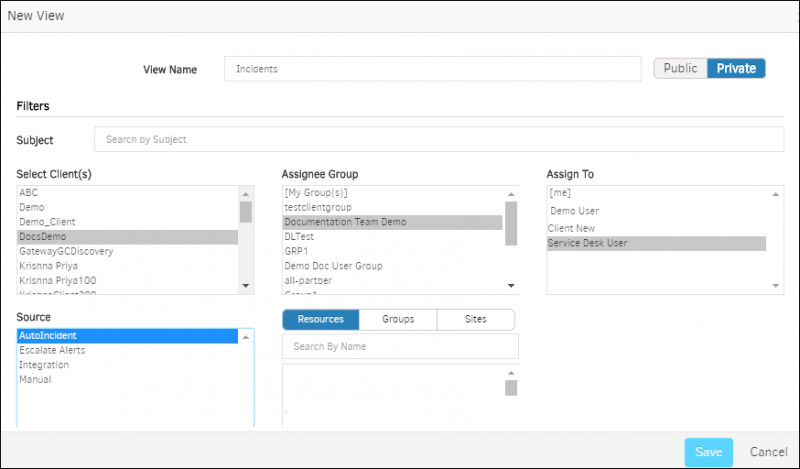
New View
To create a view from advanced search:
- Go to Service Desk > Advanced Search.
- Select the required attributes and click Submit. Search results appear.
- Click Save as View.
- Provide a View name and click Save. The search results are saved as a View.
Sharing views
You can share any view that is created as public within the organization.
To create a shared view:
- Click Service Desk.
- On the Shared menu (on the left pane), click the edit button of a view.
- Edit the required attributes, provide a View name and click Save. The shared View appears under Private views.