Introduction
The Agent-based G1 custom monitor helps you to create your own script to create new monitors. To write a script, choose a supported scripting language supported. For example, Python, Windows PowerShell, and SHELL.
To create agent-based custom monitors:
- Go to Setup > Monitoring > Agent Custom Monitors.
- From AGENT CUSTOM MONITORS, click + Add.
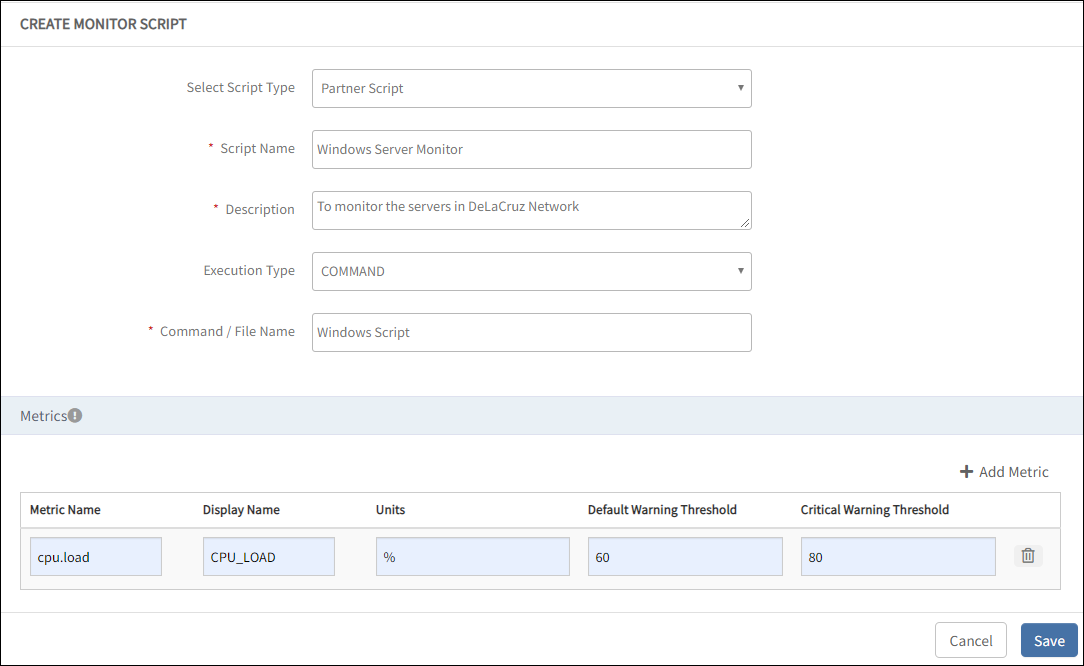
- From CREATE MONITOR SCRIPT, provide details for the following parameters:
- Select Script Type: Refers to the scripts applicable for partners and clients.
- Script Name: Refers to the unique name provided for the script.
- Description: Refers to the detailed description that explains the reason for the script.
- Execution Type: Refers to the type of execution. Select as desired.
Depending on the selected type of execution, the screen displays more fields. For example, if you selectEXEas execution type, then the File field appears below. You can use Choose File to upload the required .exe file. If you select any other execution type, you need to provide Command/File Name and the corresponding script extension. - Metrics: Refers to the Metrics required for the script.
To add Metrics:- From Metrics, click + Add Metric .
- Provide metric information.
- Click Save.
AGENT CUSTOM MONITORS screen displays the new monitor.

Agent-based Create Custom Monitor
After creating the Agent Custom Monitors, add the custom monitor to a template, and assign the template to a resource.
Agent-based custom monitor scripts
Use the following custom monitor scripts for G2 Agents:
- VBS Script
- PERL Script
- PHP Script
- PYTHON Script
- BASH Script
- POWERSHELL Script
Setting up folders and users
By default, all the custom monitor scripts and log files are downloaded to a predefined location in your system. The system user (Windows) and root user (Linux) holds all required permissions (Read, Write, and Execute) on the download folders.
The following table provides the default folder locations and users for Windows and Linux:
| Operating System | Default Folder Location | Default User |
|---|---|---|
| Windows |
| System User |
| Linux | /opt/opsramp/agent/lib/libexec/ | Root User
|
Managing agent custom monitors
You can manage the configured Agent custom monitors using multiple methods.
Search
You can use the search option to find a custom monitor by the script name. For searching with criteria, use the Advanced option.
Advanced
To use the advanced search:
- Click Advanced.
- From ADVANCED SEARCH window, provide the following parameters:
- Scope
- Script Name
- File Name
- Description
- Click Search.
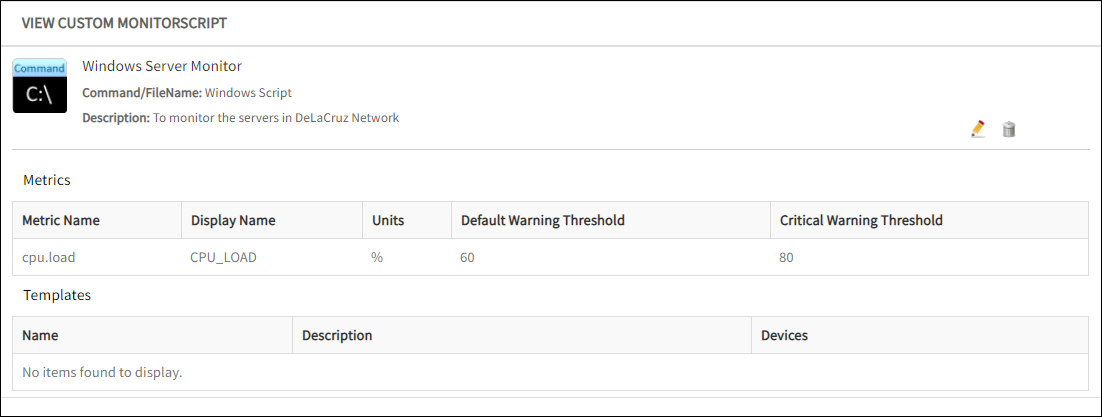
Viewing custom monitor script
After creating an agent custom monitor script, you can view the details such as metrics and templates from the VIEW CUSTOM MONITOR SCRIPT screen.

Agent-based View Custom Monitor
Creating a template using agent-based G1 custom monitor
You can add the Agent-based custom monitor to a template to initiate the monitoring of your resources.
To add agent-based G1 custom monitor to a template:
- Select a client from the All Clients list.
- Go to Setup > Monitoring > Templates.
- From the Templates screen, click + Add.
- From MONITOR TEMPLATE, provide details for the following parameters and click Save.
- Select Template Scope: Refers to the template type.
- Collector Type: Select Agent.
- Monitor Type: Select G1 Monitors.
- Applicable for: Select Device.
- Template Name: Refers to the name of the template.
- Description: Refers to the summary of the template.
- Generation: Refers to the generation that the template belongs to.
- Tags: Refers to the user-defined tags for better filtering.
- Prerequisites: Refers to the essential things that you must consider while monitoring using the template.
- Status: Refers to the Active or End-of-life templates.
- Notes: Refers to the information that you want to add to the template.
- Template Family Name: Refers to the category that applies to the application. For example, Windows Server, Storage Server, and Network Server.
- Deployment Type: Refers to one of the following methods to apply the template to the resources:
- Custom
- Optional
- Standard
After providing the template details, MONITOR TEMPLATE displays the various available Monitors. - Go to Agent Custom Monitors.
Note: The console for the Monitors section varies with the option selected in the Collector Type.
- To add details in Agent Custom Monitors:
- From the Agent Custom Monitors section, click + Add.
- From Agent Custom Monitor, provide details for the following parameters:
- Frequency: Refer to the frequency to execute the template.
- Monitor: Refers to the available Agent custom monitors.
After selecting the Monitor, you can provide the Params, Warning, and Critical threshold values. - Select Monitor, Availability, and Alert checkbox to initiate monitoring.
After adding the Agent custom monitor to a template, assign the template to a resource to initiate monitoring.