Describes how to use a training file to train learning-based alert management policies.
Introduction
The alert management training file is a CSV (comma-separated values) file that provides input data for machine learning to understand alert patterns and drive the following:
First response
Alert escalation
The data is saved in a table structured format. The training file is generally a text file containing information separated by commas and plays a key role in alert management.
Downloading a sample training file
The sample training file (downloadable from OpsRamp) contains sample metric names. As provided in the training file, alerts triggered in a sequence (as provided in the training file) are correlated.
To download a sample training file:
From All Clients, select the client.
Go to Setup > Alerts > Alert Escalation or First Response.
From the respective policies page, click +.
In the policies page:
Alert Escalation policy: From Import Dataset and Train Model section, click Alert_Escalation_Training_Example.csv to download a sample training file.
First Response policy: Select Suppress specific alerts or Snooze specific alerts for a given time. Click Alert_First_Response_Training_File_Example.csv to download a sample training file.
Creating a training file
A training file can be created or modified from the sample training file.
To create a training file:
Open a spreadsheet.
Enter the metric names. Alerts triggered in the specified sequence are correlated.
Save the training file as CSV UTF-8 (Comma delimited).
Note
Empty cells indicate All Other use cases.
Empty Cell in CSV File
When a machine-learning algorithm is doing the prediction, it uses the row which has the most exact matches.
If two rows have the same matching values, the machine-learning algorithm uses the first row it encountered.
Example of empty cell usage
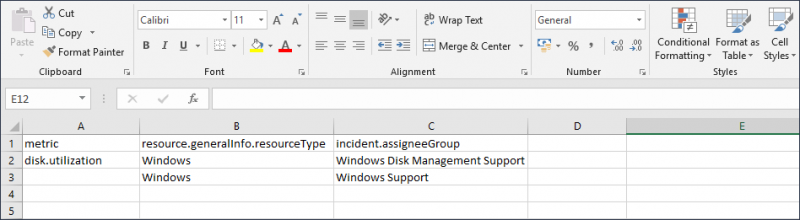
A user wants to route alerts in the following manner:
The disk.utilization metric that is triggered on Windows resources go to the Windows Disk Management Support team.
All other metrics for Windows resources go to the Windows Support team.
The following shows an empty metric cell on the second row which indicates all other metrics:
Empty Cell in training File
When a machine-learning algorithm is doing the prediction, it uses the row which has the most exact matches.
If two rows have the same matching values, the machine-learning algorithm uses the first row it encountered.
Sample training file for alert escalation
The sample training file (downloadable from OpsRamp) contains the fields clientUniqueId, metric, resource.generalInfo.resourceType, component, incident.assigneeGroup.name.
Sample training file for first response policy
The sample training file (downloadable from OpsRamp) contains the fields clientUniqueId, metric, resource.generalInfo.resourceType, currentState, component, suppressed, snoozeDuration, processIds.
Sample First Response Training File
Key considerations
Alert, resource, incident attributes, and metric names are case-sensitive.
The following table provides the metric name representation for a particular monitor.
Monitor Name and Agent
Monitor Name
G2 Agent
Disk Utilization
DISK
Memory Utilization
MEMORY
Windows Service
WINDOWS_SERVICES
Input column attributes
Types of input columns available are Predefined attributes and Custom attributes.
Predefined attributes
Predefined attributes are the default attributes supported for a training file. The attributes are derived from alert and resoource attributes. Use the Get Alert API to retrieve alert attributes and Get Resource API to retrieve resource attributes.
Note
Non-collection type attributes are supported that are within three levels down from Alert. For example, in the column name resource.generalInfo.resourceType, resource is the first-level attribute, generalInfo is the second-level attribute and resourceType is the third-level atrribute of alert.
Following are example column names for alert and alert resource attributes:
Alert attributes
Alert resource attributes
clientUniqueId
resource.state
metric
resource.generalInfo.resourceType
component
resource.generalInfo.make
alertType
resource.generalInfo.osName
currentState
resource.location.name
status
resource.deviceGroup.name
priority
resource.serviceGroup.name
elapsedTimeString
-
healedTimeString
-
repeatCount
-
Note
The attributes resource.deviceGroup.name and resource.serviceGroup.name are exceptions that belong to the collection type attributes. These attributes are very important in determining the incident routing and prioritization rules.
Important
The attributes resource.generalInfo.name is not supported as an input column name. Using resource name is error prone and may cause maintenance problems. For example, every time a resource is added or removed, the training file must be updated which can be tedious task and error prone. Consider using the high-level criteria such as resource.deviceGroup.name or resource.serviceGroup.name or resource.generalInfo.resourceType to drive incident routing, prioritization, categorization, and cc.
Custom attributes
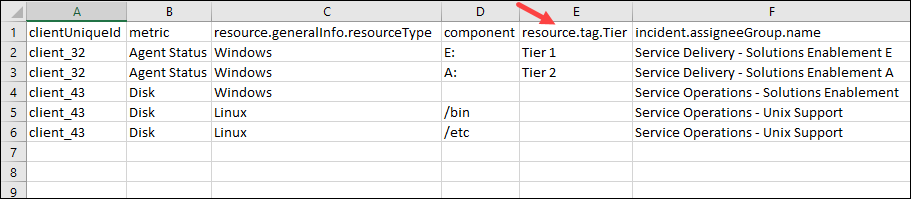
Custom attributes (tags) are definable and these attributes drive escalating and suppressing alerts. For example, in an organization, resources are divided into three tiers Tier 1, Tier 2, and Tier 3. Different tiers represent different importance. Tier 1 is a critical and highly business impacting resource. If Tier 1 resource is down, the business can be highly impacted and needs immediate attention. Therefore, assigning the resource and its related alerts to a skilled personnel is equally important. In this example, Tier is the custom attribute name and Tier 1, Tier 2, and Tier 3 are the custom attribute values.
To process to use a custom attribute is the following:
Create a training file.
Specify a column with resource.tag.<tag_name>. For example, resource.tag.Tier.
Add the values of the custom attributes. Example: Tier 1.
Example training File with Custom Attributes
Note: Multiple tag names are allowed as separate columns.
Considerations
The following are considerations for adding resource group or service group attributes:
To specify more than one device group or service group in the column names
resource.deviceGroup.name and resource.serviceGroup.name, list each group separately in a row.
If a group has parents, use the full path to specify the child group.
For example, to specify a grandChild group, provide the full path as Parent > Child > grandChild.
Similarly, to specify a child group, provide the path as Parent > Child in the training file.
Output column attributes
The following the column names are used for learned configurations:
Alert Escalation:
incident.assigneeGroup.name
incident.category.name
incident.subCategory.name
incident.priority
incident.cc
incident.businessImpact.name
incident.urgency.name
incident.knowledgeArticleIds
First Response:
suppressed
snoozeDuration
processIds
FAQs
What are the agent versions?
Windows Agent: G2 Agent version starts with the 6 series. Example: 6.00.0011
Linux Agent: G2 Agent version starts with the 4. or 5. series. Example: 5.2.1-1
How do I check the agent version on a resource?
To check the agent version:
Select a client from the All Clients list.
Select Infrastructure, select the resource type, and click the resource name.
From the left pane, click Attributes.
Click More Information and view the OpsRamp Agent Version.