Introduction
Time series forecast visualizes the expected trends of a metric within a specified time period and generates alerts about potential breaches. For example, a forecast alert can be notified when a disk is expected to run out of space within five days.
Forecasts have the following behaviors:
- The forecast model provides forecasts once in a day.
- If a forecast model learns that a forecast is not going to breach a limit, an existing forecast alert is removed.
- To commence a forecast, at least 20 days of disk metric data must be collected. This means that a new resource wo not have a forecast until 20 days have passed.
Important
Forecast monitoring can be applied to a maximum of 25 resources. To request more resources, contact support.Forecast applicable metrics
Metrics that support metrics can be used for agent or gateway collector types:
- For agent collector types, forecast monitoring is configured only on Application Monitors.
- For gateway collector types, forecast monitoring is configured on Application Monitors and Monitors.
The following table provides details of forecast-supported metrics:
| Metric name | Collector type | Applicable resource | Monitor type | Application/Monitor definition |
|---|---|---|---|---|
| emc.vnx.volume.utilization | Gateway | Any Resource | Monitors | G2 – EMC VNX Volume Monitor |
| emc.vnxe.disk.utilization | Gateway | Any Resource | Monitors | G2 – EMC VNXe Storage Array Disk Monitor |
| vmware.vm.disk.usaged | Gateway | Any Resource | Monitors | GE – VMware VirtualMachine Performance |
| system.disk.used.util.percent | Agent | Device | Application Monitors | Memory Utilization (%) and Disk Utilization (%) |
| mounted.disks.utilization | Agent | Device | Application Monitors | MountPoints_Instance_Monitoring |
| netapp.7mode.disk.utilization | Gateway | Storage LUN | Application Monitors | NetApp 7 Mode API Monitors |
| netapp.7mode.LUN.utilization | Gateway | Storage LUN | Application Monitors | NetApp 7 Mode API Monitors |
| netapp.7mode.volume.utilization | Gateway | Storage LUN | Application Monitors | NetApp 7 Mode API Monitors |
| netapp.cluster.LUN.Utilization | Gateway | Storage LUN | Application Monitor | NetApp C Mode API Monitors |
| netapp.cluster.volume.util | Gateway | Storage LUN | Application Monitor | NetApp C Mode API Monitors |
| nimble.volume.usage | Gateway | - | - | Nimble Storage Monitors |
Configuring time series forecast
To configure time series forecast:
- Select a client from the All Clients list.
- Go to Setup > Monitoring > Templates.
- Click +Add and provide the monitor details.
- On either the Application Monitors or Monitors section, click Add.
- Configure the following details:
- Frequency: How often the monitor must run on a resource.
- Application or Monitor Definition: The application name to be assigned for forecast monitoring.
- When to Alert: The scenario used for an alert. Select Forecast of a Breach of a Threshold.
The forecast metrics for the selected monitor or application will appear. - Select the desired metric.
Note: Few applications (or monitors) have only one metric applicable for forecast. Instead of selecting a metric, directly configure the parameters.
- Configure the following parameters for the metrics:
- Limit: Provide the capacity percentage so that an alert is triggered if the forecast breaches (or exceeds) capacity.
- Warning Threshold: A forecast period that can trigger a warning alert. For example, enter a value of 5 to receive a warning alert if the limit value is breached within five days.
- Critical Threshold: A forecast period that can trigger a critical alert. For example, enter a value of 2 to receive a critical alert if the limit value is breached within two days.
- Alert: Determines if a monitor should trigger an alert if either a warning or critical threshold is breached.
- Click Add.
- Click Save.
After creating a forecast monitoring template, assign the template to a resource.
Viewing forecast results
When the configured forecast conditions are met, alerts are triggered and are available for viewing in the Alerts browser. The time series widget tracks the results of the forecast.
To create time series forecast widget:
- Go to Dashboard > + Add Widget.
- Click Generic and select both the resource and resource type.
- From the Time Series Type drop-down, select Forecast.
- Select the device component and the duration of the most-recent forecast.
- Provide a widget title, select a chart type: Line Chart or Area Chart.
- Click Save.
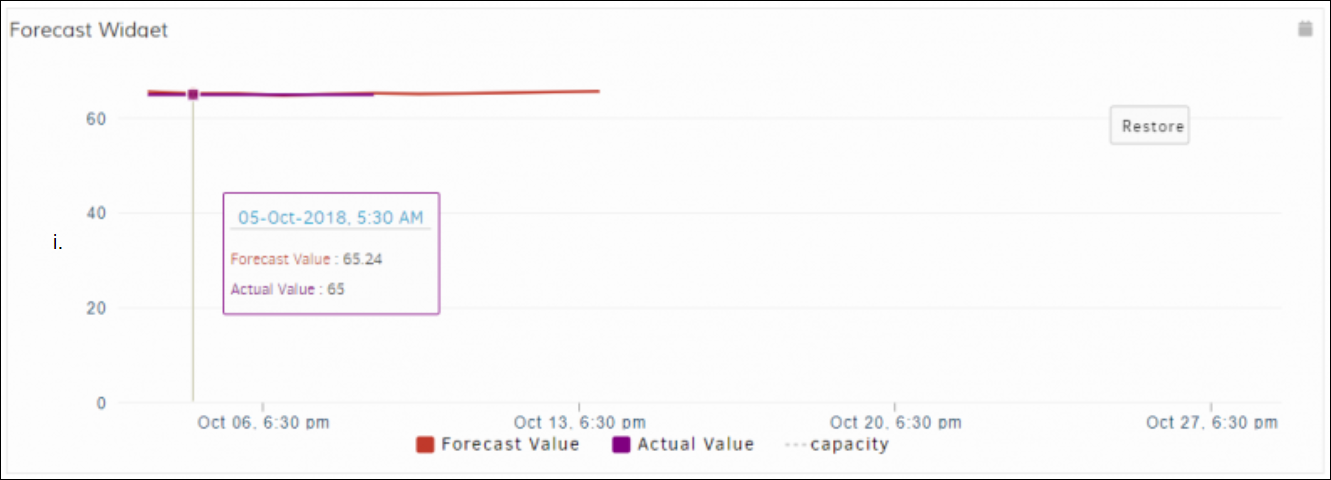
The time series forecast widget appears on the dashboard: