Introduction
Patching the resources consistently ensures complete protection against any security threat. Configuring the patch schedule allows the administrator to decide when to apply the patch updates.
Note
You can schedule patch configurations on a periodic or on-demand basis.Adding and scheduling patches
To add a patch configuration:
- Select a client from the All Clients list.
- Go to Automation > Patch Management > Patch Configuration and click Add.
- From Add Patch Configuration, provide the following:
- Select Client
- Patch Configuration Name: Refers to the name for the patch ready for installation.
- Description: Refers to the patch details.
- Apply To: Refers to applying the patch to desktops or servers.
- Resource Groups: Refers to applying patches to Windows and Linux devices in the resource groups.
- After providing the basic details, navigate to the Assign Devices section.
- From Assign Devices, select the devices from the Available Devices section.
The selected devices appear in the Assigned Devices section. - After selecting the devices, navigate to Approval Type.
- From Approval Type, select one of the following options:
- Manual Approve
- Auto Approve
- After selecting Approval Type, navigate to Reboot Options.
- From Reboot Options, select one of the following options:
- Do not reboot
- Reboot after install if required
- After selecting the reboot options, navigate to the Patching Schedule section.
- From Patching Schedule, provide the following parameter:
- Select Time Zone: The patching process runs according to the selected time zone. For existing patch configurations, Resource Time Zone is automatically assigned.
- Start Date: Select the date and time (In hours and minutes) to start the patching process.
- Recurrence Pattern: Select the pattern to run the patching process. For example, Run On Demand, Patch Tuesday.
Note: For Windows, select Patch Tuesday to schedule the patch installation process. This selection helps to align patching with Microsoft’s Patch Tuesday every month. You can set up patching to trigger at an offset of up to 26 days after the Patch Tuesday of every month. For example, if the Patch Tuesday of the current month falls on the 11th, then an offset of one day schedules the patching to trigger on the 12th of the same month. Similarly, if Patch Tuesday falls on the 9th of the following month, then patching for the same schedule triggers again on the 10th. - Enable patching during shutdown/reboot: Select to enable automatic patching when the device is in shutdown or reboot mode.
- Enable maintenance: Select to enable maintenance period.
- Escalate maintenance alerts when window ends: Toggle
ONorOFFto escalate maintenance alerts that do not auto-resolve after the patch maintenance duration.
To view the Escalate maintenance alerts when period ends column displaying Yes or No according to the selection, go to Infrastructure > Maintenance. - Select schedule duration: After enabling the maintenance period, select the desired duration.
- Escalate maintenance alerts when window ends: Toggle
- Add Users: To add users, do the following:
- Click +Add Users.
- From the Users screen, select the desired users.
- Click Add Users.
The selected users receive an email notification after completing the patch configuration job.
- Click Finish.
Notes
- The patch configuration is displayed in the configured list and click Run Now to install the approved patches as per requirement.
- The approved patches are installed only when a patch configuration is added.
- Patches are downloaded directly to individual desktops and servers. The administrators can install Patches using Agent for Windows. The administrator might experience above normal bandwidth usage during the weekend patch maintenance period.
Viewing the patch configuration list
View the configured patches in Patch Management > Patch Configuration.
Patch Configuration
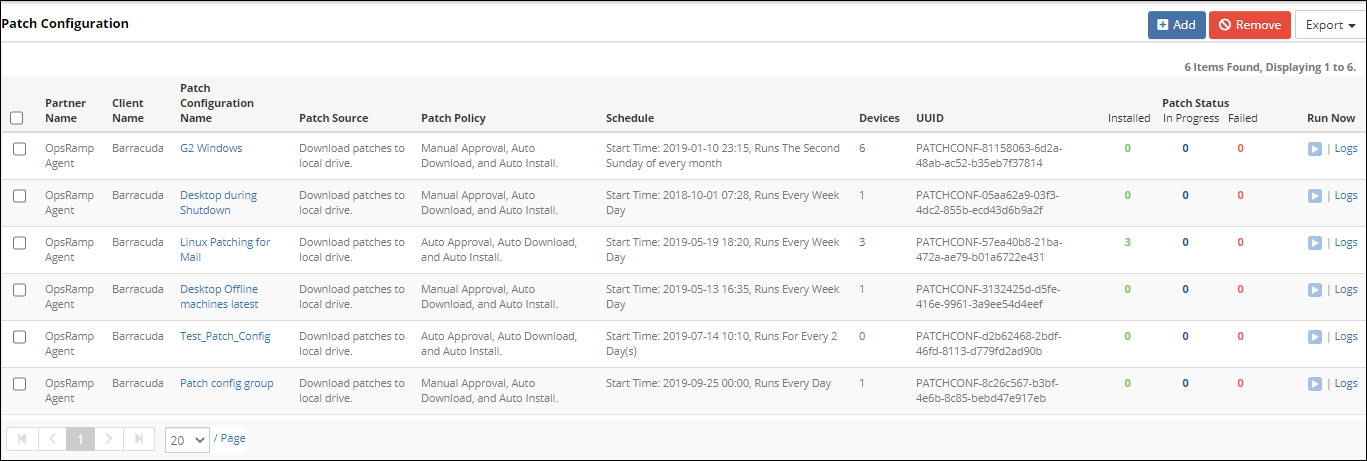
The following table describes the various attributes displayed on the Patch Configuration page:
| Attribute | Description |
|---|---|
| Client Name | Name of the selected client. |
| Patch Configuration Name | Name of the configured patch. |
| Patch Source | The location to save the downloaded patches. |
| Patch Policy | Describes whether the patches are auto-approved, manually approved, or auto-installed. |
| Schedule | The start date, time, and the recurrence pattern of the patch configuration. |
| Devices | The numeral indicates the number of chosen devices. Click the displayed number to view the selected devices. |
| UUID | The universally unique ID used for API communication. |
| Patch Status | Tracks the Installed, In Progress, and Failed patches in the patch configuration. The counts refresh every five minutes and display only the past 24 hour details. Click the displayed number to view the corresponding patch progress device list details such as patch names, device names, and count. |
| Run Now | Run the patch job on selected devices and resource groups. |
Patch Status
The Patch Status tracks the Installed, In Progress, and Failed patches in the patch configuration. The In Progress column displays the number of patches that are in the process of installation and are yet to be installed.
For example, if there are 100 patches ready for installation, the corresponding patch status is:
- Installed - 0
- Progress - 100
- Failed - 0
After five successful and three failed patch installations, the patch status is:
- Installed - 5
- Progress - 92
- Failed - 3
Internal patch configuration process
After the patch configuration job begins, the agent executes the following:
Note
This process is shown for Linux resources.Step 1: Agent receives control MSG xml (as seen in debug logs)
<cm><id>MISSING_PATCH_DL_IN</id><reqid>2018-06-25 06:49:14</reqid><params>2</params></cm>
Step 2: Agent sends response
<cm><id>RES_MISSING_PATCH_DL_IN</id><response><![CDATA[<winadviceinfo><result params=”2″>success</result><reqid>2018-06-25 06:49:14</reqid></winadviceinfo>]]></response></cm>
Step 3: Agent receives control MSG xml
<cm><id>MISSING_PATCH_DL_IN_LIST</id><reqid>0</reqid><params><ps><p><name>fcoe-utils-1.0.28-6.el6.x86_64 — “”</name><name>curl-7.19.7-53.el6_9.x86_64 — “”</name><name>libtiff-3.9.4-21.el6_8.x86_64 — “”</name><name>efibootmgr-0.5.4-15.el6.x86_64 — “”</name><name>grep-2.20-6.el6.x86_64 — “”</name></p><list>0</list></ps></params></cm>
The agent saves the kbid in path location /opt/opsramp/agent/tmp/approved_pkgs.json file.
Step 4: Agent runs patch install job
The following commands are used (depending on the OS) to generate a patch_install_result.json file in path location
/opt/opsramp/agent/tmp/patch_install_result.json:
- Ubuntu –
/usr/bin/python /opt/opsramp/agent/lib/apt_frame.py install - CentOS, Fedora –
/usr/bin/python /opt/opsramp/agent/lib/yum_frame.py install - SUSE -
/usr/bin/python /opt/opsramp/agent/lib/zypper_frame.py install - DARWIN –
/usr/bin/python /opt/opsramp/agent/lib/mac_frame.py install
After running the patch install job, the agent checks for the KBIDs that requires a reboot.