Introduction
OpsRamp supports patch management for Windows and Linux operating systems.
OpsRamp provides a list of missing patches that you can install in your devices. You can create jobs to automate the missing patches process that runs at the scheduled time and date on each device. All users added to the missing patch request job receive notifications after the job starts. You can filter the missing patches using the patch baselines for Windows and Linux devices.
Creating jobs for missing patches
You can create and schedule a job to identify the missing patches in your Windows or Linux devices. You can view the missing patches after running the jobs.
To create jobs for missing patches:
- Select a client from the All Clients list.
- Go to Automation > Jobs > Jobs List and click Create. Add Job screen appears.
- From Add Job, provide the following:
- Select Client: Refers to the desired client name
- Job Type: Refers to the reason for creating the job. For example, you can select Missing Patches Request to create a job to identify the missing patches.
- Job Name: Refers to the unique name for the job process.
- Go to the Job Schedule section and provide the following:
- Start Date: Refers to the start date of the job process.
- Recurrence Pattern: Refers to the pattern that you want to run the job.
- Daily
- Weekly
- Monthly
- Run ONce
- Never
- Devices: Refers to the devices that you want to add for patching.
- Add Users: Refers to the users receiving the notification when a patch scan job executes.
- Click Save.
The created job appears on the Job List page.
After creating the job, you can view that on the Automation > Jobs > Jobs List page. The Jobs list page displays the Client Name, Job Name, Job Type, Job Schedule, Devices, UUID, and Run Now.
Note
You can use the Run Now option to run the job at that moment.Viewing resources with missing patches
You can view the list of missing patches in the application using one of the following options:
- By Patch
- By Device
Viewing by patch
The By Patch option allows you to view the list of missing patches applicable to each device. The other available patch status is – Missing, Approved, Installed, and Failed.
To view the list of missing patches using By Patch:
- Select a client from the All Clients list.
- Go to Automation > Patch Management > Missing Patches and click By Patch (Default option).
- After selecting By Patch, select one of the following operating systems:
- Windows (Default option)
- Linux
- From the options in the drop-down menu, select the desired Baseline.
- After selecting the Baseline, select one of the following options:
- INCLUDE (Default option)
- EXCLUDE
The list of missing patches for the selected operating system appears.
The numeral in the Missing column allows you to view the devices that require patch management. Click the numeral to view the list of devices.
Viewing by patch (Windows)
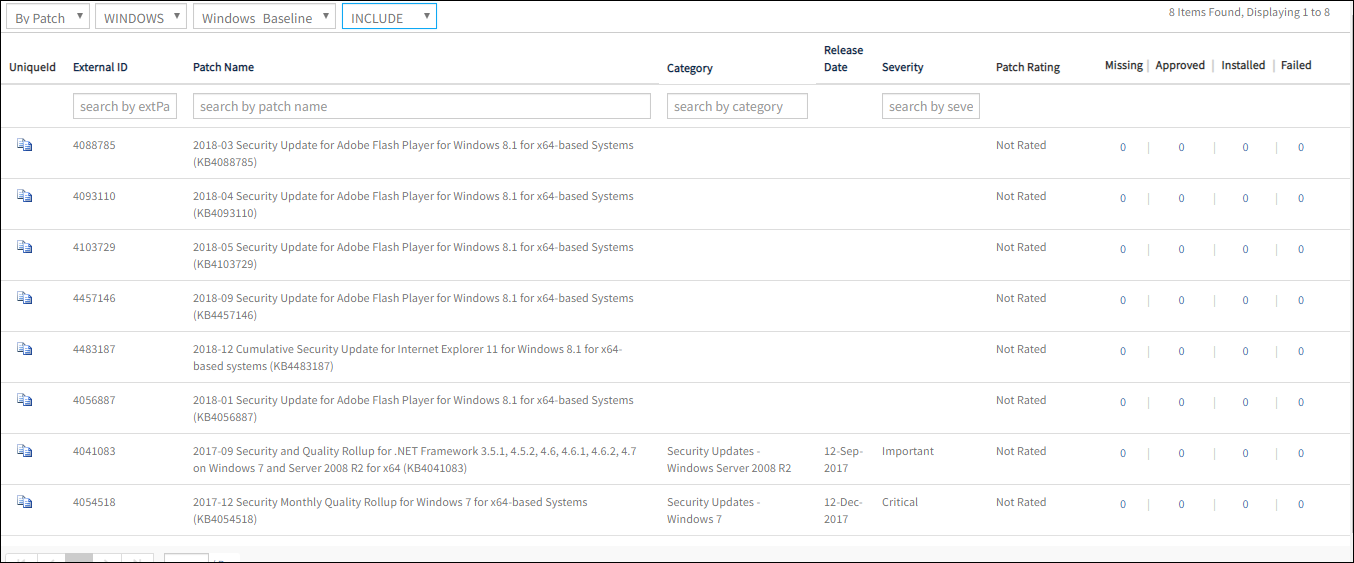
By Patch - Windows
Important
All users added to the missing patches job receive an email after the patch scan process.when new patches supersede the existing approved patches with the same KBID. The email consists of a consolidated list of the following:
- No of devices successfully scanned for patches.
- No of devices failed for patch scan.
- No of devices that have superseded patches and unapproved by OpsRamp.
Viewing by patch (Linux)
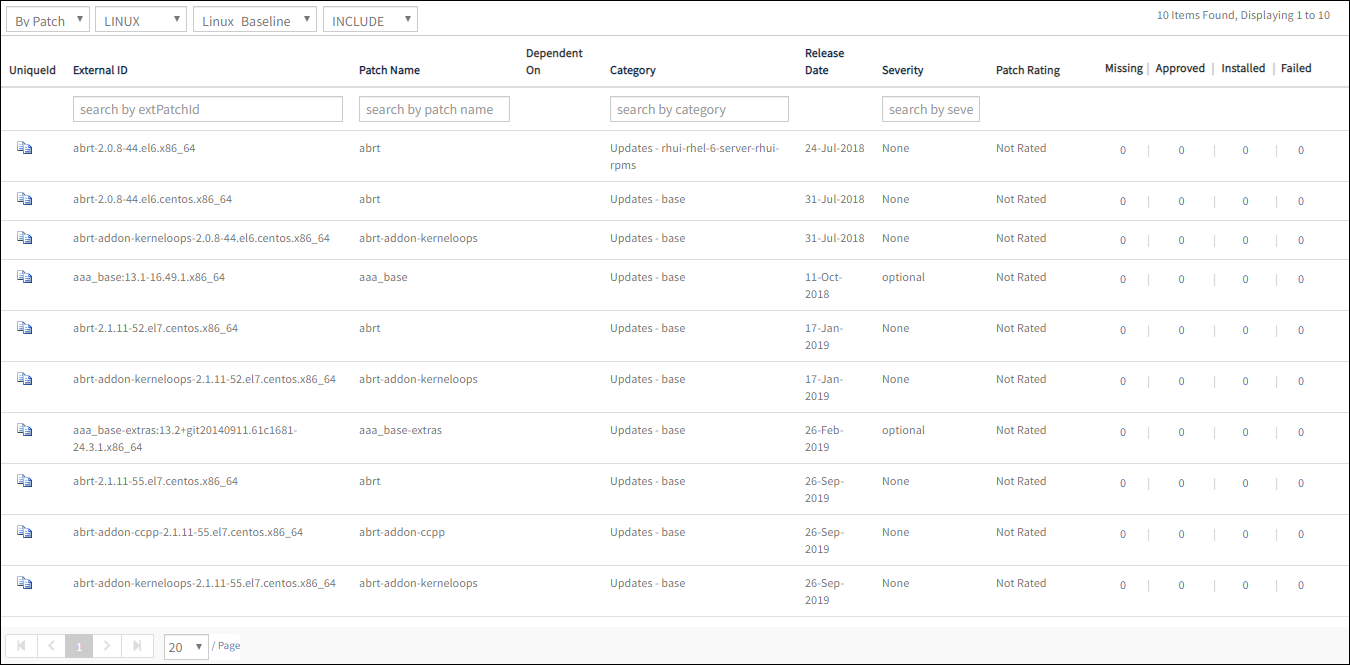
By Patch - Linux
Notes
- After you get the missing patches list, you can approve the selected missing patches. For more information, view Patch Approvals.
- The missing patches page does not display the Approve button after you select the desired baseline.
- The list displayed in the Baseline drop-down menu is dependent on the selected operating system.
Viewing by device
To view the list of devices with missing patches using By Device:
- Select a client from the All Clients list.
- Go to Automation > Patch Management > Missing Patches.
- From the list of missing patches page, click By Device.
All devices that require patches appear.
The numeral in the Missing column allows you to view the list of missing patches for a selected device. Click the numeral to view the list of patches.
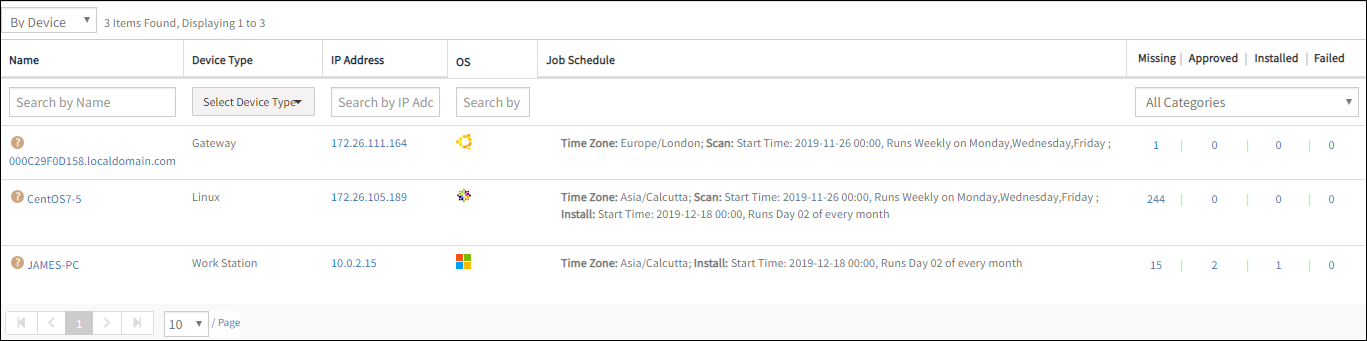
By Device
Viewing missing patches at the resource management level
You can also view the missing patches for a device from the Infrastructure > Resources tab using one of the following options:
- By Patch
- By Device
Viewing by patch at the resource management level
You can view the missing patches for the desired device from the Infrastructure page. Perform the following steps to view the missing patch details for a device from Infrastructure:
- Select a client from the All Clients list.
- Go to Automation > Patch Management > Missing Patches.
- From the list of missing patches, click By Patch.
- After selecting By Patch, select one of the following operating systems:
- Windows
- Linux
- From the Missing patch numbers, click the numeric value to view the devices that require patch management.
Device List of Security Update screen appears. - From Device List of Security Update, click the desired name.
The device details page for Infrastructure > Resources page appears. - From the center pane, click Patches.
- After selecting Patches, do one of the following actions:
- From the options in the drop-down menu, select the desired Baseline.
- Click the Missing tab to view the missing patches.
The other tabs appearing on the screen are: Approved, Installed, and Failed.
Viewing by device at the resource management level
- Select a client from the All Clients list.
- Go to Automation > Patch Management > Missing Patches.
- From the list of missing patches page, click By Device.
All devices that require patches are displayed. - From the Name column, click the desired name. The device details page for Infrastructure > Resources page appears.
- From the center pane, click Patches. The patch details for the selected device is displayed.
- After selecting Patches, do one of the following actions:
- From the options in the drop-down menu, select the desired Baseline.
- Click the Missing tab to view the missing patches.
The other tabs appearing on the screen are: Approved, Installed, and Failed.
Internal patching process
The patching process starts immediately after you schedule the Missing Patches Request job.
Note
This process is shown for Linux resources.After the patch configuration job begins, the agent executes the following:
Step 1: Agent displays a control message
The control message is displayed after the missing patches request job begins:
Control MSG xml received by agent: <cm><id>MISSING_PATCH_REQ</id><reqid>2018-06-21 06:27:31</reqid><params></params></cm>
Step 2: Agent runs the missing patch request job
The job is run using the related python scripts present in the agent/lib folder.
The agent internally executes the following files corresponding to the OS distribution and
generates a patch_scan_result.json file at the path location: /opt/opsramp/agent/tmp/patch_scan_result.json:
- UBUNTU –
/usr/bin/python /opt/opsramp/agent/lib/apt_frame.py scan - FEDORA, CENTOS –
/usr/bin/python /opt/opsramp/agent/lib/yum_frame.py scan - SUSE –
/usr/bin/python /opt/opsramp/agent/lib/zypper_frame.py - DARWIN –
/usr/bin/python /opt/opsramp/agent/lib/mac_frame.py
Step 3: The Agent reads the .json file and sends a control message to the cloud.
The obtained patch information is displayed in the patches tab of the device in the Infrastructure tab.